Tag Archives: landscape

Boundary Warp

There’s a new feature in the latest Creative Cloud versions of Lightroom and Camera Raw, and if you stitch together multi-frame panoramas like I tend to, then you should take a close look at it.

It shows up as a new slider called “Boundary Warp” in the “Merge to Panorama” dialog and it’s designed to help fix the empty areas along the edges of some stitched panoramas.  You can see an example in the first image below.

The Tarn - This is a three frame panorama from Acadia National Park that I'd never processed. I used it to test the new "Boundary Warp" feature
The Tarn – This is a three frame panorama from Acadia National Park that I’d never processed. I used it to test the new “Boundary Warp” feature

An easy way to fix this is to crop out the empty portions of the frame, like this:

The Tarn - This version has been cropped to eliminate the missing portions.
The Tarn – I cropped the missing portions out of this version.

But that throws away pixels that you may want to keep.  You can also try to fill in the empty areas with content aware fill or the clone stamp, but that often leaves some anomalies that take time to clean up.

Using the new function is easy.  It keeps all the pixels in the image and warps the edges to fill in empty areas.

The Tarn - I used Boundary Warp on this version to fill in the missing areas.
The Tarn – I used Boundary Warp on this version to fill in the missing areas.

I like the way it works. It’s better than cropping or trying to fill in missing portions with the clone stamp.  Try it – I think you’ll like it too.

Thanks for stopping by and reading my blog. Now – go make some photos and warp some boundaries!

©2016, Ed Rosack. All rights reserved.

Lake Apopka wildlife Drive

My friend Tom M. wanted to go out shooting last week and hadn’t ever been to the Lake Apopka Wildlife Drive. The drive itself is only open to cars from Friday through Sunday, so we met on Friday morning and went over.  It was raining when I got up and still cloudy on the way over, which made for interesting skies in my infrared photos.

Lake Apopka Pump HouseLake Apopka Pump House – 2 frame panorama, infrared, black and white.

We did have a bit of good light while we were there.  We saw this bird struggling to swallow a fish and stopped to watch for a few minutes.  It was on the side of a canal with the clouds reflecting in the water behind it and flowers blooming in front.  I stayed in the car so I wouldn’t bother it and shot a series of single frames while we watched.  This one was the best one of the series.

Nice catch! Nice catch! – an Anhiga tosses a fish it caught along a canal on the Lake Apopka Wildlife Drive.

On this trip, I brought my micro four thirds cameras.  I’ve used the system for about four years and they’ve worked very well.  The dynamic range and noise performance are not as good as larger sensor cameras, but it’s “good enough”.  And the noise is not an issue for me.  DxO Optics Pro does an outstanding job processing the RAW files.  The focusing capabilities have been fast for static subjects – but I’ve never been able to do very well with continuous focus.  Well, I recently traded up to a used Olympus E-M1, which has phase detect sensors built into the image sensor and it’s been doing a great job with continuous focus. So much so that even for birds in flight it’s working “good enough” too.  Here’s an example from Friday:

Checking me outChecking me out – A hawk in flight looking at the camera

You can view other photos I’ve made with the micro four thirds system in this album on Flickr.

Lake Apopka is an awesome place, I’ll definitely go back.  I’m collecting photos from there in this folder on Flickr, and you can also read an earlier article I wrote about it here on the blog.

Thanks for stopping by and reading my blog. Now – go make some photos!

©2016, Ed Rosack. All rights reserved.

Panama Canal

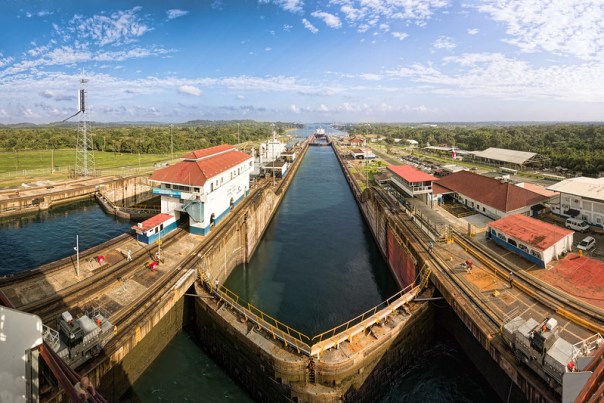
Our visit to the Panama Canal and passage through the Gatun Locks was the main feature of our recent cruise.   As an engineer, I’ve long been intrigued by the canal and it lived up to my expectations.  It’s amazing that something built over 100 years ago in such difficult conditions is still operating and remains an import part of global commerce.

The ship’s Captain planned well.  We arrived near the entrance just in time to view the day’s sunrise.

Panamanian SunrisePanamanian Sunrise – a pilot-boat paces us as we head toward the canal entrance

The crew opened up normally closed areas at the bow for viewing and many folks crowded there to watch the activity.

Entering the Panama CanalEntering the Panama Canal

At the evening meal the night before we arrived, Nino (the maître d’) promised us the “best seat in the house” if we came to breakfast at 7:30 that morning.  We thought we had a nice view up on the bow, but decided to follow his recommendation and go down to breakfast.  It was surprising how few people were in the dining room.  He fulfilled his promise and we sat at a table at the very stern of the ship right next to the large windows on deck 2 – and it did have the best view!!  Watching the locks filling and the canal walls go by from that vantage point was captivating.  It took longer than normal for us to finish our meal!

In the Panama Canal Gatun LocksIn the Panama Canal Gatun Locks – view from the Main dining room on deck 2

The MS Zuiderdam is 106 feet wide and the canal is only 110 feet, so there’s very little clearance.

MS Zuiderdam in the Panama Canal - showing the 2 foot clearance
View from our balcony on the 6th deck – 2 foot clearance!

The operation, control, and precision while in the canal is very skilful.  The photo above shows the 2 foot clearance between the ship and the canal.  One of the “mules”  (center left) is helping to position us and move us safely through.

Once past the locks, we anchored in Gatun Lake so people taking excursions could disembark.  Then we sailed back out through the canal and tied up for a port visit in Colon Harbor, where the excursions re-joined us that night.

Colon Harbor at nightColon Harbor at night

Colon wasn’t our favorite stop, although I was able to buy a genuine Panama Hat there.  Interesting fact:  Panama Hats are made in Ecuador!

I’ve posted a short video that we made in the canal here on YouTube.  It shows our entrance followed by a time-lapse as we descend into the Gatun Locks on our return.  Take a look if you get a chance.

Thanks for stopping by and reading my blog. Now – go make some photos!

©2016, Ed Rosack. All rights reserved.

Death Valley Addendum

Good morning, wonderful readers!  I hope you don’t mind a short post today with a few more photos from Death Valley.  The place made a big impression on me.  I hope to return  sometime in the future.

Desert rain waterDesert rain water – A different view of the post storm water in Death Valley. Some locations had 5 inches of rain on October 18th. The water here collected in small puddles.

Overbury Building ruinsOverbury Building ruins in the Rhyolite Ghost Town near Beatty, Nevada.  Black and White Infrared panorama.

Death Valley SundownDeath Valley Sundown – I like the sun rays and reflections from the wet mud below.

Mosaic Canyon MonochromeMosaic Canyon Monochrome – Rushing water carved these canyon walls, resulting in a variety of textures to explore.

Monochromatic testuresMonochromatic textures – Zabriskie Point in Death Valley is a wonderful place to photograph. The hills vary in color and with the changing light and clouds, it seems there are always new textures, shadows, and compositions to focus on (pun intended). I wanted to emphasize the textures, so I used Lightroom to convert this one to monochrome. For some reason, this was one of the first photos I made there and one of the last that I finished processing.

We’ve added even more photos from our Death Valley expedition in the albums at these links:

Thanks once again for stopping by and reading my blog.  Now – go make some photos!

©2015, Ed Rosack. All rights reserved.

Life gives you photos … and photos give you life

After getting back from an exotic, far away spot (Death Valley), I returned to a nearby, familiar Florida locale yesterday.

I’ve lost track of how many times I’ve been to Merritt Island National Wildlife Refuge, but there are 57 posts where I write about it here on the blog.  Make that 58 now.

Another Merritt Island MorningAnother Merritt Island Morning – I combined multiple frames to get everything in focus and well exposed. Blended manually in Photoshop.

Why do I like going there so much?  Even after so many visits, it’s impossible to see everything it has to offer.  I appreciate getting to know a place and watching it change over time.  I enjoy seeing the same locations in different light or weather, with different birds around.

Not Birds of a FeatherNot Birds of a Feather – An interesting group of at least four species

I do know that every time I visit, I see something beautiful – either something new, or something commonplace, but in a new light.

“We do these things not to escape life, but rather so life does not escape us.”  From a favorite t-shirt

And yes, sometimes I get back and the photos I made aren’t very good.  But I still have a wonderful day.  Much better than the owner of this boat had.

Sunken SailboatSunken Sailboat – On this one, I also combined multiple frames to ensure everything was sharp and to emphasize the smooth water.

Henri Cartier Bresson said that “You just have to live and life will give you pictures.”  And I think my t-shirt is right too.  Going after photos will give you life.

You can view many more Merritt Island National Wildlife Refuge photos in this album on Flickr.

Thanks for stopping by and reading my blog.  Now – go live life – and make some photos!

©2015, Ed Rosack. All rights reserved.

Death Valley National Park, California

As you may have gathered from last week’s post, I got home on October 24th from a trip to Death Valley National Park.  Four of us from the Photography Interest Group (me, Tom M., Kevin M., and Kevin K.) were out there together, exploring this waterless wonderland on our longest, farthest group photo expedition yet.

When you think of the desert in the western US, you might imagine extreme heat and monochromatic scenes of empty barren land.  If so you probably haven’t been to Death Valley.  There is some empty barren land:

Badlands sunriseBadlands sunrise – This was my first visit to Death Valley and what I thought it would look like. 

And there are sand dunes and wind-blown textures:

Photographing Mesquite Flat DunesPhotographing Mesquite Flat Sand Dunes – A distant photographer lines up his shot.

But there are so many more things to experience there.

It’s the largest national park in the contiguous US at over 3.4 million acres.  The habitats are varied and the elevation ranges from 282 feet below sea level in Badwater Basin (the lowest point in North America) to more than 11,000 feet at the top of Telescope Peak.

Badwater panorama from Dantes ViewPanorama of Badwater from Dantes View, looking west toward Telescope Peak

Wait – did I say “waterless wonderland”?  When we arrived on October 18th, there was an epic rain storm in progress that caused flash flooding, road closures, downed power lines and other damage inside the park.  If you’re interested, I’ve posted a short video on YouTube that we made on our drive into Death Valley, showing the rain storms and some of the flooding we ran into.  And you can read this article on the National Parks Traveler webpage about the floods and damage.

Many of the places we wanted to see weren’t accessible while we were there.  The good news is that there were more than enough locations we could still get to, and the water created some rare views of the area.

Death Valley FloodsDeath Valley Reflections – Some locations had 5 inches of rain.  The following morning, we saw large pools of water west of route 190 and north of Furnace Creek.  It was a long walk (~1.5 miles from the road) to get close, and at times I wondered whether it was a mirage.  I’m guessing it’s rare to see the mountains and clouds reflected in standing water at this spot.

And are there any waterfalls in the desert?  You wouldn’t think so, right?  We decided to find out one day and after a long drive, hike, and rock scramble through a gorgeous canyon, we arrived at Darwin Falls, which seems like a miracle in the middle of such arid country.

Darwin FallsDarwin Falls – This desert waterfall in Death Valley had about a 40 foot drop. It’s spring fed and  flows year round, although the rains may have added some water while we were there.

There’s a lot of history in Death Valley too.  The Native American Timbisha tribe have lived in the valley for at least 1000 years.  Gold and silver mining started in the 1850s and Borax was discovered in the 1880s.  There are also several ghost towns to explore in the park and the surrounding areas.

20 Mule Team Wagon Train20 Mule Team Wagon Train – Used in 1885 to haul Borax From Death Valley to Mojave.
Borax Museum, Furnace Creek, California

Landscapes and scenery aren’t the only things to see.  There’s very little light pollution in the area.  The milky way is easily seen and we viewed an active Orionid Meteor shower on the morning of 21 October.

There’s also a surprising amount of wildlife.  While hiking back from the Mesquite Flat Dunes we spotted some motion ahead that turned out to be my first sighting ever of a fox in the wild.

Fox at Mesquite DunesKit Fox at Mesquite Dunes – We saw it from a distance. At first I thought it was a coyote, but Eric Vanbergen on Flickr suggested it might be a Kit Fox. Judging by the info on Wikipedia, he’s right.  I made the photo handheld (with my tripod still attached!) using a 24-120mm lens that I was using for landscapes. This is a small crop from the frame. It was nice of the Fox to stop, stand in the light, and look at the camera for me – but it should have come closer!

We also saw several of these, curiously along or as they crossed the road.  They’re large enough (~3 inches across) to spot as you drive by.

Classic Death ValleyClassic Death Valley (Photo by Kevin McKinney – used with permission) – We saw several Tarantulas while we were there.

And birds:  The National Park Service official bird list has hundreds of species that frequent Death Valley.  On this page they have some info on where to look and migration patterns.  Kevin M. also had a good time birding in places around and on the way to the park.

Here’s one last photo.  We’d been searching for a Road Runner all week but hadn’t seen any.  On the last afternoon we finally sighted this one as we drove by the visitor’s center. Of course, none of us had our camera gear – thank goodness for iPhones!

Greater Roadrunner, running“Beep Beep” – A Roadrunner outside the Visitor Center at Furnace Creek. I think this is the one the rangers have nick-named “Robbie”. It’s very tolerant of humans and went about catching and eating bugs while we watched.  

You can view many more photos from our trip at these links:

This is really more of trip report than a review or guide.  With so little time on site, I’m not qualified to give you much specific advice on photographing Death Valley.  But here is some info I found very useful:

Thanks for stopping by and reading my blog. We are really blessed in the US with all our national parks.  Now – visit one and make some photos!

©2015, Ed Rosack. All rights reserved.

Photographing Florida Weather

Florida has wonderful weather photography opportunities.  They’re not often the kind that you see from tornado alley out west.  But the clouds here are awesome too.

Lynn and I traveled recently (New Jersey, Virginia, and Georgia).  I realized when going through those photos that they lacked dramatic skies like we often see here in Central Florida.  Maybe our timing was just bad.  Anyway, it inspired me to put together this post with some examples of our weather along with a few hints.

We’d had several days of rain last August and even though afternoon light isn’t usually the best for photography, I decided to drive over to Merritt Island National Wildlife Refuge and see if I could capture some of the weather drama.  This one is from the south-east side of the causeway.  There was a slight drizzle where I was standing and rain drops ruined several frames. This one must have been right after I cleaned the lens.

Weather over the WaterWeather over the Water (24mm focal length)

And this one was that same day, looking south along the back side of  Black Point Wildlife Drive.

Storm AheadStorm Ahead (stitched panorama, nine frames at 24mm focal length).

This next photo is from September of 2012, also at Black Point Wildlife Drive.  These clouds actually stopped me in my tracks and made me shift out of bird photography mode to make this B&W, IR image.  You can see a color version of this here.

A little stormyA little stormy (stitched panorama, three frames at 24mm eq. focal length).

These next two have been on the blog before, but they also illustrate my point:  Clouds and storms in Central Florida are photogenic!

Stormy ShoreStormy Shore:  Storm clouds blow through north of our hotel on Casey Key, Florida.  June 15, 2015 (stitched panorama, eight frames at 24mm eq. focal length).

And this last photo is from way back in October 2007.  I put it in to honor our fading Lake Jesup sunflower season.

Lakes Jesup Wildflowers and RainstormLakes Jesup Wildflowers and Rainstorm (105mm eq. focal length).

We don’t have mountains here in Central Florida.  And we don’t have very good waterfalls either.  But our clouds are just as good as anywhere else.  How are they where you are?

Photo hints:

  • Although you can see interesting weather all year, the best time here is summer afternoons and evenings.
  • The storms are big.  As you can see from the captions, many times I find myself using a wide-angle lens or stitching panoramas for this kind of photography, although some situations (like the last image) benefit from a longer focal length.
  • You can shoot from your car in many cases or just dodge the showers.  Do bring a lens cloth and maybe a towel or some plastic to cover  your camera if it’s not weather resistant.
  • Be careful with your exposures.  If you have clear sky behind the clouds you can easily blow out highlights in the image which will be tough to fix in post.
  • When processing your photos, try using some mid-range contrast / clarity to bring out details in the clouds.  Don’t go too far though or your results will look unrealistic.
  • Find yourself some good foreground locations so you’ll be ready to head out when the weather gets interesting.
  • And be careful – don’t get struck by lightning or ruin your equipment!

If you click on the photos above, you can see larger versions on Flickr and I also collected  other Florida Cloud and Storm photos that you can browse in this set on Flickr.

Thanks for stopping by and reading my blog. Now – go make some cloudy photos!

©2015, Ed Rosack. All rights reserved.

Beauty and Bugs in the Soggy Swamp: Sunflowers, 2015

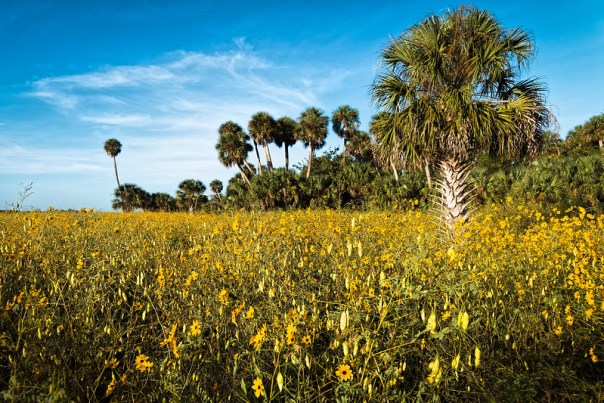
I don’t know how long the Sunflowers have staged their fall nature extravaganza along the north side of Lake Jesup near Sanford Florida. I’ve been photographing them since 2006, and my first post about them was in October 2007 – a few months after I began the blog.

I didn’t make it last year and just had to see them this time, so off I went yesterday morning (October 9) to the Marl Bed Flats in the Lake Jesup Conservation area.

Lake Jesup SunflowersLooking up

The flowers are just about in peak bloom.  If you want to hike out there, you’d better make plans quickly.  The blooms only last a couple of weeks, so by next weekend, they’ll be fading.

Lake Jesup SunflowersMonochrome flowers

The flowers are beautiful, but the bugs are swarming.  I didn’t make any photos of the insects, but I did bring home souvenir mosquito bites.  Wear long pants and a long sleeve shirt and use insect spray too.  It’s also wet.  I didn’t get far from the forest edge – but the water was already several inches deep.  Waterproof boots are a great idea.

Lake Jesup SunflowersLake Jesup Sunflowers at Marl Bed Flats

There are other things to see out there too.  It’s a good local birding spot with at least two Bald Eagle nests reported.

When you go, please be careful.  Don’t stop on the side of 417 – it’s dangerous!  It’s a bit of a hike from the parking area out to the flowers.  And it’s still hot – wear a hat and bring water with you.

The Lake Jesup Wilderness area really is wild – I’ve seen bobcats and worried about wild hogs.  I haven’t seen any snakes, but I’ll bet they’re around.  And Lake Jesup has one of the densest populations of alligators in Florida.  So enjoy, but be careful!

You can browse some of my photos of the area in this set on Flickr.  I also have more info on the area collected in these older articles:

And here are some more Florida Sunflower links you might find interesting:

For reference, here’s a Lightroom map of the area with the locations of photos I’ve made out there.  The streets leading in are also shown, so you can see how to get there (click for a larger version).

Marl Bed Flats area on the north shore of Lake Jesup

Thanks for stopping by and reading my blog. Now – go make some photos!

©2015, Ed Rosack. All rights reserved

Vacation, part 2: Shenandoah National Park

On July 4th, 1936, in the Virginia Blue Ridge mountains along Skyline Drive at Big Meadows, President Roosevelt dedicated Shenandoah National Park.  Since that time, people have greatly enjoyed wonderful vistas, beautiful waterfalls, quiet wooded hollows, hiking, wildlife and the night sky.

Shenandoah sunrise at Spitler KnollSunrise at Spitler Knoll

I’ve been to Shenandoah many times.  It’s the first national park I ever visited – too long  ago to admit.  I hiked there with our Boy Scout troop from Bowie, Maryland when I was a very young man .  Hiking’s a major activity at the park – the Appalachian Trail runs along and crosses Skyline Drive in many places.

Appalachian trail viewAppalachian trail view

Lynn and I also took Mike and Mary there when they were younger and we have fond (and scary!) memories of hikes with those two scrambling over rocks and along ridges to be first to see a view.  On one of our visits, we also picnicked with our good friends the Sullivans, and hiked with the kids down to Dark Hollow Falls.

Dark Hollow FallsDark Hollow Falls – A gorgeous waterfall, although crowded at times since it’s one of the closest ones to Skyline Drive.  (Photo from 1996).

To get the most out of your visit, you need an up to date guide-book.  We had one from our previous visits (printed in 1988!), but unfortunately we didn’t realize how out of date it was.  Fires and other events have changed places in the park, sometimes quite dramatically.  Fortunately, we found updated books at the park.  One example of the changes:

Dead eastern hemlock treesDead eastern hemlock trees – Hemlock Springs, Shenandoah National Park. We really enjoyed hiking through large stands of hemlock trees the last time we were there, 20+ years ago.  Now, 95% of the Hemlock trees in Shenandoah have been killed by the hemlock woolly adeligid, an invasive species introduced by humans. 

Weather can vary in the park.  All of our visit was beautiful, but we spent one day completely socked in with heavy rain and visibility of 50 to 100 feet.  I had fun walking around in the fog looking for photos, while Lynn wove a White Oak basket from scratch.

Rain drops in the mistRain drops in the mist

We saw lots of wildlife while we were there.  The deer are all over and not very skittish, since animals are protected in the park.  We also saw 2 black bears – exciting!  I didn’t look too hard for birds, but managed to spot at least one life bird (Dark-eyed Junco).

If you search the web you’ll see things to do in the surrounding area too.   We’ve been to Luray Caverns in the past, although we didn’t have time to explore outside the park this time.

In summary, Shenandoah National Park deserves to be on your bucket list.  If you haven’t been there yet, just go.  If you have been there, you know what I mean.

You can see larger versions of the photos above by clicking on them and some other photos from our trip in this album on Flickr.

Thanks for stopping by and reading my blog. Now – go make some photos!

©2015, Ed Rosack. All rights reserved.


Thoughts on Processing Olympus OM-D E-M5 Mark II High Resolution Photos

Introduction

I’ve been using an Olympus E-M5 Mark II for several months and I’ve mentioned it once before (in this post about algorithmic and computational photography).  I very much like the camera and the photos I’ve made with it.  You can see many more images I’ve made with this and other micro 4/3 cameras  this set on Flickr.

Today I’d like to talk more about its high res mode and some things I’ve learned so far while working with it.  I’ll use this recent image from the north bank of Haulover Canal in Merritt Island NWR for my example.  By the way, please click on the photo, you’ll be able to see a higher resolution version on Flickr.

Daybreak at Haulover CanalDaybreak at Haulover Canal

For those of you who aren’t interested in this particular camera or capability, here’s the tl;dr summary:  Your capture and processing tools, technique, and skill make a difference in the resulting photo.  But that’s true of every camera.  And you already knew that, didn’t you?

Okay, for those of you that are interested, here’s some hints on how to get the best out of this mode.

RAW Import

I’ve found that the software I use makes a big difference in the detail that shows up in the file.  I normally use Lightroom for all my photos, although I also have DxO Optics pro and I think it does a good job with higher ISO images.  But I noticed issues when using either of them with the Olympus high-resolution files.  Here are three 1:1 crops, processed in the three different software packages.  These are just after importing from the RAW file, with (mostly) default processing, although I did adjust sharpening on the first two to try to improve detail.

Lightroom Processed

Processed in Lightroom  CC Version 2015.1.1

DxO Processed

Processed in DxO Optics Pro 10 Version 10.4.2 

Olympus Processed

Processed in Olympus High Res Shot Raw File Photoshop Plug-In 

To my eye there’s no question:  the Olympus software does a better job processing the High Res Raw file.  The result is sharper, with more detail – so I’ve switched to using it instead of either Lightroom or DxO Optics Pro for initial input of the high res files.  There are limited adjustments available with it, so after importing the file I usually add an Adobe Camera Raw adjustment layer in Photoshop to help fine tune the highlights, shadows, etc.

Motion Artifacts

You can see artifacts on the water surface in the crops above.  These are from the way the high res files are created.  Each file is composed of 8 separate captures that the camera combines into the high res RAW output file.  So any motion during capture will result in strange-looking distractions.  If your camera is moving, the image will be unusable.  So I use a sturdy tripod, a cable release and / or a shutter delay.  If part of the scene is moving (like water, or wind-blown branches) you’ll see the distracting artifacts in that part of the frame.  For some subjects (e.g. still life) this isn’t a problem – nothing moves.  For landscapes, you’ll need a very calm day or you may want to remove the artifacts in post processing.

If they bother you, there are (at least) a couple of things you can try.  Olympus also saves the first of the 8 frames that it uses to create the RAW file.  You can open this, up-res it, and mask it into the high res version wherever there are artifacts you want to remove.  (Note that you’ll have to rename the normal res file – your software probably won’t recognize the .ORI extension).  And you’ll have carefully process the normal and high res files exactly the same up until the point where you do this so that any color or brightness difference doesn’t show.  And finally, you’ll have to recognize that wherever you do this, the resolution will suffer.

For water surfaces, you can also try applying a motion blur in Photoshop and masking it in to hide the artifacts.  That was easy to do in this photo, since it was a relatively long exposure (1/2 sec.) and the water surface was calm.  Here’s a before and after 1:1 comparison:

Motion Artifacts

Motion Artifacts – prior to removal

Motion Artifact removal

Motion Artifacts – masked out using a motion blur layer in Photoshop 

Other Artifacts?

Olympus outputs 64 Mega Pixel RAW files.  Olympus themselves say there’s not 64MP of information in the file.  It’s more like 40MP, so they downsize their JPG files to 40MP.  When using this mode keep that in mind.

There’s not too much else to worry about, although I have seen some things that look like “hot pixels” in the high res images (2 or less per file).  I’m not sure if that’s what they are and I also don’t see them in normal res files from the camera.  But they are pretty easy to remove with the Healing Brush in Lightroom.  By the way, If anyone else has seen these, I’d be interested in hearing from you.

Red Dot Artifact

High Res “Hot Pixel”

Conclusions

So, the E-M5 Mark II High Res mode:

  • Is most suitable for still life types of images when the camera is mounted on a tripod and nothing is moving.
  • Is best processed from RAW by the Olympus High Res Shot Raw File Photoshop Plug-In – at least with current (August 2015) versions of software.
  • Offers better resolution and improved color and noise characteristics than the normal mode images.
  • Can be used in other situations (e.g. landscapes), but unless the subject is still, you’ll need to deal with motion artifacts.
  • Provides the greatest benefit with better lenses.  Lower quality glass could compromise the output resolution of the system.

If you capture images in high res mode and the artifacts are too difficult to deal with, you can always drop back and use the normal resolution file.  The results will be almost as good for anything except large prints (or pixel peeping).

Have you used a capability like this?  What have you discovered?

Thanks for stopping by and reading my blog. Now – go make some photos!

©2015, Ed Rosack. All rights reserved.