Tag Archives: reviews

Camera Konstruction

Yes, this is an unusual post for Central Florida Photo Ops – but it is camera and photography related so I’m going with it.

A while back I received this kit as a gift (thanks kids!).  It sat in my camera cabinet for a long time waiting for me to ‘get round to it’.  The forced stay at home time during the pandemic lockdown provided an opportunity to pull it out and get started.

The Konstruktor is a complete, ready to assemble, plastic kit.  It’s a 35 mm, Single Lens Reflex, film camera. You can find out more about it at the Lomography site here: https://microsites.lomography.com/konstruktor/

When you first open the box, it might be intimidating. There are a lot of small parts and they aren’t well marked.

And to be honest, the instructions are a little sparse, although after getting through to the end of this I think all the necessary info is in there. Before I started, I did some research on line and found this helpful YouTube video: https://www.youtube.com/watch?v=pxLMpNfRUeI&list=WL&index=18&t=0s.

The camera ends up looking very usable. It has a fixed F-stop (f/10) and shutter speed (1/80s) so you’ll control exposure by choosing and loading it with an appropriate film speed (ASA / ISO).  The detachable 50mm lens can focus from .5 meters to infinity.  The viewfinder is okay but as you might expect with an f/10 lens, works best in bright light.

I probably won’t run any film through this for a while, but if you’re interested, you can see  photos people have made with them as well as other examples of the camera on Flickr at this search link: https://www.flickr.com/search/?text=Konstruktor

The kit’s supplied with decorations you can use to customize your camera.  I chose the black ‘leather’ wraps and the ‘Leica’ like red dot for mine. This is an afternoon project and teaches a bit about how a camera goes together and works.  if you want to get back to the basics with some film photography, give it a look.

Thanks for stopping by and reading my blog.  Stay safe out there and take care of yourselves, your families, and your friends.  And if you can,  make some photos – or even a camera!

©2020, Ed Rosack. All rights reserved

Atlanta at night

Focus on Atlanta

I enjoy listening to the Mirrorless Minutes podcast (audio on iTunes, video on YouTube).  It’s an interesting show on photography and since  Mike Boening and Jamie MacDonald  (the hosts) are both Olympus Visionaries, they often have good information and tips on Olympus camera gear.

So when I heard their announcement about a photo workshop in Atlanta I was eager to go – and It wasn’t too hard to talk Lynn into getting this for my birthday!  They coordinate using the Mirrorless Adventures page on Meetup.com so sign up was an easy process. If my post gets you interested, you can find out about their future workshops there.

Atlanta Marriott Marquis Interior 2Atlanta Marriott Marquis Interior 2

Our HQ was the Marriott Marquis in downtown Atlanta and it’s an awesome photo-op itself – lots of interesting architecture, angles, and patterns to fill your memory card.  And if you get tired of the photo ops there, you can take a break at one of their restaurants or bars!

We met on Friday evening and then left for the Jackson Street bridge for some sunset and light trail photography.  It’s a popular spot.  There were lots of folks making photos and it’s easy to see why – the skyline view is awesome!  Here’s one of mine:

A little laterA little after sunset.

I made this image with the Olympus “Live Composite” mode.  I’ve used this once before, but it was great to get in some guided practice and I’ll be using it more in the future.

Other stops on the workshop were at Old Car City (http://oldcarcityusa.com/), Amicalola Falls (http://www.amicalolafallslodge.com), and Oakland Cemetery (https://www.oaklandcemetery.com).  The workshop was last weekend and I came home with hundreds of photos.  I’ve been going through them every day since then – but I’m not finished processing yet.  So today I’ll just include a few from Atlanta and maybe do another post later about the other locations.

Watching sunriseWatching sunrise.  We stopped near this park while we waited for the cemetery gates to open

Oakland cemetery was founded in 1850 and many of Atlanta’s prominent citizens are buried there.  It has a great deal of sculpture, architecture, and gardens to draw your eye.  And an interesting sign across the street!

Six Feet Under BarSix Feet Under BarAtlanta Skyline from Oakland CemeteryAtlanta Skyline from Oakland Cemetery

I’ve always liked Atlanta.  My mother’s family lived in the area (in Cedartown) so we visited often when I was growing up.  I also went to college there (Go Tech!) and that’s where I met Lynn.  It was great to visit for a long weekend, and the drive from Central Florida isn’t too bad.

A photo workshop can be a big boost to your image making.  You might;

  • Learn or improve your skills:  I refreshed and practiced “Live Composite” mode and will likely use it more often now.
  • Go places you wouldn’t normally see.  I’ve been to Atlanta many times, but the only place from this workshop that I’d seen before was Amicalola Falls (mentioned in this post).  Trying new things is good for your soul!
  • Meet new people.  Hanging around with other folks passionate about photography is fun!  They don’t even get bored when you talk about lenses, cameras, technique, processing, etc.!
  • See different approaches / techniques.  On the last day, we spent a few hours processing images and each of us picked out several images to show the group and talk about.  I was floored by the variety and ideas that everyone shared.  It’s amazing how people can go to the same place and come back with such different photographs.

I really enjoyed this workshop – it was a pleasure to meet so many new photo friends! I thought the locations we went to were terrific and Mike and Jamie were extremely knowledgable, friendly, and always willing to help anyone with questions. They created a wonderful atmosphere for us to learn and make beautiful photographs.  And I liked the van they used for transport – it was a real pleasure to just climb in and have someone else drive us around to all these spots.  Well done Mike and Jamie!!!

I’ll be adding my photos from the workshop to this album on Flickr as I finish them.  Check back later for even more.  And if you want to see some of the photos the other attendees made, watch episode 95 of the Mirrorless Minutes podcast on YouTube.

And to all my new (and old) photo friends, If you’re in the Central Florida area, look me up.  Maybe we can meet at one of my favorite spots.

Thanks for stopping by and reading my blog. Now – go make some photos!  On a workshop!

©2018, Ed Rosack. All rights reserved

A day in Nassau

Lynn and I took a short cruise on Holland America’s Nieuw Amsterdam starting last weekend. One highlight was a full day spent in Nassau.

This is an image heavy post, so I apologize if you’re on a slow connection. I’ll let the photos and captions tell the story.

Nassau sunriseSunrise arrival:  Docking at 8am made for a nice view as we pulled in.

Nassau morning super moonThe Dec. 4th super moon was still around the next morning.

Lynn booked us on the Bites of Nassau Food Tasting & Cultural Walking Tour. (please click on their link for details).

Christ Curch Anglican Cathedral interiorWe met the tour a short distance from the ship, outside Christ Church Anglican Cathedral.  It’s a lovely place – I liked the light and reflections in the polished floor.

Bahamian Cookin'Bahamian Cookin’ Restaurant & Bar –  It was our second visit to this 3 generation, family owned business.  This time we had conch fritters and a delicious light lunch.

Towne Hotel: Max the Macaw likes to drinkOur guide Captain Ron, at the Talking Stick Bar in the Towne Hotel: Max the Macaw likes to steal straws and sample your drink!

Street muralStreet art – there’s a lot of color in Nassau

News standNews stand

Graycliff Dinning RoomGraycliff Hotel Dinning Room.  According to Captain Ron, all the famous folks visiting Nassau stay here.  Capt. Kirk (William Shatner) was there the week before we were.

Graycliff CigarsGraycliff Cigar Factory – they roll their own and also sell Cuban cigars (for $75 and up – each!)

Nassau street colorStreet colors

Looking up from the Drawbridge Patisserie courtyardLooking up from the Drawbridge Patisserie & Gelateria courtyard

Nassau sunsetSunset view

Nassau at nightNight departure – this is a high res image made from the deck after dark.  Ships tied up at the dock can be a remarkably stable platform for long exposures.

Although I don’t have any more images to show you (thank goodness, right?),  we also  visited the Athena Cafe & Bar and the Tortuga Gift Shop & Rum Cake Bakery.

You might not consider Nassau a “Central Florida Photo Op”, but I do.  It’s one of many places that are very accessible via cruise ports in our area.  We left from Fort Lauderdale, but Tampa, Port Canaveral, Miami and other places offer cruises to many destinations.  If you haven’t tried one, check it out.

We’ve been to Nassau several times and wouldn’t normally think of it as our favorite port.  But this time we had a wonderful visit and got to see (and taste) a lot of new things.  Highly recommended!  I’ve embedded links to most of the places above.  Please click on them  for more info.  And you can see more Bahamas images in this folder on Flickr.

Thanks for stopping by and reading my blog. Now – go make some photos!

©2017, Ed Rosack. All rights reserved

Boundary Warp

There’s a new feature in the latest Creative Cloud versions of Lightroom and Camera Raw, and if you stitch together multi-frame panoramas like I tend to, then you should take a close look at it.

It shows up as a new slider called “Boundary Warp” in the “Merge to Panorama” dialog and it’s designed to help fix the empty areas along the edges of some stitched panoramas.  You can see an example in the first image below.

The Tarn - This is a three frame panorama from Acadia National Park that I'd never processed. I used it to test the new "Boundary Warp" feature
The Tarn – This is a three frame panorama from Acadia National Park that I’d never processed. I used it to test the new “Boundary Warp” feature

An easy way to fix this is to crop out the empty portions of the frame, like this:

The Tarn - This version has been cropped to eliminate the missing portions.
The Tarn – I cropped the missing portions out of this version.

But that throws away pixels that you may want to keep.  You can also try to fill in the empty areas with content aware fill or the clone stamp, but that often leaves some anomalies that take time to clean up.

Using the new function is easy.  It keeps all the pixels in the image and warps the edges to fill in empty areas.

The Tarn - I used Boundary Warp on this version to fill in the missing areas.
The Tarn – I used Boundary Warp on this version to fill in the missing areas.

I like the way it works. It’s better than cropping or trying to fill in missing portions with the clone stamp.  Try it – I think you’ll like it too.

Thanks for stopping by and reading my blog. Now – go make some photos and warp some boundaries!

©2016, Ed Rosack. All rights reserved.

Contemplating Vivian Maier

Vivian Maier was an enigmatic nanny and an extremely prolific street photographer who passed away in 2009.  She’s the subject of the film Finding Vivian Maier.  Lynn, Mary and I saw it when it played recently in Orlando.  I enjoyed the movie and  recommend it to anyone, especially if you’re interested in photography.

If you haven’t followed her story, you can easily catch up by googling her name or clicking on her website (first link above).  It’s worth your time.

What I find fascinating is that while she made over 100,000 photographs, she was completely unknown before they were discovered in an abandoned storage locker in 2007.  And her photos are very good.  She captured street scenes in Chicago and other places that show us what life was like.  She was obviously passionate about photography.  But –  she apparently had no interest in sharing her work.  There were even 2000 rolls of film that she never developed.

Brooks Jenson (publisher of Lenswork Magazine) has a podcast that I listen to.  In one of them, he talks about why we photographers are so passionate about what we do.  For him, photography is a way to explore life.  I like that idea.  It seems Vivian Maier was exploring life around her with her photography too.  He goes on to say that there are two sides to photography:  The observation / capture side, and the publication / sharing side.  Brooks says you can’t have one without the other.  I think that’s right for most people.  They want to share something they’ve seen with others.  Something that they see differently or that others may pass by.

Street photography isn’t my forte, but I suppose we need at least one photo for this post. Vivian Maier would sometimes include herself in her photos.  So here’s my attempt.

Waiting at the corner of Venice and NokomisWaiting at the corner of Venice and Nokomis – I was playing with my camera while the ladies shopped.  Vivian Meir’s version of this would be in Black and White, and probably use a vertical 4×5 format.  It also might include a reflection of her, not me.

I find Vivian Maier’s story compelling.  She did the observation / capture side of photography without the publication / sharing side.  Until recently her photography was incomplete since no one had seen it.  After she’s gone, her work is finally being shared and we’re seeing some of what she observed.

Thanks for stopping by and reading my blog. Now, go make some photos – and share them!

©2015, Ed Rosack. All rights reserved.

Orlando Wetlands and B&W Conversion Software

Here are three photos I made at Orlando Wetlands Park last Thursday morning.

Waiting for sunrise at Lake Searcy

My favorite program for converting images to black and white is the Nik Silver Efex Pro plug-in.  I wanted to try a new one called “Tonality” by Macphun software.  I processed these next two photos in both programs so I could compare results.

Cypress and calm water

Clear and very calm
Clear and very calm

Tonality is an exceptionally complete B&W conversion program with lots of presets and sliders to play with.  It also has some built-in capabilities you might not expect such as layers, gradients, and selective edits.  These come in handy when you want to combine several conversions without going through layers in Photoshop.  Silver Efex Pro’s control points provide some of the same selective edit capability, but for me, the Tonality controls are more flexible.  Tonality also has lens blur and glow simulations  and the ability to blend in texture patterns.  Lots of presets, options, and control!

I noticed that the clarity control in Tonality sometimes resulted in halos that I has to tone down.  But I found that overall I preferred the Tonality result over the Silver Efex version for these two photos.  I don’t know if this will hold up long-term, since I’m pretty sure you can achieve very similar results with either one.  I’m going to keep playing with it and see.

By the way, Tonality is Mac only, Silver Efex runs on both Mac and PC.   There are free trial versions you can download, so check them out yourself and see what you think.

Thanks for stopping by and reading my blog. Now – go make some photos!
©2014, Ed Rosack. All rights reserved.

Adding location information (GPS) to your photos

Here comes the sun
Here comes the sun – Sunrays shining through offshore clouds mirrored on calm inshore water.  Merritt Island National Wildlife Refuge. GPS:  28°38’8″ N 80°46’33” W

I’ve been adding Lat/Lon location info to my photos for several years.  It’s helpful to others to see where I made each one.  And I like to look back and see the info too.  If you click on a photo in the blog that I’ve geo-tagged, it’ll display on Flickr with a map showing the location below the photo.

I use Lightroom’s Map module for this.  If I know where I was I can easily drag the photos to that place on the map.  For unfamiliar places, I try to remember to make at least one iPhone photo so I can copy its GPS info to the other photos I make there.   That’s what I did on my recent trip to Acadia National Park and it worked well.  But I want something a bit less manual.

It would be nice if all cameras did this automagically like the iPhone does.  The only other one I have with GPS capability is an Olympus TG-2 underwater camera that I use when kayaking.  Nikon makes an add-on GPS, but it only works with Nikon, you’d have to remember it, not lose it, and it plugs into the remote release socket – so it’s a pain when you’re shooting from a tripod.

I’ve experimented before with using my phone to record GPS tracks.  On our trip to Alaska in 2009, I used an app and later synced the tracks to photos back on my computer.  That was a pain too (the app and software weren’t very reliable).  But it seems I wasn’t paying attention to Lightroom updates since then.  I completely missed that it now has the capability to sync a captured GPX format track to photos in your library.

Screen-Shot-2014-08-29-at-12.01.05-PM

Lightroom Map Module:  The track interface is hidden in a pull down menu at the bottom of the screen. 

Using the interface at the bottom of the Map Module (shown above), you can load a track and use it to auto-tag the location of photos in a folder.  And it works very well!

So how exactly do you do this?  There are three steps:

  1. Before you leave, make sure you set the time in your cameras correctly.  The time stamp is used to sync the position from the GPS track to each photo.
  2. Use your GPS unit or an app on your phone to record a track of your movements.  There are several iPhone apps that will capture the track info.  I tried GeoTagr ($4.99 in the app store) and it worked well.  Motion-X GPS (no longer in the app store?) also works.  When I got back home, I emailed myself the .gpx file with the track information.  One warning:  sometimes these location recording apps can be power hungry.  You might want to check to make sure you don’t run down your battery doing this.
  3. Move the .gpx track file to the folder on your computer with your photos.   Then load it into Lightroom and apply it to the photos.  Easy-peasy!  It all just works!

Two more geo-tagged photos from a quick trip to Merritt Island early last Thursday:

Nearby Mangroves and distant storms
Nearby Mangroves and distant storm.   Merritt Island National Wildlife Refuge. GPS:  28°38’8″ N 80°46’33” W

Morning by the causeway
Morning by the causeway.  Parrish Park. GPS:  28°37’21” N 80°47’45” W

I like this method and I’ll probably use it in the future.  It’s much less fussy than what I tried several years ago.  Now all I have to do is remember to start the app at the beginning of a photo-op.  I wish I’d worked this out before my trip to Maine.  It was an effort to figure out where each of those photos were made.

By the way, MINWR was still quiet last week – not much wildlife or birds about.  I did see a group of White Pelicans there.  Usually, they don’t show up until November.  I’m not sure what that means, but they were fun to watch.

Thanks for stopping by and reading my blog. Now, go make some photos! And geo-tag them!

©2014, Ed Rosack. All rights reserved.

Silver Springs State Park

Intro / Description

I spent some time at Silver Springs State Park in late May.  This is Florida’s newest park, created in October of last year when the former Silver Springs and Wild Waters commercial attractions were merged with Silver River State Park.  Lynn and I used to visit when our kids were younger and the commercial attractions were going strong.  But that was a while ago and it’s a different place now.

Silver Springs headwaters, view 2
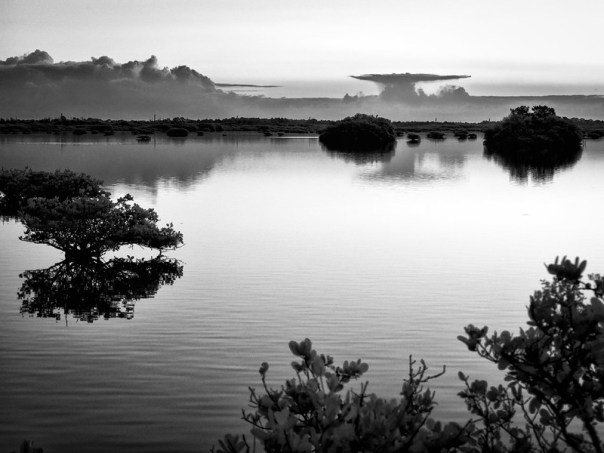
Silver Springs headwaters – A glass bottom boat returns to the dock before a storm

Florida’s renovating Wild Waters and has already re-opened some of the water rides.  The Glass Bottom Boats still run in the Silver Springs area, although the jungle river boat tour and antique car museum that I remember from past years are gone.  It’s a little soon to say what the park will look like after the state is finished merging the areas together, but it always was and still is a fine place to visit.

Info for Photographers

Photo hints:

There are hiking and biking trails throughout the park, but I think the real attraction is the water.  You can rent canoes and kayaks or bring your own, and there are several places to put in.  I used the launch close to the headwaters.  It’s a short paddle to the main spring.  It’s also very close to the Fort King paddle trail (where the Jungle Cruise used to go) which is open to paddlers now for the first time since the 1800s!

In addition to the put in I used (off the Silver Springs parking lot) there’s also one inside the main park, but it’s about a 1/2 mile carry to the water – too far for me!  One other place you can put in is at Ray Wayside Park where you can paddle upstream to the spring.   Silver Springs also offers guided kayak tours and a shuttle service to / from Ray Wayside.

A view from my kayak
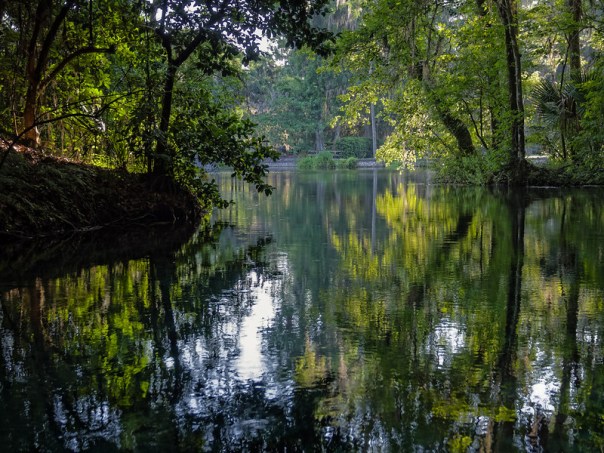
A view from my kayak – Along the Fort King paddle trail near the Silver Springs headwaters

Here are a couple of articles from other sites about paddling at Silver Springs.  Take a look – they like it as much as I do!

If you can’t go on a paddle, at least ride the glass bottom boat or take an air boat excursion.  You’ll get to see more of the scenery and wildlife than you can from the land.

Airboat ride on the Silver river

Airboat ride on the Silver river

Tripod/Monopod:  I did have mine, but didn’t use it as much as I thought I would.  It’s a very wooded area and landscape opportunities aren’t as numerous as they are in some other places.

Lenses:  Bring what you can carry.  I got the most use out of a normal range zoom (~24-70), but longer and wider would be nice to have in your bag if you need them.  If you have any waterproof equipment, bring it for paddling expeditions.

Best time to visit:  It’s starts getting very warm in May and doesn’t cool off until September or October, so plan accordingly.  If you’re going on the rides at the water park or kayaking, the heat is a bit more tolerable.  I went during the week.  Weekends will be crowded.

Other:

There’s a variety of wildlife, but not as much as some other locations in Central Florida.  For instance eBird lists 112 species at Silver Springs vs 293 in Merritt Island National Wildlife Refuge.   I spotted Ospreys, Cardinals, Black Vultures, Red-bellied Woodpeckers, a few wading birds, Alligators, Deer, Turtles, Cormorants (on the water and in nests, and one swimming underwater), Barred Owls (calls and one in flight), Hawks and a few other species.  There are recent reports of Manatees in the springs.  And although I didn’t find any, there’s a troop of feral rhesus macaque monkeys  descended from ones let loose in the 1930s.

Typical Turtle
Typical Turtle – Along the the Fort King paddle trail near the Silver Springs headwaters

The River side of the park is home to the Silver River Museum and Environmental Education Center (open to the public on weekends and holidays).  Tours through the pioneer cracker village are offered once a month, except in the summer.  You’ll have to call the park for details.

Cracker cabin
Cracker cabin

Finally, 60 campsites are available along with 10 very nice, two bedroom cabins.  I’d recommend staying for one or two nights so you have some time to explore.  There are also several other great areas nearby including the Ocala National Forest, Rainbow Springs State Park, Juniper Springs Recreation Area, and Salt Springs Recreation Area.

Summary

Click on any of these photos to go to Flickr where you can see larger versions.  My Silver Springs album on Flickr includes these and a few other  photos.

Silver Springs State Park is a wonderful place to visit and an especially wonderful place to paddle!

My Gallery /  Flickr photo set:  https://www.flickr.com/photos/edrosack/sets/72157644924434114
Website: https://www.floridastateparks.org/silversprings
Address / Phone: 1425 N.E. 58th Avenue, Ocala, Florida 34470(352) 236-7148
Central Florida Photo Ops Rating:  A Central Florida Photo Op must do!

P.S. – In the good news department, it looks like those of you that subscribe to the blog via email are getting the updates.  If you’re having any issues, please let me know.

Thanks for stopping by and reading my blog.  Now, go make some photos!

©2014, Ed Rosack. All rights reserved.

Maitland, Florida

Intro / Description

Maitland is a particularly photogenic city in the greater Orlando metro area.  I’ve found several locations there with good photo ops – my most recent visit was to the Maitland Art Center with Keith H.

Way out
Way out: A gate in the wall at the Maitland Art Center (Infrared, Black and White)

The Maitland Art Center used to be known as The Research Studio and is on the U.S. National Register of Historic Places.  It’s one of the few examples in our area of Mayan Revival architecture, which can make for some intriguing  details to photograph.  The grounds are a popular place for weddings.  You may run into one on weekends that will keep you out of one or more of the venues.

Mayan Revival carved door
Mayan Revival carved door – I wonder if this is where Indiana Jones keeps his stuff?

Other museums in this location in addition to the Art Center are: the Telephone Museum; the William H. Waterhouse House Museum; and the Carpentry Shop Museum.  If you’re visiting, check the websites linked here – the hours and fees vary.

Info for Photographers

Photo hints:

My approach was to wander and photograph whatever caught my eye.  I found the Art and History Museum  productive for IR / B&W photography.

Tripod/Monopod:  Allowed and helpful.

Lenses:  You’ll probably use wide and normal lenses the most.  I didn’t feel any need for a telephoto lens.  A polarizing filter might be helpful to block reflections in glass.

They're all in the garden at the party
They’re all in the garden at the party

Best time to visit:  Year round, early or late in the day for the best light.  Avoid weekends if possible so you don’t run into any weddings.

Other:

There are some other photo ops close by.  I’ve written before about the Audubon Birds of Prey center – a great place to get close portraits of some very impressive birds.

Recovering eagle, Audubon Birds of Prey center, Maitland, Fl
Recovering eagle, Audubon Birds of Prey center

And the park at Lake Lilly is also photogenic.  Try some sunrise or sunset photos there, or walk through the farmers market on Saturdays for some local interest / people photos.  Be careful the ducks don’t peck on your lens!

Wide angle, backlit, ducklings
Wide angle, backlit, ducklings at Lake Lilly – looking for a handout

And the Fort Maitland boat ramp at 900 South Orlando Ave. would be a great place to launch your kayak!

Summary

My Gallery /  Flickr photo set:  Maitland on Flickr
Website:  http://artandhistory.org
Address / Phone: 231 West Packwood Avenue, Maitland, Florida
Central Florida Photo Ops Rating:  A great place to explore; Lots of photo ops

Thanks for stopping by and reading my blog.  Now – go make some photos!

©2014, Ed Rosack. All rights reserved.

Panoramic alternatives – iPhones and more

If you’ve read this blog for any length of time, you know that I like panoramic photos.  We’ve all been to many places where the view is so grand it doesn’t fit into a single frame.  Sometimes you can’t capture what your eyes see with one camera exposure.  So I started stitching panoramas together.  My first few were way back in the film era (1999 or 2000).  When I started using digital cameras, panoramas became easier and I’ve made many more since then.   They help me avoid “tunnel vision” and show more of a scene.  They’re also an excellent way to capture an image with a huge number of pixels – which allows for very large prints.

I often include panos in this blog.  When I checked today, there are 33 different posts (over 10%) that are tagged “panorama”, including my very first one from May of 2007.  For some panorama examples, look at this set of over 100 images on Flickr.

San Francisco panorama from Twin Peaks

May 2007:  View of San Francisco from Twin Peaks (6389 x 3110 pixels)

I’ve learned quite a bit about how to make panos, and in August of this year, I shared info on how I usually process them.  That was a description of the detailed workflow I use to make the best quality image I can.  It can be time consuming and requires care in capture as well as post processing.  But if you put in the effort, the results are very good – and the files are much bigger than from a single frame.  Here’s a recent example:

City at twilight
September 2013: Chicago skyline at twilight (11,175 x 4706 pixels)

But it turns out that my way isn’t the only way to make panos.  There’s a much easier way to make them – here’s an example:

Underneath the bridge over the St. John's River by the old bridge and railroad trestle
October 2013: Underneath the bridge over the St. John’s River by the old bridge and railroad trestle (7908 x 2692 pixels)

I made this pano with my phone.  It’s not as large (2692 pixels on the short side compared to 4706), but you probably couldn’t tell much of a difference in quality unless you pixel peep.  Using my phone is easier and if something is easier, people will do more of it – and more panos means better memories.

iPhones have had a built-in panorama mode for a while, and the latest versions bring a lot of processing power into it.  The iPhone 5S does automagic adjustment of exposure across the frame, and stitches the results together in real-time as you sweep your phone.  The results are fairly large files, and the quality is surprisingly good.

Here’s one more recent iPhone panorama example and proof of the saying that the best camera is the one you have with you:

Interior panorame of the Roman Colosseum (Flavian Amphitheatre)

November 2013:  Interior panorama of the Roman Colosseum (Flavian Amphitheatre) – Photo by MK Rosack (used with permission)

Lets compare making panoramas on a phone with a multi-photo approach.  I’ll use the iPhone 5S for this – your phone may be different.

iPhone 5S Multi-Photo
Capture convenience Very high – you always have it with you Low – You need to plan for it and carry your gear
Quickness High – End result available very quickly.  And can post right from the phone. Low – Need to get home and run your software
Processing flexibility Low – Done by the camera; Can adjust jpg result High – Adjustments can be made throughout each processing step
Processing difficulty Low – Done by the camera;  Some amount of touch up may be needed May be High, depending on software and source images
Raw capture No – jpg only Yes
Output size Medium – Short dimension a max of 2448 pixels High – DSLRs typically higher resolution than iPhone and you can make multiple rows if desired

So, should you use your phone for panoramas?  Yes!

Should you always use your phone for panoramas? Not quite yet.

Phones are getting better all the time.  And they’re getting better faster than cameras are getting better.  Sooner or later, most people won’t want or need a dedicated camera.  Right now I think phones are “good enough” in many cases, especially if you think about the trade-off between output quality and ease of use.   For panoramas, the ease of use and convenience allows many people to make photos they otherwise wouldn’t.  In my case, if I don’t have any other camera with me, I’m sure going to use my phone.  But if I want the best quality image possible, I’ll still use my stand alone cameras when possible.  Check again in a few years – the answers may be different.

Thanks for stopping by and reading my blog. Now – go make some panoramas!  And don’t forget your phone!

©2013, Ed Rosack. All rights reserved