Category Archives: Technique

Let's go fishing – how I made the image

Here’s another photo from my last trip to Viera Wetlands.

Let's go fishing!
Let’s go fishing! Two fishermen head out before dawn.

I’ve made this kind of photo before – you can see some examples in this set on Flickr.  I think this one turned out better than my earlier tries.  I used a different approach and because it’s been a while since I’ve written a “behind the scenes / how-to post”, I thought I’d fill you in on how I made this.

The boat ramp at this little park where SR 520 crosses the St. Johns River is pretty busy around dawn.  It seems to be a popular place for fishermen to put in.  I  waited several times while they cleared my frame and the water calmed down before I could make my next exposure.  So I decided to make an image that included a boat.

It’s a challenging shot.  I wanted to capture the intense sunrise colors so I had to be careful not to over expose and blow out the sky.  I also wanted some detail in the boat, so I needed to over expose there a bit, but still minimize motion blur.  At sunrise, I normally use a low ISO for the best quality image, and a small aperture for good depth of field.  This results in a long shutter speed, which is bad for photographing moving boats.  And if I want to bracket and use multiple frame HDR to capture the huge contrast range in the scene – that’s even worse for moving boat photography.  So how did I make this image?  Glad you asked!

The secret is to carefully capture two frames and blend them together by hand.  The first frame is exposed for the boat:  I used a high ISO and a wide open  aperture to get my shutter speed as fast as possible, and I overexposed slightly to capture a little shadow detail in the boat and in the vegetation on the shore.  With my camera set and on a tripod, I composed and waited for the next boat to get to the right point in the frame.  Here’s that RAW file:

1-the boat Screen Shot 2014-07-22 at 12.49.58 PM
First frame, exposed for the boat, ISO 1000, f/4, 1/20 second

The second frame was my main exposure and I wanted it to be the best quality possible.  I also wanted to slightly under expose to capture color and detail in the sky.  I waited until the boat was gone and the water was calm again and then made this exposure:

2- the sky Screen Shot 2014-07-22 at 12.49.51 PM
Second frame, exposed for the sky, ISO 100, f/11, 0.8 sec

When I got home, I preprocessed the two raw files using identical color balance and paying careful attention to noise reduction (especially on the higher ISO frame with the boat).  I’ve used DxO Optics Pro lately when I want the best RAW conversion.  It does a wonderful job on both lens corrections and noise reduction for supported equipment.  After a few tweaks to exposure in each file, I brought them into Photoshop on separate layers.

The next thing to deal with was the boat.  Even though I’d pushed my shutter speed as high as I thought I could, 1/20 second still left a little  motion blur visible.  The “Filters / Sharpen / Smart Sharpen” command in Photoshop has a “Remove Motion Blur” option and I’ve found that it works well in situations like this where the direction of motion is known.  I used it selectively on a duplicate layer to enhance detail in the boat.   Here are before and after crops at 200%.  I think it’s a nice improvement:

3-motion blur boat Screen Shot 2014-07-22 at 12.45.59 PM
Motion blur (before using the filter)
4-sharper boat Screen Shot 2014-07-22 at 12.45.43 PM
After the motion blur processing

Next I used layer masks to blend the multiple frames together.  I worked carefully around the boat and painted it into the main / second frame.  I like a little detail in my shadows instead of a straight silhouette.  Since I’d slightly overexposed the first frame (and was careful with noise reduction) I painted some of that into the vegetation.  Here’s the first merged result:

6-Initial merge Screen Shot 2014-07-22 at 12.48.18 PM
Initial merged frames

The only filter I used on this was Topaz Clarity – I like the way it increases mid-tone contrast without adding halos.

7-Adding clarity Screen Shot 2014-07-22 at 12.48.29 PM
After Topaz Clarity

After selective sharpening on a separate layer, I returned to Lightroom for final adjustments (black and white points, vignette, etc) to get the first image in this post.

I struggled some with the cropping. I tried a 16×9 aspect ratio, but because I wanted to keep all the sky, I thought the horizon ended up too close to the center. I decided to keep the original composition since the dark water at the bottom holds my eye in the frame. I might play with it some more.

I like how it turned out and I hope you do too.  I also hope the info helps with your photography.  If you have any questions on details or other photography related things, let me know in the comments.

Thanks for stopping by and reading my blog. Now, go make some photos!

©2014, Ed Rosack. All rights reserved.

Look Again

I drive past this place all the time.

The road less taken
The road less taken (black and white, infrared; two image vertical panorama blended manually)

I’ve made some photographs there, but haven’t actually stopped for several years.  It’s changed tremendously, and I like how the overgrown road looks now in infrared.  A little spooky.

Places change.  Even if you think you know a site, go back once in a while.  It might look different.  Or you might have an infrared camera with you next time.

Thanks for stopping by and reading my blog. Now – go make some photos!

Monochromatic HDR Photography

If you’ve looked through this blog or my Flickr stream, you know I like Black and White photography.

B&W with film used to be simple.  Get some Tri-X film, put it in your camera, and make exposures. Take the film to the drug store and wait to get your prints back.

OK, it’s never been all that simple. If you’re really hardcore, you get out your chemicals, develop the film yourself and print your best ones.  And if you were really, really hardcore – you could dodge and burn while printing to decrease and increase exposure in specific parts of the print.

You can still do all that.  But many people today use digital cameras for B&W photography.  And things are still as complicated as you want to make them.  You set your camera to color mode (yes color, unless you have a Leica M Monochrom camera) and RAW format and make exposures. You load the resulting files into your favorite processing software and adjust / convert the color images to B&W.  Then you print carefully to maintain and display all the tonality present in your carefully crafted image.

Along the way, you’ve got to make many decisions on what software to use and how to use it.  It’s very easy to get lost and see only trees, no forest.  And if you want the best results, you need to know what tools are available and how to use them.

Composing

Composing – A recent photo I made and converted to B&W

I purchased and read Monochromatic HDR Photography by Harold Davis.  I’ve been a fan of his for a long time and I admire his photographic expertise and creativity.  It’s a real treat to read this book and follow along as he makes some absolutely lovely B&W images.  He covers info that will help beginners as well as experienced photographers and it’s not just post-processing technique.  He also talks about the reasons behind choices and creative aspects.

I won’t give away the whole book.  It’s a good one and covers the subject well, with a tremendous amount of information that everyone could use.  If you’re interested in B&W, you should buy and read it.  Basically, Harold’s work flow consists of:

  • Capturing the image as a set of bracketed exposures to make sure you preserve all the tonality that’s present in the scene
  • Converting the bracketed sequence into the best quality, color, high dynamic range image possible
  • Making multiple passes of B&W conversion on the color HDR file and saving them.  With each pass you can vary tonality, contrast, detail, etc. to enhance parts of the image.
  • Using layers to blend the different B&W versions into a single “magical” result

I’ve been trying out his ideas and the photo in this post is a recent example.  Below are some intermediate steps so you can get an idea of how this works.

pass 1Step 1:  I like the general look, but thought the trees should be darker

pass 2Step 2: I like the tree in this version, but the fern, photographer, and parts of the canopy are too dark 

pass 3Step 3:  Fixing the exposure / contrast of the photographer

finalFinal:  All layers blended together to create the version I posted on Flickr.  I like the sky and canopy glow, the dark tree, the bright ferns and the photographer’s appearance compared to the background.

Although I have a long way to go to even get close to Harold’s level, I really like his approach.  There are a great many advantages and the only disadvantage I can think of is that it takes time.  But if you have a scene that you want to render into the best B&W image possible, this is a great way to do it.  And Monochromatic HDR Photography by Harold Davis is a wonderful guide to “Shooting and processing Black & White High Dynamic Range Photos”.

Central Florida Photo Ops Book Review Rating:  5 star, must read!

Thanks for stopping by and reading my blog. Now – go make some photos!

©2014, Ed Rosack. All rights reserved.

Lessons from a photogenic place

There were a few lights in the parking lot way back behind the sand dunes and the clouds were thick and low, making it so very dark on Marineland Beach south of St. Augustine, Florida that my first few exposures didn’t even register on the sensor. I kept raising exposure times and ISO until I was able to capture this:

99 seconds in the dark
99 seconds in the dark – ISO 400, 99 seconds @ f/8; Marineland Beach, about 45 minutes before sunrise.

It sure didn’t look this way to my eyes.  I couldn’t see much at all and had to use my head lamp to compose and focus.

When I got home and processed the photos, they reminded me of some things that might be useful to others.

Pre-visualize before, during, and after you press the shutter

You should always try to pre-visualize the photo you’re making before you compose and shoot – and it’s a delightful feeling when the image turns out just like you imagined.  But this is often harder than it sounds.  Especially if you can’t see what you’re photographing.  There’s nothing wrong with adjusting your vision as you go.  This is a wonderful advantage of digital cameras that we’d be foolish to ignore.  Check your results on the LCD during the shoot and adapt as necessary.  In this case, I knew exactly what I needed to change when I first looked at my (black) LCD.  I needed more exposure!

Pre visualization is great, but there’s also nothing wrong with post visualization.  What I mean is to try as many things as you can think of while you’re there and sort it out later when you get home.  Try HDR, panoramas, high tripod, low tripod, and focus stacking.  Use different  focal lengths, shutter / aperture combinations, and positions / directions.  Exploit changing weather / light as time goes on.  Capture them all and give yourself a better chance to come out with something you like.

Shutter speed

Shutter speed is a critical variable when photographing moving water.  The 99 second exposure above gave me very smooth and milky looking water, nicely outlining the rocks.  A 1/1000th second (or faster) exposure can freeze drops of water.  In between, you can find other speeds that look very different from the extremes.  Capture the scene with different shutter speeds when possible.  In this 1 second exposure, I like the added interest from the flow patterns in the water.

Marineland Beach and cochina rocks
Marineland Beach and coquina rocks – ISO 100, 1 second @ f/4 with 8 2/3 stop neutral density filter, ~30 minutes after sunrise.

High Dynamic Range (HDR) processing and ghost removal

There are so many controls and sliders in HDR software that it’s hard to know which ones to change.  Most HDR software has an option for removing “ghosts” (differences between multiple frames for anything moving in the image) and I think it’s a critical setting.  HDR Efex allows me to select the baseline frame I want to use as well as the amount of ghost removal to apply.  I like to experiment with these and select the combination that looks best.  In the image below, there was only one  setting that showed the breaking wave. And I think the wave definitely adds to the image.

Golden rocks and sand
Golden rocks and sand – 5 image bracket (-4 to +4 stops), almost an hour after sunrise.

Don’t leave too soon

I made these three images (and more!) over a period of 90 minutes.  The changing light provided different looks and opportunities to photograph this place.  It’s worth getting there early and staying for a while.

Don’t get overwhelmed

When you visit a beautiful place, especially for the first time – it’s easy to be overwhelmed and forget about everything except pressing the shutter button.  It helps to visit multiple times. The first time, it’s hard to see all the possible compositions until you get over the novelty and excitement. When you can relax and enjoy the experience you can open your mind and get in the zone.  Then you’ll make images you’ll be happy to share with others.

You can see more of my photos from Marineland in this set on Flickr.

Thanks for stopping by and reading my blog.  Now – go make some photos!

©2014, Ed Rosack. All rights reserved.

Infrared updates

These two posts on infrared photography seem to get a lot of hits:

Since they’re from a while back, I thought I’d update you on a couple of things.

Ebbing tideEbbing tide – The outgoing current cuts a temporary channel through the beach (Little Talbot Island State Park).  IR, B&W.

I’d been using an Olympus E-PL1 camera, modified for IR by  http://www.lifepixel.com/ and I’ve been pleased with the output.  But it uses a first generation 12 MP, micro 4/3 sensor and requires care to minimize noise.  I also have an Olympus E-PL5 with a 16MP current generation sensor.  It has much better noise characteristics and additional resolution, so I decided to have it modified to upgrade my infrared capabilities.

I was very happy with the service from LifePixel, but this time, I chose Precision Camera to do the mod.  They also did a fine job, were very prompt and even a few dollars cheaper.

One change I made was to select a 665 nm filter instead of 720 nm.  What this does is pass a bit more of the visual spectrum along with the IR light.  This gives you more flexibility in post processing.  You can still process for the IR B&W look, but with the extra visible spectrum light, false color post processing is easier. 

At restAt rest – Driftwood on the beach (Little Talbot Island State Park).  IR, false color.

When I process RAW files from the E-PL1, I can easily adjust white balance in Lightroom.  With the 665 nm filter on the E-PL5, I couldn’t get to a neutral white balance until I created a custom camera calibration profile for it using Adobe’s DNG Profile Editor.  You can read more about this here (link no longer available).

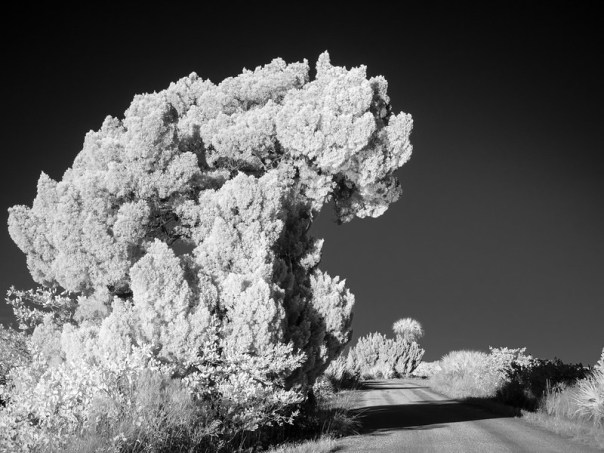
The Road Under the Red Cedar Tree
The Road Under the Red Cedar Tree (Black Point Wildlife Drive in Merritt Island National Wildlife Refuge).  IR, B&W.

I made the photos in this post with the newer camera.  There’s less noise, the 665nm filter is more flexible in post, and the extra pixels are nice to have.  I like how it’s working so far!

You can see larger versions of these and other examples of my infrared photography in this set on Flickr.

Thanks for stopping by and reading my blog.  Now, go make some IR photos!

©2014, Ed Rosack. All rights reserved.

Panoramic alternatives – iPhones and more

If you’ve read this blog for any length of time, you know that I like panoramic photos.  We’ve all been to many places where the view is so grand it doesn’t fit into a single frame.  Sometimes you can’t capture what your eyes see with one camera exposure.  So I started stitching panoramas together.  My first few were way back in the film era (1999 or 2000).  When I started using digital cameras, panoramas became easier and I’ve made many more since then.   They help me avoid “tunnel vision” and show more of a scene.  They’re also an excellent way to capture an image with a huge number of pixels – which allows for very large prints.

I often include panos in this blog.  When I checked today, there are 33 different posts (over 10%) that are tagged “panorama”, including my very first one from May of 2007.  For some panorama examples, look at this set of over 100 images on Flickr.

San Francisco panorama from Twin Peaks

May 2007:  View of San Francisco from Twin Peaks (6389 x 3110 pixels)

I’ve learned quite a bit about how to make panos, and in August of this year, I shared info on how I usually process them.  That was a description of the detailed workflow I use to make the best quality image I can.  It can be time consuming and requires care in capture as well as post processing.  But if you put in the effort, the results are very good – and the files are much bigger than from a single frame.  Here’s a recent example:

City at twilight
September 2013: Chicago skyline at twilight (11,175 x 4706 pixels)

But it turns out that my way isn’t the only way to make panos.  There’s a much easier way to make them – here’s an example:

Underneath the bridge over the St. John's River by the old bridge and railroad trestle
October 2013: Underneath the bridge over the St. John’s River by the old bridge and railroad trestle (7908 x 2692 pixels)

I made this pano with my phone.  It’s not as large (2692 pixels on the short side compared to 4706), but you probably couldn’t tell much of a difference in quality unless you pixel peep.  Using my phone is easier and if something is easier, people will do more of it – and more panos means better memories.

iPhones have had a built-in panorama mode for a while, and the latest versions bring a lot of processing power into it.  The iPhone 5S does automagic adjustment of exposure across the frame, and stitches the results together in real-time as you sweep your phone.  The results are fairly large files, and the quality is surprisingly good.

Here’s one more recent iPhone panorama example and proof of the saying that the best camera is the one you have with you:

Interior panorame of the Roman Colosseum (Flavian Amphitheatre)

November 2013:  Interior panorama of the Roman Colosseum (Flavian Amphitheatre) – Photo by MK Rosack (used with permission)

Lets compare making panoramas on a phone with a multi-photo approach.  I’ll use the iPhone 5S for this – your phone may be different.

iPhone 5S Multi-Photo
Capture convenience Very high – you always have it with you Low – You need to plan for it and carry your gear
Quickness High – End result available very quickly.  And can post right from the phone. Low – Need to get home and run your software
Processing flexibility Low – Done by the camera; Can adjust jpg result High – Adjustments can be made throughout each processing step
Processing difficulty Low – Done by the camera;  Some amount of touch up may be needed May be High, depending on software and source images
Raw capture No – jpg only Yes
Output size Medium – Short dimension a max of 2448 pixels High – DSLRs typically higher resolution than iPhone and you can make multiple rows if desired

So, should you use your phone for panoramas?  Yes!

Should you always use your phone for panoramas? Not quite yet.

Phones are getting better all the time.  And they’re getting better faster than cameras are getting better.  Sooner or later, most people won’t want or need a dedicated camera.  Right now I think phones are “good enough” in many cases, especially if you think about the trade-off between output quality and ease of use.   For panoramas, the ease of use and convenience allows many people to make photos they otherwise wouldn’t.  In my case, if I don’t have any other camera with me, I’m sure going to use my phone.  But if I want the best quality image possible, I’ll still use my stand alone cameras when possible.  Check again in a few years – the answers may be different.

Thanks for stopping by and reading my blog. Now – go make some panoramas!  And don’t forget your phone!

©2013, Ed Rosack. All rights reserved

Oviedo and Port Orange Camera Clubs

Just a quick post this week (a schedule update and one recent photo).

I’ve been invited to speak at both the Oviedo and Port Orange Camera Clubs next month.  I’ll talk about “Winter Photo Ops in Central Florida” and recommend things / places to photograph in our area this winter along with sample images.  Depending on interest and time, we may go a bit further and talk about other times of year too, or we may also discuss tools and techniques for any of the photos I show.   Questions on anything else presented are also welcome.

The Oviedo Photo Club meeting is on November 4th at 7PM in the Memorial Building in Oviedo (38 South Central Avenue, Oviedo FL 32765).

The Port Orange Camera Club meeting is on November 13th at 7PM in the Port Orange Adult Center (4790 South Ridgewood Ave. Port Orange FL 32127)

If any of you are at one of these meetings, please say hello – I love to meet readers!

And since we can’t have a blog post without a photo, here’s one I made at the beginning of October in Winter Park, Florida.

Stationary water
Stationary water

I liked this fountain, but wanted to make the photo look a bit different.  My normal approach might have been to use a very slow shutter speed to make the water silky smooth.  This time, I decided to use as fast a shutter speed as possible to “freeze” the water.  So I opened my aperture and ended up with a 1/8000 sec shutter speed.  The wide aperture also helped to blur the background and isolate the subject.  I don’t think you can make a photo like this with your cell phone!

Thanks for stopping by and reading my blog. Now – go make some photos – and go to a camera club meeting!

©2013, Ed Rosack. All rights reserved

Is photography a group or solo activity?

Four of us from the Photography Interest Group went to Viera Wetlands last Saturday.  On the way, we stopped by Riverfront Park on the Indian River at SR 520 in Cocoa for sunrise.

Old boat by a bridge

There weren’t many clouds, but with a longer lens than I normally use (120mm equivalent instead of an ultra wide-angle), I managed to place this boat in the frame against a background of clouds and the causeway bridge.  The colors on the water are nice and I was happy with the result.

As we left, I saw what looked like a sunken boat out of the corner of my eye to the south of where we’d been photographing. Since the good light was fading, and everyone else was ready to leave for Viera, I didn’t get a chance to check it out at the time.

For some reason, sunken / abandoned boats really appeal to me as photographic subjects. Maybe it’s because I spent time in the Navy. They seem sad and make me wonder what happened and why. This one nagged at me, and I really wanted to explore it so I decided to drive back over on Wednesday to see what I’d missed.  Many times the boat gets salvaged – so if you don’t photograph it when you find it, you may not get a second chance.

A dream, gone
A dream, gone – in the harbor at dawn.

Luckily the boat was still right where I’d seen it.  I found a spot where I could use the sailboat mast reflections to outline the sunken hull and place it between the blue and orange colors mirrored on the water.  I like the first photo, but I think this second one is stronger.

If we’d taken the time to explore this on our first visit, would I have gotten as strong a photo?  Did I get a better photo on my second trip because I was by myself?  Is photography essentially a solo activity?

Cue the standard photography answer:  “It depends.”   I believe you need to be “in the zone” to make great photos.  Distractions and / or fellow photographers can hinder concentration – or they can point you in the right direction.  When you’re with a group you also have to compromise and go along – you can’t do everything you want and force everyone else to do it too.  If you’re mainly a landscape photographer, going photographing with someone really into bird photography may not help your landscape images.  Or it might – birds hang out in some beautiful places.

If you go with people more experienced / knowledgable than you are,  you may learn a bit and make better images as a result.  Or you may find out about new places that they know but you don’t.  Or you might even open your eyes to a different way of seeing something.  If you’ve ever been out photographing with a group, you know there will be many similar images.  But there will also be some that look completely different even though two photographers stand right next to each other.

I looked through my most interesting images (according to Flickr, anyway).  Of the first 20, 10 were when I was by myself and 10 when I was with other photographers.  Conclusive numerical evidence, eh?

So to answer the question in the title of this post:  Is photography a solo or a group activity?  Yes.  You’ll be a better photographer if you go photographing both by yourself and in groups.  Mix it up and take advantage of both ways to enjoy and improve your photography.

By the way, we did make it to Viera Wetlands.  We saw many of the usual animals in the main area including Hawks, Ospreys, Great Blue Herons, Little Blue Herons, Green Herons, Snowy and Great Egrets, Grebes, Black Bellied Whistling Ducks, Alligators, Turtles, etc.  We saw a few more species in the Click Ponds:  White Pelicans, Sandpipers, Roseate Spoonbills, and Woodstorks.  A nice visit.

Sandpiper flock and reflections

Thanks for stopping by and reading my blog. Now – go make some photos – alone and in a group!

©2013, Ed Rosack. All rights reserved

Review and Reprocess

Sometimes after a photo shoot, I’ll skip over images if I’m short on time or something looks too hard to deal with.  Other times, I may play with a photo for a while and then set it aside when I just can’t seem to get it right.  When I learn a new technique or get a new software package or upgrade I try to go through my image library and pick out existing photos that could benefit from the new capability.  And yes, I also notice images that no longer look as good to me as they did at first.  Something I did a few years ago may have seemed great then – but tastes change.

I use Lightroom to catalog my photos and I have a keyword called “Process” with three sub-keywords “Color”, “pano”, and “other”.  Using these, I mark photos I want to revisit and I’ve built up a collection of them for future processing.  I had a little time this week to go through and pick three to work on:

Reflections at Kelly Park
Kelly Park Reflections:  Merritt Island, Florida, February 19, 2013. The water was amazingly calm that morning and I like the reflections as well as the detail / lights on the horizon.  I  bypassed this image at first because of trouble with the white balance.  This time through the result is much closer to the look I wanted.

Main Sanctuary of the Cathedral Basilica
The Main Sanctuary of the Cathedral Basilica, Saint Augustine, Florida, February 28, 2013.  Black and white infrared.  I don’t remember why I didn’t finish this photo back in February.  I like the light, detail, and tonality.

Three more cypress trees
Three more cypress trees:  Blue Cypress Lake, near Fellsmere, Florida, June 2, 2012. False color infrared.  Since IR doesn’t capture color as your eye sees it, color conversions are very subjective.  As I gain experience, my tastes are changing.  This version is very different from how I processed other IR photos at the time.

So, some recommendations:

  • If you’re struggling with an image, don’t delete it.  Mark it and move on.  Come back and revisit it later.
  • Organize, document, and keyword your images so you can find hidden gems to re-process.
  • Review your photo library occasionally.  Your photography skills and tools aren’t static.  So your portfolio shouldn’t be static either.  Revise older images and make them better.  You might be surprised what comes out of your archives.

Thanks for stopping by and reading my blog. Now – go revise some photos!

©2013, Ed Rosack. All rights reserved

Topaz ReStyle Mini Review

Topaz released a new plug-in recently, called ReStyle.  You can download any of their products for a free thirty-day trial, so I thought I’d give it a go.  This isn’t a full review or tutorial (I haven’t used it long enough for either of those).  But I have used it a bit so I’ll try to introduce you to some possibilities with three examples I’ve played with.  If you want to see the “before” versions, I’ve included them towards the end of the post.

I had trouble with the white balance in this photo of Marineland beach at dawn.  I could have separately adjusted the color balance on the sky and ground using layer masks in Photoshop or gradients in Lightroom.  Instead, it was easy to pick out this version from the grid displayed inside ReStyle.  It’s interesting how   remapping changed the color in the beach and rocks differently from the sky.

Down on the beach at dawn

Down on the beach at dawn (after Topaz ReStyle).

ReStyle maps color and tone statistics from a selected style to a target image.  It seems like Photoshop’s “Image/Adjustments/Match Color” command.  When you do this in Photoshop, you have to supply an image with the colors you’re trying to match.  ReSyle comes with over 1000 presets and provides control / adjustment of the results that aren’t easily available in Photoshop.   There are so many presets that they’re overwhelming, but ReStyle breaks them down into collections (e.g. “Landscape”), and you can mark your favorites.   You can show a collection or your favorites as a grid applied to your photo, which makes choosing one very simple.  You can also search for  similar styles by color or by name.  Within each style, you can further adjust the hue, saturation, and luminance of the five colors in each style, as well as the opacity, original image “Texture” strength, and others variables.  It also includes mask / selections controls to apply the effects selectively.  There’s a lot more info available in the manual at this link.

In this photo of some struggling trees on a small rocky island near Haulover Canal, I wanted a more dramatic color palette.  Once again, it was easy to pick out this version from a grid of possibilities.

Survivors
Survivors (after Topaz ReStyle)

For this infra-red photo of sea oats on the beach that I made in Fred Howard Park near Tampa , I wanted a different look from a typical IR false color image.  I like this color mapping I found in ReStyle .
Sea oats

Sea oats – False color infra-red (After Topaz ReStyle)

There are so many presets, options and adjustments that ReStyle can be a little overwhelming.  It’s not hard to use, but it is hard to grasp all the possibilities and decide what to do.  It’ll take a bit more time for me to get comfortable with it, so I’ll have to play with it some more.

For comparison purposes, here are versions of the photos before I applied Topaz ReStyle:

__D8C4109_HDR_Ed-Rosack
Before:  Down on the beach at dawn.

_P8110813_Ed-Rosack

Before: Survivors

Sea oats

Before:  Sea oats – False color infra-red processing.

Summary:  Do you have to use plug-ins?  Of course not, but they’re useful and save time.  And ReStyle seems to offer something I haven’t seen elsewhere.  It’ll definitely make your images look different.  Are they better?  I think ReStyle improved these three images, but only you can decide for your photos.  Will this fix all of your problems and should you use it on every photo?    Definitely not  – I’m new to the tool, but on several photos I tried, I couldn’t get anything that I thought looked good.  But it does look like something that’ll be good to have in your bag of tricks.

Off topic public service announcement:  I’m always telling you to get out and enjoy nature.  I also need to remind you to protect yourself from the sun.  I had two skin cancers removed last week.  I’m fine – but it’s not the most pleasant thing to go through.  And it can be much, much worse than mine were.  So when you’re out in the sun enjoying nature, please protect yourself.  Use sunscreen, wear a hat and long sleeves, stay in the shade as much as possible, etc.  The sun is brutal, especially in Florida.  And no one wants to suffer the consequences of too much exposure ten or twenty years down the road.

Thanks for stopping by and reading my blog. Now – go make some photos!  And use sunscreen!

©2013, Ed Rosack. All rights reserved