I’ve been interested in infrared photography for a long time. I first attempted it sometime in the 1980s using black and white IR film. The results weren’t very good. Focus and exposure using IR film was a challenge back in ancient times.
One of my first digital cameras was a Minolta DiMage 7Hi and in 2003 I tried again with an IR filter on the lens of the unmodified camera. The dense filter required long exposures on a tripod even in daylight. I hadn’t mastered RAW file processing and was using jpg format which didn’t help. But results were better than 1980s film!
2003: An Oak tree, Oviedo FL – B&W 49 IR filter on an unmodified Minolta DiMage 7H camera, 4 sec @ f/8 ISO 200
In 2011 I started researching IR modified cameras and ended up sending my Olympus E-PL1 off to have its IR blocking filter replaced with one that passed IR light and blocked normal visible light. That was a big step forward. Focusing just worked and exposures were similar to those on an unmodified camera. I made the image below from a small boat and it would’ve been very difficult with a dense filter and 4 second exposure!
2012: Blue Cypress Lake, Fellsmere FL – IR modified Olympus E-PL1, 1/250 sec @ f/5.6 ISO 100
In 2013, I traded up to an IR modified Olympus E-PL5 to take advantage of the lower noise and additional resolution.
2014: A calm day on Jordan Pond, Acadia National Park, Maine – IR modified Olympus E-PL5, 1/200 sec @ f/5.6 ISO 200
Then in 2017 I bought a second hand IR modified Olympus E-M5 MII and sold the E-PL5. The E-M5 MII was a bit better and had a hi-res mode which I used frequently.
2019: Wetlands view, Merritt Island National Wildlife Refuge – IR modified Olympus E-M5 MII, 1/1600 sec @ f/3.5 ISO 200
In late 2021, I decided to sell the E-M5 MII. I hadn’t been using it much. Packing the extra camera, lenses, batteries, chargers, etc. was a hassle. And remembering how to use another camera system isn’t easy when you don’t use it very often. Now, if I want to do any B&W photography I have to use one of my non-IR cameras.
2022: Along the shore, Merritt Island National Wildlife Refuge – unmodified Fuji X100V, 1/140 sec @ f/8 ISO 160
For all except the first, I started with the original RAW file and processed them with my 2022 current work flow and software. You can click on the last four to see higher res versions on Flickr. And I’ve collected many IR photos in this album: https://www.flickr.com/photos/edrosack/albums/72157628062119778
It has been a long journey with infrared. Am I done with it? It seems so, but who knows? Not me!
Thanks for stopping by and reading my blog. Your visits, comments, and likes are always very welcome and a big motivator for me. Be kind, take care of yourselves and each other. And if you can, make some photos – you’ll cherish the memories!
This is a long article about Infrared (IR) image processing. If you don’t process IR photos, feel free to just look at the photos! And please take a look at the new Infrared Gallery I added under the Galleries / Portfolio menu at the top.
You probably know I like IR photography. I’ve written about it before (click here to review my posts) and I often include IR photos in this blog. Here’s a recent example:
Circle B Bar Infrared 1 (four frame vertical panorama)
Infrared’s an interesting medium.
IR captures invisible light: a portion of the spectrum that’s different from what your eyes can see.
The spectral response makes blue sky look dark and foliage bright. This reverses a normal daylight scene’s brightness values. It helps tame contrast and allows you to shoot even when the sun is high in the sky.
Since your eyes can’t see infrared, your interpretation of the alternate reality is up to you. You can process IR in Monochrome or as a false color image.
IR can sometimes capture details that aren’t seen with visible light.
If you use a modified digital camera, you may see improved detail in your photos. The conversion process removes the IR blocking / anti-aliasing filter. In many digital cameras this slightly blurs the image during capture to lessen Moire and other aliasing artifacts.
I’m not really qualified to discuss shooting IR film – I’ve only done it a few times. But I will say that modifying a mirrorless digital camera is a great way to approach infrared. The mirrorless design eliminates any issues with IR focus. The camera’s built-in exposure meter works well and values are close to the normal visible light ones, so you can hand hold in daylight conditions.
Another example:
Circle B Bar Infrared 3 (three frame vertical panorama)
Eight Cedar Waxwings – I forgot to bring the spare battery for my main camera and ran out of charge. So I switched my long lens to my IR modified body and kept shooting.
So what’s the point of this post? I’ve struggled lately with how I process my IR images. The work flow I’ve used seems to result in too much contrast / clarity. I just felt that the results looked a bit “digital”. So I’ve searched for new methods and I’ve found one that I like. I’ve used it on all these photos and I feel that they look much more “organic” and much less “digital”. What do you think?
Five nest Cypress (five frame vertical panorama)
Here is my updated workflow:
Capture the RAW images with a modified micro 4/3 mirrorless camera. Aperture priority, mostly handheld (although I do occasionally use a tripod).
Import into Lightroom to save the master files. Then decide which ones are worth processing and discard the seconds / rejects.
Batch process the “selects” through DxO Optics Pro to take advantage of its noise and camera / lens module processing. This step returns copies back to Lightroom in Adobe DNG RAW format.
In Lightroom, apply a custom camera profile to optimize the white balance (see this article for how to create one). And if it’s a multi-frame image, stitch it together with Lightroom’s merge to panorama function.
Sometimes, you can use Lightroom’s B&W conversion and finish an image. But I’ll open ones I really like in Photoshop.
There, straighten and crop, use the content aware fill, and clone if needed.
Finally, it’s back to Lightroom for any final adjustments (tone curve, sharpening, vignette, grain, etc.).
Circle B Bar Infrared 6 (five frame horizontal panorama)
Could I achieve this look some other way? Maybe even with a lot fewer steps? Yes, I’m sure it could be done.
Circle B Bar Infrared 2 (three frame horizontal panorama)
Just a few years ago, we only had Adobe Photoshop and then Lightroom to process RAW images. One of the great things about photography and image processing today is that there are so many ways to do things. That’s also bad, because it takes a lot of effort to study all the options and find out which ones work best. It seems like each program has strengths and weaknesses.
Software is changing every day, but I don’t know if there will ever be a single image processing program that does every thing I want. For now, I’m happy with the results I’m getting using this somewhat complex workflow. That doesn’t mean I’ll stop looking for new or simpler ways to do things.
If you’ve read this far, thank you! That probably means you’re very interested in IR. If you have any questions about this, let me know in the comments and I’ll try to answer.
Thanks for stopping by and reading my blog. Now – go make some IR photos!
Keith H. had his Olympus EM-5 MII camera converted to infrared, so one day after lunch we stopped by Central Winds Park in Winter Springs so he could test it. I’ve had my IR E-PL5 for a while, but wanted to see how it worked with the Oly 50 – 140mm f/2.8 lens.
Flower in IR
This frame was at ISO 200, 150mm (300mm equivalent), f/5.6, 1/80 second. It’s handheld, but I braced the camera and the winds were calm so the shutter speed was high enough to prevent motion blur. And the long focal length and close focus makes the blurred background look very nice. So I think this lens works well in IR.
The processing was comparatively straightforward. I ran it through DxO Optics Pro for noise reduction and detail improvement. The rest was in Lightroom: Crop, exposure, contrast, clarity, to taste; spot removal for small specs of dirt on the flower; and then small doses of post-crop vignette and de-haze to get to an initial false color IR image.
As a last step, I tried something new. Instead of converting to Black and White, I played around with the vibrance slider to partly desaturate the colors in the image. This gave me the “pseudo B&W” you see above. I like this rendering and I’m going to try it in the future for IR images.
If you have any questions about this, feel free to ask in the comments and I’ll do my best to answer.
Thanks for stopping by and reading my blog. Now – go make some photos!
Since they’re from a while back, I thought I’d update you on a couple of things.
Ebbing tide – The outgoing current cuts a temporary channel through the beach (Little Talbot Island State Park). IR, B&W.
I’d been using an Olympus E-PL1 camera, modified for IR by http://www.lifepixel.com/ and I’ve been pleased with the output. But it uses a first generation 12 MP, micro 4/3 sensor and requires care to minimize noise. I also have an Olympus E-PL5 with a 16MP current generation sensor. It has much better noise characteristics and additional resolution, so I decided to have it modified to upgrade my infrared capabilities.
I was very happy with the service from LifePixel, but this time, I chose Precision Camera to do the mod. They also did a fine job, were very prompt and even a few dollars cheaper.
One change I made was to select a 665 nm filter instead of 720 nm. What this does is pass a bit more of the visual spectrum along with the IR light. This gives you more flexibility in post processing. You can still process for the IR B&W look, but with the extra visible spectrum light, false color post processing is easier.
At rest – Driftwood on the beach (Little Talbot Island State Park). IR, false color.
When I process RAW files from the E-PL1, I can easily adjust white balance in Lightroom. With the 665 nm filter on the E-PL5, I couldn’t get to a neutral white balance until I created a custom camera calibration profile for it using Adobe’s DNG Profile Editor. You can read more about this here (link no longer available).
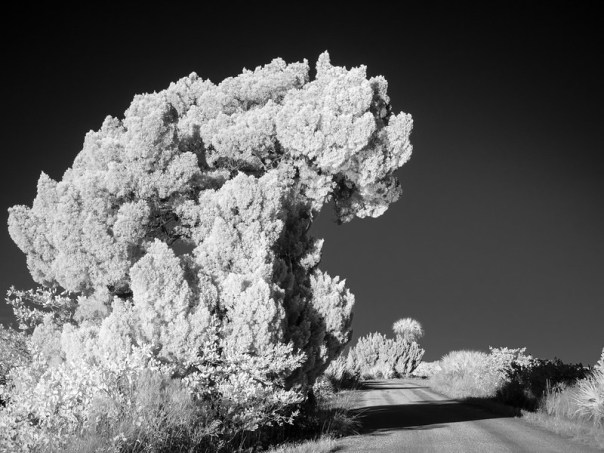
The Road Under the Red Cedar Tree (Black Point Wildlife Drive in Merritt Island National Wildlife Refuge). IR, B&W.
I made the photos in this post with the newer camera. There’s less noise, the 665nm filter is more flexible in post, and the extra pixels are nice to have. I like how it’s working so far!
If you’re a regular reader, you saw my post from a couple of weeks ago about infrared photography and how I post process my IR images. If not, please check it out!
That post concentrated on a single image and tried to show some detail on how I processed it. Today, I’d like to show you a few more examples of what you can expect when you try this very interesting genre of photography. I made these photos with my IR modified Olympus E-PL1 camera.
I R n Air: A river runs through the countryside in this B&W digital infra-red photo made out the window at ~30,000 feet. The IR light cuts right through the haze to show a lot of detail.
Palm Tree: IR sensitivity makes the foliage stand out against the sky in this false color image.
Calm water and birds: Bird photography is not a strength of IR, but the birds in the water and the ones flying through the frame add to this landscape.
Play time at Union Station: Buildings, architecture, and people can be good subjects.
Jefferson Memorial from across the Tidal Basin: IR adds a different look to this classic view.
If you’ve read through my blog or looked at my photostream on Flickr, you’ll already know that I enjoy black and white photography and occasionally post B&W images. Removing color from a scene abstracts reality – and emphasizes shapes, composition, and texture. The image becomes a bit unreal, but since we’re used to B&W – not too unreal. This makes B&W a great way to make your images stand out.
Another way to make your images stand out is by using infrared (IR) film or an IR modified camera:
IR captures a portion of the spectrum of light that’s different from what your eyes can see.
The spectral response makes blue sky look dark and foliage bright. This reverses a normal daylight scene’s brightness values, helps tame contrast, and allows you to shoot even when the sun is high in the sky.
You can interpret this alternate version of reality by processing your IR photo as B&W or various types of false color images.
IR can sometimes also capture details that aren’t seen with visible light.
If you use a modified digital camera, you may see improved detail in your photos, since the conversion process removes the anti-aliasing filter that most digital cameras use to slightly blur the image during capture (and remove Moire patterns and other aliasing artifacts).
I’ve gotten some questions about my infra-red images. And I haven’t written anything about technique recently, so in this post, I’ll go into detail about a recent IR image I made. I’m relatively inexperienced at this, but as a IR n00b I’ve learned a few things that may come in handy if you want to try it.
Messy knees: Cypress trees on the south shore of Lake Jesup. Cypress trees and their roots are good subjects, especially along the water where they’re usually found. The light hitting these tree trunks and the Spanish Moss also caught my eye. I’m still playing around with infra-red. There’s a range of post processing options available. I was hoping that this false color version looks just alien enough to make people take a second look. Click here to view a larger version of this photo on Flickr.
Camera
I use an Olympus E-PL1 modified for IR by http://www.lifepixel.com/ and I’m very pleased with the result.
Using a micro 4/3 camera has advantages for IR:
Older models like the E-PL1 are relatively inexpensive;
They have a large sensor (compared with compact cameras) which helps image quality;
They use the sensor for contrast type focusing so there are no focus calibration issues that can occur in a DSLR
Most have RAW format capture available
Settings
I shoot in RAW, not jpeg. For IR, it would be tough to get all the settings perfect in camera. Plus, there are a lot of post processing options which you’d give up if you only capture jpeg.
White balance is one thing that you should set. If you shoot in RAW, white balance can be adjusted in post processing. But setting a white balance in camera is important since it lets you judge your shots on the LCD screen as you take them. Unless you set a custom (preset) white balance all IR images would look very red. On my E-PL1 I use a temperature setting of 2000K which is as low as it will go. This camera has no tint adjustment, so photos still look blue, but it’s good enough for judging exposure.
Workflow
Here are 7 versions of this photo that show the processing steps I went through along the way. Don’t be alarmed – this is quicker and easier than it sounds.
This is the RAW photo straight out of the camera. My custom white balance adjustment isn’t able to completely correct the IR spectrum so there’s a pronounced bluish tint.
This is the image after white balance and levels adjustment in Photoshop. Other initial adjustments in LR or Photoshop may include a bit of noise reduction, lens corrections (if available), cropping / straightening, and spot removal.
In this version, I’ve used several copies of the same scene (shot from a tripod) to smooth the water’s surface and make the trees / knees stand out more.
This version has a Channel Mixer preset adjustment layer (red and blue colors swapped). Debra Sandige’s IR page (listed in the references below) has detailed steps on how to do this in Photoshop.
A Hue / Saturation / Brightness adjustment layer was used to modify the Hue in the cyan and blue channels so it looks a bit more natural.
This is after final adjustments in Lightroom: clarity(+47), vibrance (+24), medium contrast tone curve, sharpening with edge mask. (note: this is the same image as at top of post).
For comparison, a black and white conversion of the final false color image. I like the false color version better.
References
You can find out more about Infrared photography at these places:
This Wikipedia article has some background information on infrared photography – especially film techniques.
I had my camera converted by LifePixel and was extremely pleased with the result. They have a huge amount of IR information including tutorials,FAQs, and a blog on their website.
I read and enjoyed Debra Sandige’s recent book about IR photography. She’s very creative and presents a lot of good information. She has a page on her website with IR information.
Lloyd Chambers also has an intro to infra-red on his site and offers a paid site with more info.
The Khromagery website has several good articles on IR cameras and processing. They also offer an IR Photoshop action as a free download.
Conclusions?
So, is IR an infatuation? Will I use it for a while and then let it fade away? Will I only bring it out for special photo ops as inspiration? Will it take over my photo life to the exclusion of all other approaches? Who can say? You’ll just have to keep reading my blog and see what happens. Along with me.
You can visit my IR set on Flickr to see more examples of what I’ve done. What do you think? Is IR photography something you’d like to explore?

 2012: Blue Cypress Lake, Fellsmere FL – IR modified Olympus E-PL1, 1/250 sec @ f/5.6 ISO 100
 2014: A calm day on Jordan Pond, Acadia National Park, Maine – IR modified Olympus E-PL5, 1/200 sec @ f/5.6 ISO 200
 2019: Wetlands view, Merritt Island National Wildlife Refuge – IR modified Olympus E-M5 MII, 1/1600 sec @ f/3.5 ISO 200
 2022: Along the shore, Merritt Island National Wildlife Refuge – unmodified Fuji X100V, 1/140 sec @ f/8 ISO 160