Tag Archives: tree

Hillsborough River State Park

For some reason, I’d never noticed Hillsborough River State Park until fellow Photography Interest Group member JT Smith asked me about it – thanks JT!  There are a lot of photos of the park on Flickr, many of them quite nice.  So I decided to go over on a scouting trip.  Flickr’s a great place to research new locations and I spent a while going through their search results as well as Google maps before my trip.

Dark river in the deep woods
Dark river in the deep woods.  A Hoya 8 2/3 stop neutral density filter let me stretch my exposure time to 25 seconds at f/8 and ISO 100 to smooth the water surface.

The park is about 20 miles north-east of Tampa and an hour and 40 minutes west of where I live.  Not too long a trip.  With all the rain we’ve had recently,  added water’s made the current look pretty fast through the rapids.  My kayak would get a few scrapes paddling through this.

Hillsborough River rapids
Hillsborough River rapids.  I’m a sucker for Cypress Knees and it was a treat to find some by the rapids to use as foreground.  Since the wind was blowing a bit, I made two exposures.  A slow one (30 seconds with the ND filter), and another not so slow one (no filter, 1/13th second).  To eliminate the blurred leaves, I combined them in Photoshop using layers and masking the first for the water and second for the foliage.

I want to see what this looks like when we haven’t had so much rain.  I think a few more exposed rocks would be nice.  Here’s one last image from the trip:

Hillsborough River

Hillsborough River.  This is an Infrared, false color, three exposure panorama.  This place is near the kayak put-in.

I’m going to make a return trip and bring my kayak.  I think I’ll paddle the parts in the first and third photos and not the second.

Thanks for stopping by and reading my blog. Now – go make some photos!

And if you know of a good photo photo-op in Central Florida – please let me know.  I love to explore new places.

©2013, Ed Rosack. All rights reserved.

Colorado: New vs. Familiar

I was in Colorado last week and had a chance to go sightseeing in the mountains near Denver.  Whenever I visit, I find it to be so scenic and photogenic that it overwhelms me.  It’s different from what I normally see at home here in Florida and I want to make photos of everything.

Valley of sunbeams and shadows

Valley of sunbeams and shadows – Don’t miss Mount Evans if you ever get to Denver in the summer time. This is a four image panorama from near the summit, about 13,500 feet.

I find when I get back from a trip like this and go through my images, most don’t have the impact that I felt at the time.  My “keeper” rate seems lower than from local trips.  Maybe this is because I’ve photographed in Florida so much that I don’t see as many new things when I go out – so I make fewer photos.  Luckily, I did end up with some that I really like from Colorado.

The Chapel on the Rock (Saint Catherine of Siena Chapel)

The Chapel on the Rock (Saint Catherine of Siena Chapel) – This is in Allenspark, Colorado, south along Route 7 out of Estes Park on the grounds of the Saint Malo Retreat.  We didn’t know this was on our route. It’s wonderful to discover something unexpected like this while on a drive.  Another 4 image pano.

I guess we humans are hardwired to find new and unfamiliar things more interesting.  And familiarity can breed complacency.  Do people in Colorado get used to the mountains and sleep in some days instead of getting up and out to see and photograph them?  Like we sleep in here instead of getting up to go out into a world-class wildlife refuge like Merritt Island?

Bristlecone pine trees
Bristlecone pine trees – Some of the trees in the Mount Goliath Natural Area are over 1,600 years old. I used my IR modified Olympus E-PL1 for this photo. Yes, it’s one more 4 image pano.

Wildlife is different out there too.  Some non-Florida species I saw included six new life birds (Steller’s Jay, Gray Jay, Common Raven, Black-billed Magpie, Dark-eyed Junco, and a Broad-tailed Hummingbird) as well as plenty of Mountain Goats, Marmots and Chipmunks.

Broad-tailed Hummingbird
Broad-tailed Hummingbird – Behind my Sister’s house in Littleton, Colorado. These birds look very similar to the Ruby-throated Hummingbirds we have in Florida, but the Broad-tailed doesn’t have a black chin. No, this is not a pano.

I wonder if Florida’s unique landscapes and wildlife are as interesting to people visiting here as Colorado’s are to me when I’m out there?

Here are two earlier posts about Mount Evans:  Mt. Evans and Mt. Evans Redux.  You can view other Mount Evans photos here on Flickr.  And this set on Flickr has more Denver area photos.

Thanks for stopping by and reading my blog. Now – go make some photos – of new and of familiar things!

©2013, Ed Rosack. All rights reserved

Return to Shingle Creek

Mary and I took our kayaks to Shingle Creek last week.  I wanted to post a few photos to show you again how pretty this area can be.

Shingle Creek reflections

Winds are usually calm early in the morning – leading to scenes like this.

It was a calm morning, but the current was strong – probably because of all the rain we’ve had recently.  Shingle Creek gets  narrow in spots.  If you go kayaking, watch for it and turn around before I did so it doesn’t knock you up against the cypress tree knees!

Paddling through Shingle Creek sunbeams and reflections

The reflections weren’t as pristine after Mary paddled through them – but the sunbeams made up for it.

I’m still building my kayaking skills and I’m not yet confident enough to take non-waterproof gear out with me.  I made the top two photos using a GoPro camera mounted on the bow of the kayak.  I set it to make a shot every few seconds and compose by positioning / pointing the kayak and selecting from the results.  It’s a bit hit or miss, but I usually manage to get some I like.

The GoPro is super small, comes with a waterproof case and has a fixed, very wide-angle lens.  I like all its built-in capability but it does have a couple of limitations.  There’s no viewfinder, although there’s a model with wi-fi and an iPhone app that lets you control it and see the output.  I don’t use my iPhone on the kayak, since I don’t want to drop it in the water either.  Also, like most small sensor cameras, the dynamic range is limited (compared to larger sensors and shooting in RAW format) – so highlights have a tendency to overexpose.  But if you work within its capabilities you can capture great images.  You can also try the old Black and White trick to hide any blown highlights.

Shingle Creek is wonderfully scenic. There’s not as much wildlife as we see at other sites, but there are plenty of birds, turtles, fish, and I’ve heard reports of alligators and otters.  If you want to see more, there are other  Shingle Creek photos in this set, and kayaking photos in this set  on Flickr,

Thanks for stopping by and reading my blog. Now – go make some photos!

©2013, Ed Rosack. All rights reserved

Return to Big Tree Park

You may remember my posts about “The Senator”, a 3500 year old Cypress tree in Big Tree Park in Longwood, Florida (Big Tree Park – Home of the Senator, and “The Senator” is destroyed by fire).  The destruction of the tree in January of last year was an awful event.  The park closed after the fire but it’s open again now and the story has taken a fascinating twist – so I went by to check it out.

The Senator
The Senator in September of 2011 – just a few months before the fire

The Senator remains

The Senator in March of 2013 – the charred base of the original tree is all that’s left.

The Seminole Voice newspaper website had a good article with details on this very unlikely story (no longer available), but here’s a summary:

  • In 1997 a branch fell from the Senator after a storm.
  • A Miami science teacher happened to be there and happened to know about a North Florida tree farmer who was creating a cypress grove cloned from trees from all over the country.
  • The science teacher gave the branch to the farmer who used it to create ten cloned trees.
  • Seven of them survived (an unusually high percentage).
  • Fifteen years later, in January of 2012, the Senator burned.
  • A forestry specialist at the University of Florida heard about the fire and recalled the cloning project.
  • Seminole County officials then worked to move one of the clones to Big Tree Park.
  • The identical clone (appropriately named “The Phoenix”) was transplanted to Big Tree Park and dedicated on March 2nd, 2013.  It’s doing well and is already more than 50 feet tall!

The Phoenix rises
The Phoenix rises:  An identical clone of the 3500 year old “Senator” cypress tree was started in 1997.  Already 50+ feet tall, it was transplanted into Big Tree Park in 2012

There are some other changes, including a refurbished boardwalk, new signs with information about the park and trees, and new fencing (to keep drug addled arsonists out).

It’s horrible that this ancient tree burned, but it’s amazing that a clone existed.  I wonder if people will visit “The Phoenix” far in the future and think about the 21st century, just like I sometimes think about the time 3500 years ago when The Senator first grew.

Thanks for stopping by and reading my blog. Now – go make some photos.
©2013, Ed Rosack. All rights reserved

Merritt Island – March 26, 2013

I saw an interesting article in the New Your Times this week confirming what I feel:  Spending time out in nature can improve your mind.  It’s called “Easing Brain Fatigue With a Walk in the Park” and references a study published this month in The British Journal of Sports Medicine.  (I hope you can read the NYT article – I’m not sure how their pay wall works.)  The study measured volunteer’s brain waves as they walked along a path through three parts of a city.  Then they looked at the recorded patterns for signs of frustration, agitation, attention / engagement, and calmness.  The portion of the path through a park engaged the people’s attention while at the same time increasing their calmness.  The urban portions of the walk increased their frustration.  The moral of the story (at least for me):  Spend more time with nature, and wildlife.

I increased my engagement with nature and my calmness this week by visiting the Merritt Island National Wildlife Refuge.

I stopped first at Kars Park.  I hadn’t been there before and wanted to scout it as a sunrise spot.  I also hoped I could see / photograph the cruise ships at Port Canaveral from there.  They should make a good subject when they’re lit up in the dark.  I arrived before dawn and found a pier, but didn’t really like the results and moved on.  I’ll have to try again some time.

On the way to MINWR I noticed clouds developing on the horizon.  They were pretty enough to make me pull over for this photo:

Pretty clouds
Pretty clouds – My sunrise photos didn’t come out so well, but the light was interesting a little later in the morning.

Turning in to Gator Creek Road, I spotted an Osprey in a dead tree.  I crept up slowly, stayed in my car, and tried not to disturb it.  It gave me a few hard looks but kept eating and was still there when I left.

No sushi for you!

No sushi for you – An Osprey with breakfast along Gator creek Road. It watched me as I drove slowly by and didn’t seem to want to share.

A little further on, I ran into this pair, also enjoying breakfast:

No sushi for you! 2
No sushi for you! (2) – A pair of eagles. They didn’t look like they wanted to share their meal either. I enjoyed watching them for a while and when they finished eating they flew away together – so I’m pretty sure they’re a couple.  I’d like to go back to the area to see if I can get a better photo.

After Gator Creek, I took a turn around Black Point Wildlife Drive.  It was pretty quiet but I did see a few of the regular birds (Great Blue and Tri-colored Herons, Great and Snowy Egrets, Black Skimmers, Gulls, Mottled Ducks, Terns, Scaups, etc.).

My last stop was the Bairs Cove boat ramp.  I wanted to check out a new kayak launch area just across Haulover Canal from there.  On the way in to Bairs Cove I noticed an isolated tree on the left and made a quick photo.  As I drove around the boat ramp parking area I kept thinking about the scene.  Something was very appealing and I didn’t want to get home without a good image of it, so on the way out I stopped again and made this more careful photo.  It’s two IR, HDR images arranged so I could stitch a vertical panorama to get this square format result.

A tree along the road to Bairs Cove

As usual, my visit to MINWR was very enjoyable – and engaging, and calming.  Click on the photos above to see larger versions.  You can also see more photos from MINWR in this set on Flickr, and Black Point in this set.  And I have many older posts about MINWR  – you can look through them from this link.

Thanks for stopping by and reading my blog. Now – go make some photos!  And by the way, Happy Easter!

©2013, Ed Rosack. All rights reserved.

A few photos from St. Augustine

I visited St. Augustine, Florida last week with fellow Photography Interest Group member Tom M. It’s a high density photo-op  environment and if you haven’t ever been there you really should go.  We only spent a few hours, but we saw interesting things to photograph almost everywhere we looked.  Here are a few examples:

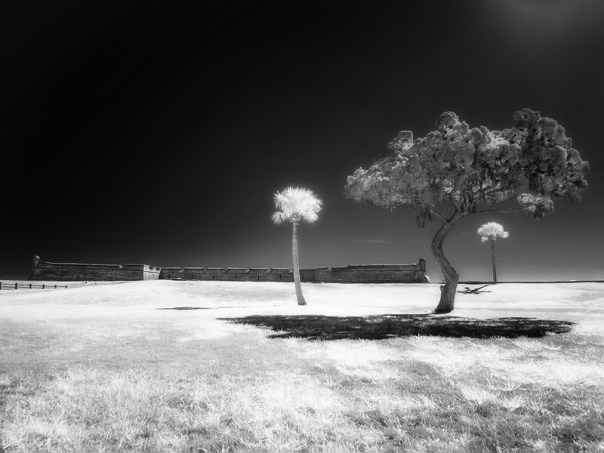
Three trees, their shadows, and the Castillo de San Marco
Three trees, their shadows, and the Castillo de San Marcos

Bottoms up
Bottoms up – The St. Augustine Lighthouse staircase

Alcove in the Cathedral Basilica of St. Augustine

Whistling waters
Whistling waters

I’ve written about this town several times before. You can browse through those posts by selecting the category from the pull down on the right (or click this link). And you can visit this set on Flickr to see other images from St. Augustine.

Thanks for stopping by and reading my blog. Now – go make some photos!
©2013, Ed Rosack. All rights reserved

Long exposure at Lake Eola

Deborah Sandidge and Jason Odell led a sunset photo walk around Lake Eola in downtown Orland on Friday evening.  I’ve followed their work online and wanted to meet them, so I signed up.  Conditions weren’t the best for sunset photography, but I still had a good time.  I used a neutral density filter to make several long exposure photos and I thought I’d walk you through my process.  First of all, here’s the final version:

Lake Eola - Orlando, Florida
Lake Eola – Orlando, Florida.  Long exposure, cloudy, sunset. You can click on this image to see a larger version on Flickr.

And here’s the initial version of this photo:

-_D8C7377- Ed Rosack

f/8, 25 seconds; after initial adjustments in Lightroom.

Here are the steps I went through to get to the final version:  First, I corrected the distortion to make the buildings vertical in Lightroom.  Then I edited it in Photoshop.  I used content aware fill to finish the vertical distortion fix, then added a layer and masked out noise from darker areas.  Finally, I ran the single image through Nik HDR Efex Pro 2 to enhance color, contrast and details.  Back in Light room again, I finalized exposure, contrast and white balance and applied sharpening and a small amount of vignette.  I like how it came out.
For comparison purposes, here’s a 1/20 second exposure of the same scene.

-_D8C7376- Ed Rosack

f/8, 1/20th second; Same initial adjustments as the version above.

Looking at the long exposure version, the main differences I see are:  the smooth sheen on the water surface, the much more prominent tree shadow in the lower right, and the radial motion blurring in the clouds.  The tree shadow surprised me the most.  In the short exposure version, the water ripples break up the shadow.  They don’t in the long exposure version, which makes the shadow much more interesting.

There are lot of upsides to long exposure photography and a few downsides.  For instance, since the wind was blowing so hard on Friday, some of the smaller tree branches are a little blurry.  Also, when you use very dense neutral density filters, your camera probably won’t auto expose or auto focus correctly, so you’ll have to take care of those things on your own.  And some of these filters can also add a color cast to your photos, so you may need to be careful with your color balance.  But all in all, it’s a great technique to have in your bag of tricks.  Have you tried it yet?  Why not?

You can see more photos from Lake Eola in this set on Flickr.

Thanks for stopping by and reading my blog. Now – go make some photos!

©2013, Ed Rosack. All rights reserved.

Digital Infrared Photography – a post processing example

Introduction

If you’ve read through my blog or looked at my photostream on Flickr, you’ll already know that I enjoy black and white photography and occasionally post B&W images. Removing color from a scene abstracts reality – and emphasizes shapes, composition, and texture. The image becomes a bit unreal, but since we’re used to B&W  – not too unreal.  This makes B&W a great way to make your images stand out.

Another way to make your images stand out is by using infrared (IR) film or an IR modified camera:

  • IR captures a portion of the spectrum of light that’s different from what your eyes can see.
  • The spectral response makes blue sky look dark and foliage bright.  This reverses a normal daylight scene’s brightness values, helps tame contrast, and allows you to shoot even when the sun is high in the sky.
  • You can interpret this alternate version of reality by processing your IR photo as B&W or various types of false color images.
  • IR can sometimes also capture details that aren’t seen with visible light.
  • If you use a modified digital camera, you may see improved detail in your photos, since the conversion process removes the anti-aliasing filter that most digital cameras use to slightly blur the image during capture (and remove Moire patterns and other aliasing artifacts).

I’ve gotten some questions about my infra-red images.  And I haven’t written anything about technique recently, so in this post, I’ll go into detail about a recent IR image I made.  I’m relatively inexperienced at this, but as a IR n00b I’ve learned a few things that may come in handy if you want to try it.

Messy knees

Messy knees:  Cypress trees on the south shore of Lake Jesup.  Cypress trees and their roots are good subjects, especially along the water where they’re usually found. The light hitting these tree trunks and the Spanish Moss also caught my eye.  I’m still playing around with infra-red. There’s a range of post processing options available. I was hoping that this false color version looks just alien enough to make people take a second look.  Click here to view a larger version of this photo on Flickr.

Camera

I use an Olympus E-PL1 modified for IR by http://www.lifepixel.com/ and I’m very pleased with the result.

Using a micro 4/3 camera has advantages for IR:

  • Older models like the E-PL1 are relatively inexpensive;
  • They have a large sensor (compared with compact cameras) which helps image quality;
  • They use the sensor for contrast type focusing so there are no focus calibration issues that can occur in a DSLR
  • Most have RAW format capture available

Settings

I shoot in RAW, not jpeg.  For IR, it would be tough to get all the settings perfect in camera.  Plus, there are a lot of post processing options which you’d give up if you only capture jpeg.

White balance is one thing that you should set.  If you shoot in RAW, white balance can be adjusted in post processing.  But setting a white balance in camera is important since it lets you judge your shots on the LCD screen as you take them.  Unless you set a custom (preset) white balance all IR images would look very red. On my E-PL1 I use a temperature setting of 2000K which is as low as it will go.  This camera has no tint adjustment, so photos still look blue, but it’s good enough for judging exposure.

Workflow

Here are 7 versions of this photo that show the processing steps I went through along the way.  Don’t be alarmed – this is quicker and easier than it sounds.

This is the RAW photo straight out of the camera. My custom white balance adjustment isn’t able to completely correct the IR spectrum so there’s a pronounced bluish tint.
This is the image after white balance and levels adjustment in Photoshop. Other initial adjustments in LR or Photoshop may include a bit of noise reduction, lens corrections (if available), cropping / straightening, and spot removal.
In this version, I’ve used several copies of the same scene (shot from a tripod) to smooth the water’s surface and make the trees / knees stand out more.
This version has a Channel Mixer preset adjustment layer (red and blue colors swapped).  Debra Sandige’s IR page (listed in the references below) has  detailed steps on how to do this in Photoshop.
A Hue / Saturation / Brightness adjustment layer was used to modify the Hue in the cyan and blue channels so it looks a bit more natural.
This is after final adjustments in Lightroom: clarity(+47), vibrance (+24), medium contrast tone curve, sharpening with edge mask.  (note: this is the same image as at top of post).
For comparison, a black and white conversion of the final false color image.  I like the false color version better.

References

You can find out more about Infrared photography at these places:

  1. This Wikipedia article has some background information on infrared photography – especially film techniques.
  2. I had my camera converted by LifePixel and was extremely pleased with the result.  They have a huge amount of IR information including tutorials, FAQs, and a blog on their website.
  3. I read and enjoyed Debra Sandige’s recent book about IR photography. She’s very creative and presents a lot of good information.  She has a page on her website with IR information.
  4. Lloyd Chambers also has an intro to infra-red on his site and offers a paid site with more info.
  5. The Khromagery website has several good articles on IR cameras and processing.  They also offer an IR Photoshop action as a free download.

Conclusions?

So, is IR an infatuation? Will I use it for a while and then let it fade away? Will I only bring it out for special photo ops as inspiration? Will it take over my photo life to the exclusion of all other approaches? Who can say? You’ll just have to keep reading my blog and see what happens. Along with me.

You can visit my IR set on Flickr to see more examples of what I’ve done.  What do you think?  Is IR photography something you’d like to explore?

Thanks for stopping by and reading my blog. Now – go make some IR photos!
©2012, Ed Rosack. All rights reserved

[Additional info, added 1/24/2014]:

Mount Evans Redux

I’ve been to Mount Evans before and written about it here.  I got a chance to go back this week and my second visit was as good as the first.  Maybe even better, since I showed this wonderful place off to Sara, Mike, and Julie.

The highest paved road in North America starts in Idaho Springs, Colorado and winds for 28 miles around tight switchbacks to an altitude of just over 14,100 feet.  There’s a small parking lot near the summit, and a short (but vertical) hike to the very top at 14,270 feet.  The road is quite narrow in spots, and is exciting or scary depending on your attitude and its altitude / slope.  There are many places to pull over that offer outstanding views of the surrounding landscapes and wildlife.

Bristlecone pine
Bristlecone pine:  This species of tree is the longest lived single organism on earth

Take I-70 west from Denver and exit at County Road 103.  The first half of the drive from there is pretty but not too out of the ordinary.  The fee station is around the halfway point, and this is where most of the excitement begins. Pick up a brochure so you’ll have a map and information about the park.

Both times I’ve gone have been in early July so I can’t say much about the rest of the year.  Try to visit on a weekday to avoid crowds, and if you can’t go on a weekday – leave early.  The only day we could drive up was the 4th, so we left around 7am.  When we asked the ranger at the fee station, he said it wasn’t crowded yet but would be, and recommended we go up to the top and stop at places on the way down.  If you don’t, you might not get a parking spot – they get very limited at the top as the day goes on.  We saw lots of cars headed up as we were leaving.

Wildflowers are abundant in July.  Even above 14,000 feet where the terrain seems barren – you can see flowers in between the rocks.  July is also a great time to view wildlife.  On this trip we saw a Deer, Chipmunks, Elk, Mountain Goats,  Marmots, and a Pika.

Baby mountain goat
Baby mountain goat –  There were several families of mountain goats near the summit.  This little one posed for me so I could frame him against the out of focus mountains in the background.  It’s amazing to watch them scramble from rock to rock and never slip.

Pair of Marmots
Pair of Marmots

At the summit, the average summer temperature is ~44 degrees (F) and the average wind is ~30 mph, so we were particularly blessed with a low temp of 55 and very calm winds.  The winds were so calm that on the way down we decided to stop and hike to a couple of pools of water, hoping for a photo of the clouds reflecting in the ice melt.  It seemed like a really short hike downhill from the road to this pool.  When we turned around to go back uphill, the car looked really, really tiny and far, far away.

Catch pool reflection
Catch pool reflection and Mike admiring the view

If you’re ever in the Denver area, you just have to visit Mount Evans.  It’s spectacular and very accessible.  Flatlanders like me shouldn’t do the trip on their first day at altitude.  I’m not in the best of shape and at 14,000 feet I found I was out of breath even after short walks.  A few days to acclimate at around 5000 feet may have helped.

Click on any of the photos above to go to Flickr where you can see a larger version.  You can see the rest of my Mount Evans photos from this trip here, and you can see photos from my earlier trip here.

Thanks for stopping by and reading my blog. Now – go make some photos!
©2011, Ed Rosack. All rights reserved