Tag Archives: black and white

A Motionless Marina Morning

The wind’s often calm before dawn (maybe this is why: https://www.chicagotribune.com/weather/ct-wea-1220-asktom-20151218-column.html). When you’re photographing around boats, even calm winds can move the mast tips (or the hulls) enough to blur them in a long exposure. But that wasn’t happening that morning at the Sanford Marina.

Glassy HarborGlassy Harbor (24mm, f/5.6 @ 25s, ISO 100).

My weather app said the wind was 2 mph – about as calm as it gets. Very good for low light photography. Not so good for keeping biting insects away, but artists have to suffer, right?

Paddle wheel and yachtsPaddle wheel and yachts. I Like the juxtaposition of the aft end of the St. Johns Rivership Company’s Barbara Lee with the modern yachts. (34mm, f/11 at 15s, ISO 100)

If the wind’s smearing your subjects, you can try making an extra frame at a higher ISO value to increase your shutter speed. Then you can blend the water and sky from your long exposure frame with the faster shutter speed frame to reduce bluring. But it’s not ideal: the higher ISO may reduce image quality and blending can be tricky with moving subjects. I’m glad I didn’t have to do that for these – things were stock-still!

Peaceful HarborPeaceful Harbor (24mm, f/5.6 @ 25s, ISO 100).

By the way, I was going to call this “Minimal Motion Marina Morning” but that seemed like too much alliteration, even for me.

Thanks for stopping by and reading my blog. Stay positive, be kind, take care of yourselves and each other. And if you can, make a motionless photo!

©2022, Ed Rosack. All rights reserved

More from Wayside Park

Since I hadn’t gone through my photos from that morning in Sanford, Florida, I used an iPhone image I like from under the bridge at Wayside Park for last week’s blog post. I’ve processed the others now and have several more that I’m partial to.

This is on the old bridge that you could see on the right hand side in the previous blog (https://www.flickr.com/photos/edrosack/52187355071/in/dateposted-public/). I like the low viewpoint, composition, and tones.

Old BridgeOld Bridge (July 2022)

For comparison purposes, here’s another photo I made in almost the exact same spot back in 2013. There have been a few changes in the vegetation and the bridge structure. (And the photographer too!)

The old bridge over the St. John's RiverThe old bridge over the St. John’s River (October 2013)

And finally, when I thought I was finished at this place, I walked to the end of the bridge to look around. For some reason I didn’t do that in 2013. I’m glad I did this time, because the scene was pretty pleasant!

A quiet morning on the St. Johns riverA quiet morning on the St. Johns river. Looking South East toward Lake Monroe

For those of you viewing this on the web, the header image is a small portion enlarged so you can see the person fishing on the dock. They didn’t catch anything while I watched, but I’m guessing they still enjoyed the morning as much as I did!

Thanks for stopping by and reading my blog. Stay positive, be kind, take care of yourselves and each other. And if you think you’re done, walk a little farther – you might be pleasantly surprised and make a nice photo!

©2022, Ed Rosack. All rights reserved

A Stroll in the Dark

I wanted to check on the Osprey nest in downtown Winter Park, Florida. I decided to leave (very) early so I could also make some night time / low light photos in the area. I’ve done that before (see: /https://edrosack.com/2015/10/03/winter-park-at-night/). Here are a few of the results from this time.

Colony Theater BuildingColony Theater Building

The Colony Theater on Park Avenue in Winter Park Florida first opened in 1940. Matinees during WW II cost 39 cents. The theater closed in 1975 and was converted to retail space (see winterparkmag.com/history/). It’s still photogenic. This is a single frame (ISO 100, 26mm, f/8 @ 3.2 sec.)

Bright blooms at nightBright blooms at night

When I saw that planter in full bloom in front of an interesting building across the street, I knew I had to make a photo. But I wanted everything in focus and both the flowers and the building / lights well exposed. I made three frames: one focused and exposed for the flowers (ISO 100, 35mm, f/8 @ 20 sec.) and two more focused on the building (ISO 100, 35mm, f/8 @ 10 sec. and 4 sec). I did an HDR blend of the building exposures in Lightroom, and loaded the result along with the flower exposure into separate Photoshop layers. There, I aligned and masked the sharp flowers into the building layer. It took a few minutes, but I like the result.

Almost emptyAlmost empty

This one is a three frame exposure bracket (ISO 100, 24mm, f/8 @ 4, 10, and 20 sec.). I first called it “Empty street”, but then noticed the three ghostly figures and changed the title. The header image in this web post is an enlargement of the center.

Very early trainVery early train

I set up and made a test shot while I waited for a train to come through (ISO 100, 53mm, f/7.1 @ 25 sec.). I wanted a long exposure to show a lengthy train streak. When I looked at the image later on my computer, I didn’t like the way the train headlight changed the lighting on the trees, so I ended up using the test frame as the base image and blending in the train streak from the other frame. I’m glad I had that test shot to use!

Anyway, I like how these turned out and I thought maybe you’d be interested in a brief overview of how I made them. And by the way, Momma Osprey was on the nest but I don’t think any chicks have hatched yet. I’ll try to go back and get some photos of them.

You can review my other posts about Winter Park here: https://edrosack.com/category/photo-ops-in-florida/winter-park/. And you can view other photos from there in this album on Flickr: https://www.flickr.com/photos/edrosack/albums/72157636838442164/with/10424895284/.

Thank you very much for stopping by my blog! Your visits, comments, and likes are always welcome and a big motivator for me. Stay positive, be kind, take care of yourselves and each other. And if you can, make some photos!

©2022, Ed Rosack. All rights reserved

Mostly Shorebirds

Our weather’s been interesting – lots of rain and warmer than expected. Between that and other obligations, I’ve had a hard time practicing photography. Checking the forecast late on Thursday night, Friday looked like it would be halfway decent so I jumped at the chance to head out.

There were a few rain drops falling at first and it was overcast. But that made for some dramatic clouds when I stopped by the marina.

Impressive clouds over the marinaImpressive clouds over the marina

Later on it turned into a pretty nice day. I spent some time around Parrish Park watching all the shorebirds.

I like photos like this next one. Getting a flock of birds close by with a fast enough shutter speed and in focus isn’t easy though. This time most of the birds listened to me when I asked them to all fly by at the same distance!

A "grain" of SanderlingseeA “grain” of Sanderlings

I drove slowly along the shore and stayed in the car trying not spook the birds. I spotted several different ones and worked to isolate each one in the frame:

Semipalmated PloverSemipalmated Plover

Ruddy TurnstoneRuddy Turnstone

Dunlin Dunlin

MINWR was quieter than last time I was there. But shore birds were out over there too.

Lesser YellowlegsLesser Yellowlegs

I was sitting at this next spot when MaryKate called. The Killdeer were so loud she heard them through the phone and asked about them.

Killdeer Killdeer

Thistles are blooming on Black Point. They’re attractive photo subjects if you catch a colorful one in good light. A bee or butterfly helps too.

Busy beeBusy bee

There were other birds and wildlife around: the regular wading birds (herons and egrets), Alligators, Belted Kingfishers, Northern Shovelers, Blue-winged Teals, Caspian Terns, Black Skimmers, and I’m sure others that I missed. I also spotted a different looking hawk that the Merlin Bird ID app thinks is a Swainson’s Hawk (I’m not convinced).

Anyway, it was a wonderful visit and a very nice distraction from current events.

You can click on these photos to view larger versions on Flickr.

Thanks for stopping by and reading my blog. Your visits, comments, and likes are always very welcome and a big motivator for me. Stay positive, be kind, take care of yourselves and each other. And if you can, practice some photography.

©2022, Ed Rosack. All rights reserved

Black and White Light

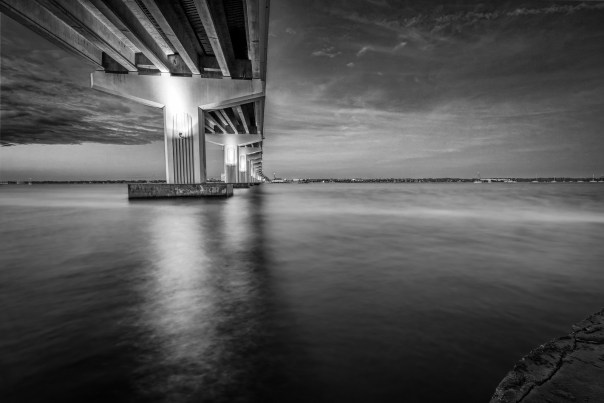
I’ve written a bit about this before (see #2 in this post: https://edrosack.com/2020/06/28/black-and-white/), but I don’t think I’ve ever explicitly revealed the secret.

Here’s the finished photo:

Under the bridgeUnder the bridge(click to view larger on Flickr)

I like it and the Flickr folks seemed to like it too. It’s a two frame composite blended from these images:

Image 1, exposed for the water: ISO 100, 16mm, f/11, 13s
Image 2 – exposed for the sky: ISO 100, 16mm, f/11, 2.5s

I think the the subject and composition are nice, but the mixed natural light and bridge lighting are too different. I could have tried to use selective white balance (see: https://edrosack.com/2011/10/30/using-selective-white-balance-to-fix-problem-photos/) to fix this, but I think it would have been hard in areas where the colors overlap.

Anyway, today’s secret is that wild lighting can look a lot better in B&W. The Lightroom B&W conversion tool has sliders to adjust the intensity of eight different colors in an image. Wide color differences in the photo combined with all that control gives you a lot of variability and choice when converting to B&W. To me, the B&W lighting in the finished version is much more attractive than the original colors.

Thanks for stopping by and reading my blog. Your visits, comments, and likes are always very welcome and a big motivator for me. Be kind, take care of yourselves and each other. And if the light is wild, make some B&W photos.

©2022, Ed Rosack. All rights reserved

So long IR, and thanks for all the memories

I’ve been interested in infrared photography for a long time. I first attempted it sometime in the 1980s using black and white IR film. The results weren’t very good. Focus and exposure using IR film was a challenge back in ancient times.

One of my first digital cameras was a Minolta DiMage 7Hi and in 2003 I tried again with an IR filter on the lens of the unmodified camera. The dense filter required long exposures on a tripod even in daylight. I hadn’t mastered RAW file processing and was using jpg format which didn’t help. But results were better than 1980s film!

2003: An Oak tree, Oviedo FL – B&W 49 IR filter on an unmodified Minolta DiMage 7H camera, 4 sec @ f/8 ISO 200

In 2011 I started researching IR modified cameras and ended up sending my Olympus E-PL1 off to have its IR blocking filter replaced with one that passed IR light and blocked normal visible light. That was a big step forward. Focusing just worked and exposures were similar to those on an unmodified camera. I made the image below from a small boat and it would’ve been very difficult with a dense filter and 4 second exposure!

Blue Cypress Lake2012: Blue Cypress Lake, Fellsmere FL – IR modified Olympus E-PL1, 1/250 sec @ f/5.6 ISO 100

In 2013, I traded up to an IR modified Olympus E-PL5 to take advantage of the lower noise and additional resolution.

A calm day on Jordan Pond2014: A calm day on Jordan Pond, Acadia National Park, Maine – IR modified Olympus E-PL5, 1/200 sec @ f/5.6 ISO 200

Then in 2017 I bought a second hand IR modified Olympus E-M5 MII and sold the E-PL5. The E-M5 MII was a bit better and had a hi-res mode which I used frequently.

Wetlands view2019: Wetlands view, Merritt Island National Wildlife Refuge – IR modified Olympus E-M5 MII, 1/1600 sec @ f/3.5 ISO 200

In late 2021, I decided to sell the E-M5 MII. I hadn’t been using it much. Packing the extra camera, lenses, batteries, chargers, etc. was a hassle. And remembering how to use another camera system isn’t easy when you don’t use it very often. Now, if I want to do any B&W photography I have to use one of my non-IR cameras.

Along the shore2022: Along the shore, Merritt Island National Wildlife Refuge – unmodified Fuji X100V, 1/140 sec @ f/8 ISO 160

For all except the first, I started with the original RAW file and processed them with my 2022 current work flow and software. You can click on the last four to see higher res versions on Flickr. And I’ve collected many IR photos in this album: https://www.flickr.com/photos/edrosack/albums/72157628062119778

It has been a long journey with infrared. Am I done with it? It seems so, but who knows? Not me!

Thanks for stopping by and reading my blog. Your visits, comments, and likes are always very welcome and a big motivator for me. Be kind, take care of yourselves and each other. And if you can, make some photos – you’ll cherish the memories!

©2022, Ed Rosack. All rights reserved

Lightroom Masking Changes

Back in October, Adobe changed the way masking works in Lightroom and Camera RAW. I was a little irritated at first. The new interface was unfamiliar and I didn’t know how to do things I was used to doing with the old version (the radial and gradient tools). How dare they “move my cheese“?

Anyway – I’ve been using it since, have figured it out, and now like it much better than the older approach. The AI based capabilities (select sky and subject) are awesome and work pretty well. And the re-organized interface combines all of the masking capability into one place with very helpful ways to combine selections.

I won’t try to explain how to use the new tools. There’s a lot of info on the web about it. Here’s one tutorial that’ll get you started: https://digital-photography-school.com/lightroom-masking-tool/.

Instead, I’ll show you an example of how I processed an image using the tools. This one is from Merritt Island and it’s been sitting un-processed in my archives since 2016. Once I started working on it, I wondered why I’d left it sitting there for so long! This is the finished version:

Another morning in the marshAnother morning in the marsh

And now, here are the four different masks I used in the final stage of processing:

Mask 1: Some areas in the clouds were too bright. I reduced highlights and bumped up texture and clarity.
Mask 2: I also lowered highlights in the corresponding reflection so they better match the sky.
Mask 3: The trees on the right were very dark, so I increased shadows there to bring out more detail.
Mask 4: And finally, the clouds on the left were a bit dark. I increased the exposure there by about 1/3 stop. This one is a radial filter intersected with a dark luminous range.

Here’s a before / after slider that shows the effects of the mask adjustments.

Comparison slider: Before (left) and after (right) masking. The changes aren’t all that dramatic, but I think they help.

So that’s my example. If (like me) you were a little put off by these changes, I’d encourage you to have another look. It’s worth the effort to master them. The control we have with digital capture and processing is just amazing when you think about how hard this would be to dodge and burn using film in an actual darkroom.

You can see a higher resolution version of this photo on Flickr at this link: https://www.flickr.com/photos/edrosack/51720541937/in/dateposted-public/lightbox/

And you can see many more of my black and white photos in this album: https://www.flickr.com/photos/edrosack/albums/72157625316775091

Thanks for stopping by and reading my blog. Please be kind, take care of yourselves and each other – and if you can, get out and make (and mask) some photos!

©2021, Ed Rosack. All rights reserved

Get there early (or stay late)

I’ve been an early riser for a long time. I used to be at work before others and got a lot done before they showed up. I thought that would change when I retired, but the habit stuck with me.

I’m still up way before sunrise almost every morning. It’s an asset for landscape photography. I get to places when it’s still dark and things (and photos) look different.

Too early at the boat rampToo early at the boat ramp

When I start early, I can go to more places. I’ll continue making landscape photos in different spots as I look for wildlife and the light changes. So I usually come home with a number of landscape images. These two very different photos are from the same trip.

Catfish Creek Trail Catfish Creek Trail

Getting there early gives me extra opportunities. It doesn’t work all the time or for everyone. It’s not the best approach for sunset and late night photography – but staying up late is. If you like to sleep in, you’ll need to apply my “too early” strategy in reverse and stay a little later after sunset. And if If you’re lucky enough to be at one of your “bucket list” locations, you’ll probably want to get set up and wait for the best light before you start moving around like I do.

Thanks for stopping by and reading my blog. Please be kind, take care of yourselves and each other – and if you can, get out early (or stay late) and make some photos!

©2021, Ed Rosack. All rights reserved

MINWR: Oct. 18,2021

Our weather here in Central Florida is finally starting to cool off a bit. I could definitely feel a difference when I set out for Merritt Island National Wildlife Refuge early last Monday. And the high temperature reached just 81ºF later that day. Our forecast for next weekend predicts highs in the mid 70s – the beginning of a very nice time of year!

Anyway, I came home with a number of photos I really like. This week I’m going to go way over my usual photo quota and share many of them. First, a couple of landscapes

Beneath the bridge at daybreak Beneath the bridge at daybreak: This is along side the A. Max Brewer Causeway, looking east into the refuge, about a half hour before sunrise.

Around the shore Around the shore: Pretty light and calm water along Gator Creek Road, about 15 minutes before sunrise

Next, some visitors. As pleasant as the cooler temperatures are, they also mean it’s time to start looking for some of our winter bird friends and I spotted several on my trip.

Palm Warbler Palm Warbler. They can be a little jumpy and hard to photograph. But this one sat still for a moment on an interesting and close perch, in nice light, with a good background. Doesn’t happen very often for me – I’m glad it was briefly cooperative.

Adopt an Area Adopt an Area: This Eastern Phoebe has adopted the refuge for a while.

Blue Wing Teal Blue Wing Teal: A few ducks have started to show up too.

Of course we also have many of our normal residents around.

Bottlenose Dolphin Bottlenose Dolphin: The Dolphins and the Brown Pelicans were chasing plentiful fish in Haulover Canal

The header image is a of a Brown Pelican that just caught a fish in the canal. It’s not that good of a photo, but I kept it because it shows an interesting moment in nature’s circle of life.

Posing Anhiga Posing Anhiga: Anhigas are very common here but still well worth photographing when they pose against such a nice background in morning light.

Dragonfly Dragonfly: These can be skittish too, but if you see one in pretty light, be patient and still. Often they’ll return to the same perch and you can squeeze your shutter button.

I saw other birds on this trip, including Great Blue and Tri-colored Herons, Great and Snowy Egrets, White and Glossy Ibis, Ospreys, Belted Kingfishers (sorry couldn’t get a photo), Pied-billed Grebes, Mourning and Common Ground Doves, and others I’m forgetting. I also used the Merlin bird app a couple of times to listen to bird calls. It ID’d a Black Scoter. Those have been spotted before at MINWR, but I wasn’t able to find it to confirm.

I haven’t mentioned this in a while, so I’ll bring it up again: You can find out what birds are in an area on the ebird website: https://ebird.org. Their page for MINWR is here: https://ebird.org/barchart?byr=1900&eyr=2021&bmo=1&emo=12&r=L123565 and it shows what species are seen there during each month of the year – a fabulous resource!

You can click on each of these photos to see larger versions on Flickr. And I have a huge collection of MINWR images in this album: https://www.flickr.com/photos/edrosack/albums/72157627776386723


Changing the subject #1 : This week, Go take a look at Diane’s Swamp Sunflower post: https://lavenderdreamstoo.blogspot.com/2021/10/in-search-of-swamp-sunflower.html. She spotted them near the Pruitt Trailhead at Halpata Tastanaki Preserve and along the Marjorie Harris Carr Cross Florida Greenway trail. Wonderful photos Diane!


Changing the subject #2 : Halloween is next weekend so here’s one more photo from last Monday that fits with the holiday:

Web and Mangrove Web and Mangrove

Okay – I think that’s a long enough post for today! Thanks for stopping by and reading my blog. Please take care of yourselves and each other. And if you can, get out and see some nature. And make some photos!

©2021, Ed Rosack. All rights reserved

Planning or Luck?

Ansel Adams is known for his pre-visualization approach to photography.

“The term [pre]visualization refers to the entire emotional-mental process of creating a photograph”

“It’s not what you see, it’s what you want me to see”

Ansel Adams

Having deliberate control of all parts of the photo capture and printing processes allowed him to create wonderful images. We can’t be Ansel Adams, but we can continue learning so that we gain as much control as possible in our own photography.

Embrace your craft.  Study it.  Understand it.  Practice it.  Select a subject. Compose and expose. Process and print. Use all your skills to control the light you capture. It’s a life long activity that you’ll never completely master.

But sometimes the subject and light find you. When this happens, be ready. If you are, you can use all of your acquired skills to make a photo showing what you want people to see. Ansel also said:

“Sometimes I arrive just when God’s ready to have someone click the shutter”

Ansel Adams

A while back over in Merritt Island National Wildlife Refuge, I saw this scene developing and really liked the way the sun was shining through the backlit clouds. I quickly searched for some foreground and found a pool of water reflecting the sky. I made a set of four frames that I could stitch into a vertical panorama.

Wetland Weather Wetland Weather

Later on the computer, I had to solve issues with stitching, exposure, and focus but luckily I knew what to try and had the tools to do so. Of course, it’s not Ansel Adams level photography – but I’m very pleased with the result.

What kind of photographer are you? Do you pre-plan / visualize all of your photos? Or do you wander around and photograph what nature presents? Which approach gives you the best results? Which gives you the most pleasure:  A carefully controlled composition that comes out exactly like your vision?  Or a serendipitous image that came out well when you tried something new?

Luck is good.  Preparation is good.  Being prepared when you get lucky is better.

“Chance favors the prepared mind.”

Louis Pasteur

Thanks for stopping by and reading my blog. Please take care of yourselves and each other. And if you can, be ready – and make some photos!

©2021, Ed Rosack. All rights reserved