Using aperture brackets to overcome blur and diffraction

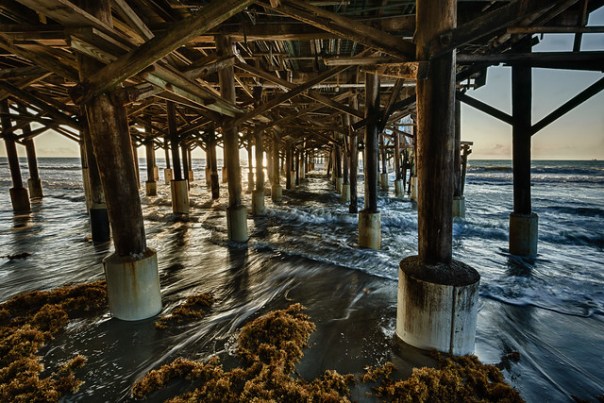
I finally made it over to Cocoa Beach in time for sunrise yesterday morning:

Sunrise by the Cocoa Beach Pier

Sunrise by the Cocoa Beach Pier

In this photo, I wanted to use a long shutter speed to blur the water and show wave motion.  I set the slowest ISO my camera supports (50), added a 3 stop neutral density filter, and used an aperture of f/22 which gave me a shutter speed of 2 seconds.  I would have liked even longer, but this was as slow as I could get it under these conditions.  I think the water came out pretty well.

As I made the exposure, I worried about two things:  1) Such a tiny aperture would lead to diffraction and blurring of small details and 2) Such a long shutter speed would add motion blur where I didn’t want any (boats and people).  So how could I overcome this?

I was shooting in aperture priority mode and my camera was locked down on a tripod.  So I made a second exposure at f/4 and let the camera set a shutter speed of 1/15 second.  Normally when you bracket, you’re trying to change the exposure (or sometimes white balance or focus).  This time, I was trying to bracket the aperture / shutter speed I was using, but keep the exposure constant. Having a second exposure let me load both images as layers in Photoshop.  Then I used a layer mask to show the first exposure for the water in the lower part, and the second exposure for the upper area including the boat and pier.  This let me have motion blur where I wanted it and still keep sharpness in areas where I wanted that.  I think the technique worked pretty well.  What do you think?  Have you ever tried this?

Thanks for stopping by and reading my blog.  Now, go make some photos!

©2012, Ed Rosack. All rights reserved.

Return to Animal Kingdom

We had family in town last weekend and they invited Lynn and I along on their visit to Disney’s Animal Kingdom.  I’ve blogged about this place before (here and here) and this was a chance to return and see if I still liked it as much as last time.

Yes, I did.  I can confirm that Animal Kingdom is still the nicest zoo I’ve ever been too.  It’s enhanced by the rides and shows, and seeing it with our young nieces and nephew makes it an even more wonderful experience.

Here are a few scenes from the trip.  You can see more photos (and larger versions of these) in this set on Flickr.

Male Silverback Gorilla holding grass
Male Silverback Gorilla holding grass. In the gorilla enclosure on Pangani Trail at Disney’s Animal Kingdom

American Crow
An American Crow enjoys a stolen onion ring

Hibiscus
Hibiscus

Thanks for stopping by and visiting my blog.  Now, go make some photos!

©2012, Ed Rosack. All rights reserved.

Central Florida Bird update

The spring migration has made the last few weeks an intense time for birding in Central Florida.  There was a fall out in Fort Desoto in late April where my friend Kevin M.  sighted 110 different bird species in one day!  As those migrants moved on, other locations have also seen a few visitors, especially smaller birds.

The activity at Black Point Wildlife Drive in Merritt Island National Wildlife Refuge, Orlando Wetlands Park, and Viera Wetlands is slowing down now from the peak nesting and breeding season.  Most of the young ones are hatched, grown, and fledged, although you can still find some amazing sights such as a White Eyed Vireo nest next to the boardwalk at the MINWR visitors center.

At BPWD the water is quite low.  We found some concentrations of birds in a few of the areas that did have water including Redish Egrets, Roseate Spoonbills, Great Egrets, Little Blue Herons, etc.  There are also some juvenile Green Herons in the bushes by the rest rooms.  But the ducks seem to be mostly gone – even the moorhens and coots.  And we haven’t seen any Kingfishers lately either. We did see an Eastern Kingbird on BPWD, and a Northern Parula and Grey Catbird at the visitor center.

Wading Roseate Spoonbill
Wading Roseate Spoonbill – feeding at BPWD

Orlando Wetlands is quiet too – both people and birds.  I was the only visitor when I went by last Thursday morning.  I saw a solitary Swallow-tail Kite fly by briefly (too fast to get a photo).  And there were plenty of Black-Bellied Whistling Ducks, some hawks, limpkins, herons and egrets – but again the most of the ducks seem have gone elsewhere.

Mom and kid Limpkin on a sunrise stroll

At Viera Wetlands we saw a few of the usual birds and there are still some GBH juveniles on nests.  Terns and Ospreys were putting on a fishing demonstration.  It’s fun to watch this behavior and it’s a good situation for Birds in Flight practice.

Blue Heron Portrait
Blue Heron Portrait

And even if the birding is slowing down, you can always find some landscape photo ops around the area.

Drippy
Drippy: I was scouting for new sunrise locations and got to the Cocoa Beach pier a bit late. I decided to make a photo anyway… Next time I’ll be there before dawn.

If you click on any of the photos, they’ll open in Flickr, where you can see larger versions.  You can also see some of my previous photos from:

Thanks for stopping by and reading my blog.  Now, go make some photos!

©2012, Ed Rosack. All rights reserved.

Cruise Ship Photography Ops

Intro / Description

Cruising is a great way to vacation and Florida is a great departure point.  There are several ports where you can board a ship, leave your everyday concerns behind, and set sail for exotic destinations.  Tampa, Miami, Palm Beach, Port Everglades, and Port Canaveral all offer cruises – both seasonal and some that go farther. We recently cruised out of Tampa on the Carnival Paradise sailing to Grand Cayman, Cozumel, and back.

The party starts
The party starts –  The Carnival Paradise departing Tampa.

Cruising provides a large choice of activities:  Spend time with friends and family, relax, sample gourmet level food, party, attend shows and other entertainment, lose money at the casino, etc.  Ports of call along the way let you to see the sights and sample what life is like in other cultures.  You can sign up for excursions to do things you may not get a chance to do everyday.  And even if your trip isn’t photography centric, you can sneak in some non-interference photography ops.

The snorkel yacht - Lynn's getting ready to jump in
A snorkeling excursion off of Grand Cayman – Lynn’s getting ready to jump in.

Your preferences will help you select which cruise to go on. For ours, we were limited to a small selection since we wanted to leave from Tampa on a specific date.

Info for Photographers

There are some cruises that cater to photographers and some destinations that are more photogenic than others.  Why you are going, where you are going, and what you expect to see will decide what equipment you should bring.  Since our cruise was a family get together, I brought a much lighter gear bag than on our Alaskan cruise in 2009.  We went snorkeling in Grand Cayman, so I took my old Canon G9 (which still works remarkably well) and the underwater housing I have for it.  I also wanted to take my IR modified camera to use at the Mayan ruins in Cozumel.  Your trip and interests will be different so you’ll need to plan accordingly.

The San Gervasio Arch Structure
The San Gervasio Arch Structure on Cozumel. This Mayan ruin dates from 1000 to 1600 AD.

Photo hints:

Spend some time enjoying sunrise and sunset.  Relax, get a cup of coffee or a drink and sit and watch.  It’s hard to tell what will develop, especially when there are clouds around.  Do some research before you go.  Flickr is a great place to search for the places you’re going to see what others have posted.

If you’re on a family trip, you’ll want to document all the fun and together times.  Be careful not to spend too much time away from your family making photographs.

One good idea is to combine everyone’s photos into a common pool and share them so that everyone has images of everything that happens.  You’ll be glad you did.

Another thing to think about is creating a photo book from your images.  Make several copies and share them with your travel companions.  They’ll make good reading several years in the future and will remind you of the good times.

Always keep a camera with you and when you’re wandering around the ship, keep an eye out for interesting art work or interesting people.

A cruise is also a good time to practice some food photography.  Take your camera to dinner and see if you can create some drool worthy images.

Tripod/Monopod:  The ship’s motion will make long exposures from the deck problematic.  A Gorillapod or something similar would be handy for HDR or long exposure photography inside the ship.  You might also want to use it for some time-lapse photography from a railing on deck.  This can be interesting as you cruise along a shoreline or enter / leave a port.

Lenses:  This depends on your destination / interests.  Bring a versatile zoom or a small assortment of lenses.  On a family cruise, you don’t want to be lugging a huge camera bag around all the time.  If you’re going to Alaska or some other once in a lifetime destination, you’ll want to take your full kit.

Best time to visit:  Do some research on your departure port and destinations.  April is a great time for the route we took.  It’s before hurricane season and the weather is warm, but not too warm yet.  If you’re into birding, April is a big time in the Caribbean for migration.  I only did some incidental birding, but I did get three life birds in Cozumel.  The Mayan ruins at San Gervasio are out in the middle of the jungle, so there are birds around.  I saw a Black-and-white Warbler, a Ruby-throated Hummingbird, and several others I couldn’t get a photo of or ID.  I also saw this one circling the ship when we returned:

A Magnificent Frigatebird

Other:

I’ve posted three sets of photos from this cruise on Flickr.  If you look through them, you can get an idea of the things you’ll see on a similar cruise.

For descriptions of a different type of cruise experience, you can go back and read my three posts about our Alaska cruise here, here, and here.

Summary

You’ll have a great time!

My Gallery / Flickr photo set:  http://www.flickr.com/photos/edrosack/collections/72157629896267577/
Website:  Various – search out the cruise line / travel sites for the departure port you select
Central Florida Photo Ops Rating:  This is a Central Florida Photo Op MUST DO!


Thanks for stopping by and reading my blog.  Now, get cruising and make some photos!

©2012, Ed Rosack. All rights reserved.

Water Dragon Sunrise

Just a quick entry to say I’m very sorry about not posting last week.  I was busy with family and found it hard to update the blog.  But the good news is that I’ve got a lot of new images and info to share with you (as soon as I get finished editing my photos).

Mary graduated from the University of Florida with her MBA degree and Lynn and I celebrated with her, Mike, and Sara by taking a family cruise.  Here’s one favorite image from the trip:

Water Dragon Sunrise
Water Dragon Sunrise – The view from the deck of the Carnival Paradise last Thursday morning, somewhere near Yucatán in the Gulf of Mexico.

This illustrates an important point for sunrise photography:  It’s very hard to predict – so you have to wait and see what develops.  This scene looked very mundane at first.  Several people came out on deck, took a photo and went back inside.  But then an interesting cloud formation developed and drifted left right in front of the sun. I really liked the shape. And the back / rim lighting. And the rays. And the shadows coming up from the head that look like smoke. And the mist on the horizon. And the ocean…

And the food at breakfast was pretty good too!

Thanks for stopping by and reading my blog.  Now, go make some photos!

©2012, Ed Rosack. All rights reserved.

Avocets and Cedar Wax Wing at Black Point Wildlife Drive

Lynn and I went to Merritt Island National Wildlife Refuge this morning and drove around Black Point Wildlife Drive.

Water is very low and much of the bird population seems to have gone elsewhere. But we did see the regulars, including Snowy Egrets, Great Egrets, Tricolored Herons, Great Blue Herons, Mourning Doves, Kingfishers, Black Vultures, Blue Wing Teals, and Red Wing Blackbirds.  We saw only a few Coots and Moorhens – nowhere near the hundreds that are typical.

The highlights of the trip for me were:

American Avocets
American Avocets in breeding colors: We saw a few of these and heard many others. They’re much more fancy at this time of year than with their normal black and white coloring.

Solitary Cedar Waxwing
Solitary Cedar Waxwing: I usually see these in flocks. This one just sat there looking around. It’s the clearest photo I’ve made of one.

There was a Northern Bobwhite male near the restroom parking area, but it moved into cover before I could raise my camera.  I also added an Eastern Kingbird to my life list.  And I saw a Swallow Tail Kite on the way home along State Road 50, but again was unable to get a photo.  Something about me driving and photographing at the same time seems to make Lynn nervous.

It was a very pleasant trip — especially with Lynn along!

Thanks for stopping by and reading my blog.  Now, go make some photos!

©2012, Ed Rosack. All rights reserved.

Infrared Photography Follow Up

If you’re a regular reader, you saw my post from a couple of weeks ago about infrared photography and how I post process my IR images.  If not, please check it out!

That post concentrated on a single image and tried to show some detail on how I processed it.  Today, I’d like to show you a few more examples of what you can expect when you try this very interesting genre of photography.  I made these photos with my IR modified Olympus E-PL1 camera.

I R n Air
I R n Air: A river runs through the countryside in this B&W digital infra-red photo made out the window at ~30,000 feet. The IR light cuts right through the haze to show a lot of detail.

Palm
Palm Tree: IR sensitivity makes the foliage stand out against the sky in this false color image.

Calm water and birds
Calm water and birds:  Bird photography is not a strength of IR, but the birds in the water and the ones flying through the frame add to this landscape.

Play time at Union Station
Play time at Union Station:  Buildings, architecture, and people can be good subjects.

Jefferson Memorial from across the Tidal Basin
Jefferson Memorial from across the Tidal Basin:  IR adds a different look to this classic view.

I have some other IR photos on Flickr in this set.  And you can see examples from other photographers in The Infrared and The Digital infrared groups on Flickr.  How about it – are you inspired to try IR photography?  Let me know if you do.

Thanks for stopping by and reading my blog.  Now, go make some photos!

[Additional info, added 1/24/2014]:  https://edrosack.com/2014/01/12/infrared-updates/

©2012, Ed Rosack. All rights reserved.

Orlando’s Leu Gardens

Intro / Description

Do you enjoy gardening?  Flower or landscape photography?  Historical sites?  Then Leu Gardens in downtown Orlando, is a place you should check out. It’s a 50 acre park on the grounds of the former home of Harry P. Leu, who donated the property to the city in 1961.

Hibiscus and sky
Hibiscus and sky

There are about 40 different plant collections in the park including aroids, azaleas, bamboo, bananas, bromeliads, camellias, citrus, conifers, crepe myrtles, conifers, cycads, ferns, flowering shrubs, flowering trees, gingers, heliconias, hibiscus and mallows,magnolias, ornamental grasses, palms,perennials, roses, trees, and vines.  Many are labeled to help you figure out what you’re looking at.  Various pieces of sculpture are also located around the garden as well as some interesting planters.

Planter
Pot Heads:  Heads full of flowers:  A Leu Gardens Planter

The gardens are arranged in sometimes geometrical layouts which can lead to interesting photos.  These include the butterfly, kitchen, rose, and palm gardens along with many others.  And don’t forget to see the fairly famous floral clock!

The Leu House Museum has been restored and is on the National Historical Register.  It’s open for tours on the half hour starting at 10am (except in July when it’s closed for refurbishment).

Info for Photographers

Leu Gardens is very photo friendly.  Photography and video is permitted for personal, non-commercial use, but commercial photography requires approval in advance.

The house at the end of the lane
The house at the end of the lane on one end of the gardens.  False color IR photograph.

Photo hints:

A leisurely stroll through the grounds is the best way to find photo opportunities and will take you an hour or two.  Make sure you carry your gear with you.  The parking lot is too far to go back to if you want to switch lenses or grab a flash.  Speaking of flash – some of the flowers are located in very shaded areas.  I found myself making photos with my camera in my right hand and a flash in my left to help light my subjects.

Busy Bee
Busy Bee gathers pollen at Leu Gardens

Tripod/Monopod:

Tripods are allowed and would be good for all the normal reasons.  I didn’t bring one either time I visited.  I know, I know – I should have, but I was just carrying too much already.

Lenses:

You’ll want to have your macro and wide-angle lenses with you.  A longer macro will be most helpful.  Not all the blooms and interesting plants are right next to the paths.  And a longer distance to your subject will scare fewer insects away.

Best time to visit:

They’re open all year except Christmas day. Hours are 9am to 5pm.  There are different plants blooming year round.  Here’s a partial list by season (info from the Leu Gardens Map and Visitors Guide):

Spring  roses, hibiscus, day lilies, gardenias, trumpet trees, azaleas, citrus
Summer  roses, hibiscus, ginger, heliconias, canna, magnolia, crepe myrtle, banana, cassia, bird of paradise
Autumn roses, floss silk tree, cassia, hibiscus, ginger, helconia, bottlebrush tree
Winter  camellia, pink trumpet tree, azaleas, orchid tree

They occasionally host flower shows.  If you can catch one of those, you’ll be in for some extra treats.

Leu Gardens can be a very popular place, especially on weekends and during wedding season.  I visited once when two weddings were taking place and almost got knocked over by two photographers running backwards photographing a wedding party.  The weddings can sometimes block off areas in the park too.  Another time I visited was on a Friday morning and I had most of the place to myself.  So I’d suggest you try to avoid the weekends and weddings if you can.

Other:

Adult admission is $7.00, children in grades K – 12 are $2.00.  If you can visit on the first Monday of the month, admission is free.

I did see some birds there during my visit including Cardinals, Woodpeckers, and Northern Mockingbirds, among others.  And the birdsong adds a nice soundtrack to your stroll.

Summary

Please visit my Leu Gardens set on Flickr to see more examples of the photo ops you might find there.  I’m sure if you go, you come up with many others.  If you do, let me know about it.

My Gallery / Flickr photo set:  http://www.flickr.com/photos/edrosack/sets/72157629660062855/with/7012298391/
Website:  http://www.leugardens.org/index.htm
Address / Phone: 1920 North Forest Avenue, Orlando, FL; Phone: 407-246-2620
Central Florida Photo Ops Rating:  Botanical beauty.  A great place for a walk with many fine photo opportunities.

Thanks for stopping by and reading my blog.  Now, go make some photos!

©2012, Ed Rosack. All rights reserved.

Black Swan

The Black Swan is an interesting bird. Not only from an avian perspective, but also from a philosophy and ideas perspective. Wikipedia introduces the Black Swan (Cygnus atratus) as “a large water bird, a species of swan, which breeds mainly in the southeast and southwest regions of Australia.”

Black Swan
Black Swan at Lake Eola in downtown Orlando

Australia? Then what is a photo of a Black Swan doing on the Central Florida Photo Ops blog?

All known swans were white until Black Swans were discovered in Australia. People would never expect to find a black Swan (even in Orlando). So this bird is often used as a metaphor for an unexpected event.

Nicholas Taleb wrote a book called The Black Swan: The Impact of the Highly Improbable. His theory is that outlier events (which are essentially unpredictable) have an outsized impact, especially due to the human tendency to settle for simple solutions. This is called the Black Swan Theory.

If no one told, you’d never expect to find a Black Swan in Central Florida. But you can – at Lake Eola in downtown Orlando. So seeing a Black Swan there is a black swan event – highly unexpected. Or it was, until I just told you.

There are other Swan species there too. I saw Whooper Swans, Mute Swans, and Black Necked Swans last weekend.

You can see other photo’s I’ve made at Lake Eola in this set on Flickr.

Thanks for stopping by and reading my blog. Now – go make some unexpected photos!
©2012, Ed Rosack. All rights reserved

Digital Infrared Photography – a post processing example

Introduction

If you’ve read through my blog or looked at my photostream on Flickr, you’ll already know that I enjoy black and white photography and occasionally post B&W images. Removing color from a scene abstracts reality – and emphasizes shapes, composition, and texture. The image becomes a bit unreal, but since we’re used to B&W  – not too unreal.  This makes B&W a great way to make your images stand out.

Another way to make your images stand out is by using infrared (IR) film or an IR modified camera:

  • IR captures a portion of the spectrum of light that’s different from what your eyes can see.
  • The spectral response makes blue sky look dark and foliage bright.  This reverses a normal daylight scene’s brightness values, helps tame contrast, and allows you to shoot even when the sun is high in the sky.
  • You can interpret this alternate version of reality by processing your IR photo as B&W or various types of false color images.
  • IR can sometimes also capture details that aren’t seen with visible light.
  • If you use a modified digital camera, you may see improved detail in your photos, since the conversion process removes the anti-aliasing filter that most digital cameras use to slightly blur the image during capture (and remove Moire patterns and other aliasing artifacts).

I’ve gotten some questions about my infra-red images.  And I haven’t written anything about technique recently, so in this post, I’ll go into detail about a recent IR image I made.  I’m relatively inexperienced at this, but as a IR n00b I’ve learned a few things that may come in handy if you want to try it.

Messy knees

Messy knees:  Cypress trees on the south shore of Lake Jesup.  Cypress trees and their roots are good subjects, especially along the water where they’re usually found. The light hitting these tree trunks and the Spanish Moss also caught my eye.  I’m still playing around with infra-red. There’s a range of post processing options available. I was hoping that this false color version looks just alien enough to make people take a second look.  Click here to view a larger version of this photo on Flickr.

Camera

I use an Olympus E-PL1 modified for IR by http://www.lifepixel.com/ and I’m very pleased with the result.

Using a micro 4/3 camera has advantages for IR:

  • Older models like the E-PL1 are relatively inexpensive;
  • They have a large sensor (compared with compact cameras) which helps image quality;
  • They use the sensor for contrast type focusing so there are no focus calibration issues that can occur in a DSLR
  • Most have RAW format capture available

Settings

I shoot in RAW, not jpeg.  For IR, it would be tough to get all the settings perfect in camera.  Plus, there are a lot of post processing options which you’d give up if you only capture jpeg.

White balance is one thing that you should set.  If you shoot in RAW, white balance can be adjusted in post processing.  But setting a white balance in camera is important since it lets you judge your shots on the LCD screen as you take them.  Unless you set a custom (preset) white balance all IR images would look very red. On my E-PL1 I use a temperature setting of 2000K which is as low as it will go.  This camera has no tint adjustment, so photos still look blue, but it’s good enough for judging exposure.

Workflow

Here are 7 versions of this photo that show the processing steps I went through along the way.  Don’t be alarmed – this is quicker and easier than it sounds.

This is the RAW photo straight out of the camera. My custom white balance adjustment isn’t able to completely correct the IR spectrum so there’s a pronounced bluish tint.
This is the image after white balance and levels adjustment in Photoshop. Other initial adjustments in LR or Photoshop may include a bit of noise reduction, lens corrections (if available), cropping / straightening, and spot removal.
In this version, I’ve used several copies of the same scene (shot from a tripod) to smooth the water’s surface and make the trees / knees stand out more.
This version has a Channel Mixer preset adjustment layer (red and blue colors swapped).  Debra Sandige’s IR page (listed in the references below) has  detailed steps on how to do this in Photoshop.
A Hue / Saturation / Brightness adjustment layer was used to modify the Hue in the cyan and blue channels so it looks a bit more natural.
This is after final adjustments in Lightroom: clarity(+47), vibrance (+24), medium contrast tone curve, sharpening with edge mask.  (note: this is the same image as at top of post).
For comparison, a black and white conversion of the final false color image.  I like the false color version better.

References

You can find out more about Infrared photography at these places:

  1. This Wikipedia article has some background information on infrared photography – especially film techniques.
  2. I had my camera converted by LifePixel and was extremely pleased with the result.  They have a huge amount of IR information including tutorials, FAQs, and a blog on their website.
  3. I read and enjoyed Debra Sandige’s recent book about IR photography. She’s very creative and presents a lot of good information.  She has a page on her website with IR information.
  4. Lloyd Chambers also has an intro to infra-red on his site and offers a paid site with more info.
  5. The Khromagery website has several good articles on IR cameras and processing.  They also offer an IR Photoshop action as a free download.

Conclusions?

So, is IR an infatuation? Will I use it for a while and then let it fade away? Will I only bring it out for special photo ops as inspiration? Will it take over my photo life to the exclusion of all other approaches? Who can say? You’ll just have to keep reading my blog and see what happens. Along with me.

You can visit my IR set on Flickr to see more examples of what I’ve done.  What do you think?  Is IR photography something you’d like to explore?

Thanks for stopping by and reading my blog. Now – go make some IR photos!
©2012, Ed Rosack. All rights reserved

[Additional info, added 1/24/2014]: