Category Archives: VARIOUS

iPhone 11 Pro – Camera Comments

I’ve been using the iPhone 11 Pro camera for a bit and thought I’d post some sample photos and a few photographer type thoughts about it this week.

This isn’t a comprehensive review – you can find many of those on the web if that’s what you need.  This also isn’t a “should you buy it” post.  That’s a personal decision only you can make.

Ultra-wide

Morning Light on a Majestic OakMorning Light on a Majestic Oak. I think I’m going to like the 13mm eq. FOV ultra-wide lens

The iPhone 11 Pro has three cameras and the ultra-wide is new this year.  It’s a bit limited compared to the other two: It’s widest aperture is f/2.4 so it doesn’t gather as much light.  It also doesn’t have stabilization, it’s fixed focus, doesn’t support RAW format, and doesn’t support night mode.
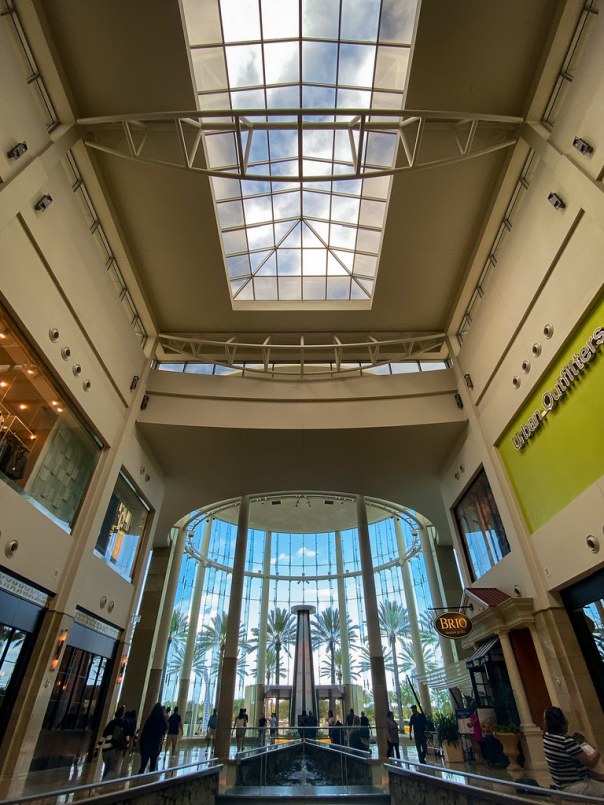
Wide angle at the mallWide angle at the mall

I’m not sure why Apple designed this camera with those limitations.  But at a 13mm eq. field of view, it truly is ultra-wide.  That’s going to be very handy in a lot of situations, especially where the light is good.  It’ll probably mean I use panorama mode on the phone a lot less.  And I think one of the main benefits of the ultra-wide is the inputs it provides for computations Apple can do.

Portrait mode

Narwhal the kittenNarwhal the kitten helping me test portrait mode

Narwhal modeled for me so I could test the latest Apple implementation of portrait mode.  I think his image above looks great and would be pretty hard to tell apart from one taken with a high end camera and a large aperture lens.

That’s because I corrected some issues with the way the phone algorithms rendered depth of field in the original photo. Things like whiskers and hair are difficult to show correctly.  Look at the image below to see what I’m talking about.  Click on it to open, and then click again to enlarge.

Correcting depth of field flaws

Look at the crop on the left – it’s the Portrait Mode photo produced by the phone.  If you’ve enlarged it, you can see that Narwhal’s whiskers have been clipped by inaccuracies in the algorithm.  Bright highlights and low contrast have confused the depth map info.  The middle photo is with portrait mode turned off.  In that one, all of his whiskers are visible with no depth of field / bokeh effects.  On the right side and in the full image I blended some of the middle image with the left one to show the focus rolling off more naturally.

Portrait mode has improved this year.  You can make portraits with both the wide and tele cameras.  And the depth mapping algorithms are better – but they can still be improved.  You may not notice or care much about these things and compared to previous attempts, the algorithms are better and the results look great.  Important photos could be manually edited to fix them.  If we can do this manually, eventually the software wizards will  figure out how to automate it into the phone algorithms.  iPhone 12 super pro?

Night mode

I complained last year, that other phones had low light modes and Apple didn’t.  They listened to me (ha ha) and added it.

Night mode street scene

I think it captures low light situations very nicely.  And the image stabilization is unbelievably good.  I made this next photo of the constellation Orion in my back yard, hand held!

Orion

Other improvements

There are other changes that I haven’t tried yet and don’t have examples of.

  • If you shoot in landscape mode with the wide (1x) camera, it saves information outside the frame using the ultra-wide.  This allows you to correct perspective distortion or rotate your images after capture without cropping(!).
  • “Deep fusion” is still in beta.  It captures multiple frames and combines them pixel by pixel for the best results.  The demos are super interesting and I’m looking forward to trying it.
What about RAW format and manual control?

So many of the improvements in phone cameras now come through software.  But the hardware has changes too.  In addition to a third camera, the sensors and lenses in the wide and tele cameras are improved.  And (except for the ultra-wide) they have all the RAW format and manual control capability they’ve always had, with a little better output.

A touch of colorA touch of color. 4 RAW frames, stitched and processed in Lightroom / Photoshop

So manual control is still possible.  The question is: “When should I bypass auto mode and use manual?”

With the software getting so good, and so much computation going on in the background, there are more and more reasons to use these cameras in automatic mode.  As a photographer, you’ll need to really understand your phone camera capabilities and be able to wisely choose when to bypass it.  For common situations, I think the answer is becoming “Use auto, most of the time”.

I believe that what I said last year will be true for a just a little longer:

Should you give away your non-phone cameras?  No, not yet.  Phones are still at a disadvantage in some ways:  Lens selection and sensor size are two important ones.  And the interfaces on dedicated cameras are better and allow quicker control.  But in some (many?) cases, your phone is an excellent photo (and video!) tool.  And they’re going to get better.  Just make sure you’re up to date on how to use the latest functions.

Thanks for stopping by and reading my blog. Now – go make some photos!

©2019, Ed Rosack. All rights reserved

Bird population loss

A study released last week in Science Journal reports that the North American wild bird population is in steep decline.  About 29%  of the breeding population (2.9 billion) vanished since 1970.  This includes species we see here in Central Florida.  There are 92 million fewer Red-winged Blackbirds:

Red-winged Blackbird in flightRed-winged Blackbird in flight, Viera Wetlands

And Eastern Meadowlarks declined by ~70% (73 million):

A Messy Molting MeadowlarkA Messy Molting Meadowlark – Joe Overstreet Road, Osceola County

The study is based on multiple independent data sources including bird counts and radar information.  This particular study didn’t investigate causes, but habitat loss and degradation are seen as the biggest overall drivers of the decline.

The news isn’t all bleak.  Raptors have increased by 15 million since 1970 due to  banning some pesticides, and waterfowl gained 35 million because of wetland regeneration.  This shows we can make a difference.

Bald Eagle in flightBald Eagle in flight – Kenansville, Fl.

The loss of birds is consistent with other data showing massive declines in insects and amphibians.  These are symptoms that our environment is not healthy and they should be a tremendous wake up call.

We must do everything we can to help keep our only planet healthy .  How will you answer your children and grandchildren when they ask you what you did about this?

Thank you for stopping by and reading my blog.  Now – go support conservation.  And make some photos.  Before it’s too late.

©2019, Ed Rosack. All rights reserved

#BringBirdsBack

Bracketing vs. Graduated ND Filters

I’d long ago answered this question, but a comment from Frank B. about this image caused me to reconsider some things.

Cocoa Beach Pier before dawnCocoa Beach Pier before dawn

Fair warning:  This post is a little deep into the weeds.  Feel free to look at the photo and move on if it isn’t your thing.  But I think it’s an appropriate subject, since part of the blog’s purpose is “… and how to photograph them.”

What are we talking about?

Bracketing means taking multiple photos of a scene, each with different camera settings (see this Wikipedia entry).  In this case, I made three photos at different exposures so I could capture the entire dynamic range from super dark under the pier to super bright above the clouds.  Making just a single exposure would’ve risked losing detail in the shadows or highlights (or both).

You can also use a Graduated Neutral Density Filter (GND) – an optical filter you add in front of your lens to reduce light in the bright part of the frame (see this Wikipedia entry).  Typically they have a 2 or 3 stop reduction that transitions into clear.

I’d long ago experimented with GNDs and decided not to use them.  I can  mostly reproduce their effect in static scenes by bracketing and then blending the resulting frames in post-processing.  For landscape images bracketing is an easier solution in the field and gives me more control and a better final result.  You can read about one example of my technique in this post (from back in 2011).

But then … Frank left a comment:

… amazing how the clouds remain sharp compared to the water given the time of exposure

And my reply:

Frank, this is a 3 frame, hi-res exposure bracket hand blended in Photoshop. The bottom portion was at f/5 for 25 seconds. The top was at f/5 for 3.2 seconds. So that and distance is why the clouds are sharp compared to the water.

The way I made this image resulted in a huge difference in shutter speed between the water at the bottom and the clouds at the top.  And using the Olympus Hi-Res mode exaggerated the shutter speed differences since it combines 8 separate captures to create each hi-res output file.

If I’d used a GND the shutter speed would be constant throughout the frame and the blur in the clouds would’ve matched the blur in the water.  In this particular case,  bracketing exposure by varying aperture instead of shutter speed would also make the motion blur consistent.  I’ve never done that since it seemed like it would lead to other issues (inconsistent focus / depth of field).  It’s something to think about and maybe try in the future for a setting where consistent motion blur is important.

Thanks for the question Frank!  Photography is fascinating.  There is so much to think about and still left to learn.

And thanks to everyone else for stopping by and reading my blog (especially if you read all the way through!). Now – go make some photos!

©2019, Ed Rosack. All rights reserved

Take the shot? Or not?

Editor’s note:  For everyone in The Bahamas, here in Florida, and up and down the east coast of the US – please keep an eye on hurricane Dorian, get prepared, and stay safe!


I’ve driven by this tree many times – every time I go around Black Point Wildlife Drive in Merritt Island National Wildlife Refuge.  I like its isolation and the reflection it makes in the usually very still water.

Lone pine between the canal and roadLone pine between the canal and road

I saw and admired it again on my visit a few weeks ago, but I almost didn’t make this image.  Why not?  Because I thought I’d already made that very one before and didn’t need another.  Fortunately, I wasn’t in a hurry, so I stopped and made a two frame vertical panorama with my IR camera.

When I got home, I tried to find the photo I thought I remembered.  Here are two of that same tree that I found in my archives.  This first one is from nearly the same spot:

Clear day, calm water 1Clear day, calm water, January 2011

And this one is from the other side:

Left at the lone pine treeLeft at the lone pine tree, August 2018

I like the newest photo the best.  I’m glad I went ahead and made it!

On the other hand: When Kevin M. and I were down in Osceola county, we saw two or three Bald Eagles.  When I was young, Bald Eagles were rare and I never saw one in the wild until I moved to Florida and started paying more attention to wildlife.  Now they’re getting much more common but I still get a thrill whenever I see one.  One of the eagles was sitting on a pile of dirt a little off the road.  Kevin asked if I wanted him to stop for a photo and I said no.  I have quite a few Bald Eagle photos that I like (e.g. this one), and the setting that day just didn’t look like it would make a good photo.  It would probably have sat on my hard drive or been deleted when I went through the photos.  Why make it?

Take the shot or not? Like many things, it depends.  I suppose the moral of this story is: “When in doubt, make the photo.  But don’t make every photo.”

Thanks for stopping by and reading my blog. Now – go make some photos, or not!

©2019, Ed Rosack. All rights reserved

Reprocessing a Mt. Evans Elk Herd panorama

Back in July of 2007, I wrote a post about Mt. Evans, Colorado and included this image of an Elk herd we saw there:

Elk herd near mile marker 8 on Mount Evans  (2007 version)

At that time, I was using a Nikon D80 camera and made this photo with an entry level 70-300 telephoto lens.  I remember wanting to capture as much detail as possible, so instead of making one exposure of the whole herd, I zoomed in as far as I could and made four different frames at 300mm (450mm eq.), f/5.6, 1/100 sec, and iso 100. I ran across these images in my photo archive recently and wanted to see if I could reprocess the RAW files for a better result.  I thought you might be interested in my work flow – not so you can reproduce my results, but to give you some ideas on how to process your own images.

Here is one of the original RAW files SOOC (straight out of camera).  The white balance and exposure aren’t optimum and sharpness isn’t very good either – maybe due to poor lens stabilization and optical performance (and maybe due to my poor technique).

Here are the steps I went through to reprocess this:

  • Used DxO Photo Lab software to convert from RAW to .tiff and take advantage of the built in Prime Noise reduction algorithm.  I like that this software applies camera and lens specific corrections to all images.  It also returns the results to Lightroom still in RAW / DNG format.
  • Made basic adjustments (exposure, white balance) in Lightroom, and copied to all four frames.
  • Opened as layers in PhotoShop.
  • Stitched the frames into a panorama: Edit -> Auto-align Layers; Edit -> Auto-blend Layers.  At this point, it looked like this:

When I made the original frames, I didn’t cover enough ground for a rectangular composition.  To fix this, I used PhotoShop’s excellent Content Aware Fill on the missing corners.

  • Select the blank areas with the Magic Wand tool.  Expand the selection (~3 pixels).  Edit -> Content Aware Fill
  • use the clone tool to eliminate any obvious fill anomalies.

And then I worked on sharpness.  Here is a 300% look at the area near the Bull Elk:

Not very sharp.  So I:

  • Duplicated the layer and applied the Topaz Sharpen AI filter.  I used the Stabilize method with a Remove Blur value of 0.70.  Here’s the much improved result:

Topaz Sharpen AI can work wonders on this kind of problem, but it does take a lot of CPU power.  Depending on your hardware, you might have to be (very) patient.

  • The final step in Photoshop was to use Topaz Clarity for some added midrange contrast.  I applied the Nature -> Fur and Feathers II preset.
  • Back in LightRoom: I cropped to a 2:3 format; tweaked White Balance and exposure again; boosted texture and shadows on the Elk with a circular adjustment and range mask; Reduced green and yellow saturation; Used a -12 highlight priority vignette and added grain at 15.

And this is the new version I just posted to Flickr.

Mt. Evans Elk herdMt. Evans Elk herd (2019 version) – Near mile marker 8. Quite a harem! There are about 60 elk in this image: A single bull, ~10 young ones, and the rest female.

It took me about 30 minutes to do this.  Was it worth the effort? I can’t answer for you.  I think it looks much better and I’m glad I saved those RAW files! As long as i can re-start from the original sensor data, I can leverage newer software and get better results.  I know a lot of folks don’t enjoy computer work, but I do – so to me it’s worth it.

Click on any of these to see larger versions.  I have other Mt. Evans (and Colorado) photos in this album on Flickr.  And if you have any questions on this, I’ll be happy to try and answer them.  Just ask in a comment below.

Thanks for stopping by and reading my blog. Now – go make (or reprocess) some photos!

©2007 and 2019, Ed Rosack. All rights reserved

Morning Dew

I try to maintain a regular schedule here and normally blog once a week – almost always on Sunday morning.  I get up early and write (or finish writing) so I can hit the “publish” button before breakfast.  My system’s worked pretty well for me and I hope for readers too.  It’s gotten me up  to almost 600 articles so far.

I enjoy it, but it’s a challenge at times.  I want to include photography info worth reading or at least an image worth viewing.  And I want each post to be something that I’ll enjoy re-visiting myself.

This morning I sat here with a blank page and a photographically blank mind.  Making and processing images is a passion for me and has been for a long time.  I’m pretty sure I’ll continue to enjoy it as long as I can.  But it is just a hobby and there can be (and this week are) more important things to think about and deal with.

I won’t burden you with any personal issues – the blog is about image making.  Instead I’ll simply leave you with another recent Caladium composition that I hope you’ll enjoy. Processing it to preserve as much detail as possible took my mind off of other things for just a little while.

Morning DewMorning Dew.  We’ve had some bumble bees flying around our flowers lately and I’ve tried to photograph them.  I made this image after giving up on the bees one morning.

You can click on this image to view a larger version on Flickr. Thanks for stopping by and reading my blog. Your visits and comments mean a lot to me.

Now – go make some photos!  I will too.

©2019, Ed Rosack. All rights reserved

Blue Cypress Lake Postcard

Hello loyal readers! This is the next entry in the occasional blog category called “Postcards” where I upload photos of Central Florida scenes – similar to ones you’d find on a postcard.

It’s easy to find all of these. Just use the “Places / Categories” pulldown menu over on the right side of the blog and select “Postcards”. If you’re viewing the site on a phone, you may not see that menu – in that case, just type “postcards” into the search box.

Blue Cypress ShorelineBlue Cypress Shoreline

I made this image in April of 2017 from a pontoon boat in Blue Cypress Lake, near Vero Beach, Florida.  This wonderful lake is part of the St. Johns River headwaters.  Here’s a link to all the posts I’ve written about it: https://edrosack.com/category/photo-ops-in-florida/blue-cypress-lake/.  And you can view other photos from there at this link: https://www.flickr.com/photos/edrosack/albums/72157630027829768.

It’s a 2 frame vertical panorama shot with an infrared modified camera, handheld with a 24 mm equivalent lens at f/3.5,  ISO 200 at 1/800 sec. I processed the photo and converted it to Black and White using Lightroom and Photoshop. You should be able to click on it to go to Flickr and then select the download symbol below and to the right of the photo. I hope you like it!

Thanks for stopping by and reading my blog. Now – go make some photos!

©2019, Ed Rosack. Creative Commons, Attribution-NonCommercial-ShareAlike 4.0 International license

Note: Items in my blog that are marked with a Creative Commons license are available in high resolution for you to download for your personal use. Please visit this page to see details and restrictions that apply: https://creativecommons.org/licenses/by-nc-sa/4.0/.

Long Exposure with Variable Neutral Density Filters

A friend wants to make long exposure photos on an upcoming trip. I recommended using a Variable Neutral Density Filter (VND) and offered to let them try mine.  So  we headed over to the Cocoa Beach Pier last Friday to test them out on some ocean waves.

Cruising homeCruising home. VND, ƒ/11, 35 mm, 0.3sec, ISO 100

VNDs are made from two polarizing filters – one’s fixed and the other rotates. You use the rotating one to vary the amount of light that’s blocked (typically between 1 or 2 and 6 or 8 stops).  I like them because they give you precise and easy control over how much light hits your sensor.  If you reduce light on the sensor, you can use a slower shutter speed or a wider aperture for a given scene.  They’re good to have when you photograph waterfalls (slow shutter to blur / smooth water) or in bright light (to shoot with a wider aperture and blur backgrounds).

Here’s my approach for smoothing water:

  1. Mount the camera on a tripod and trigger it with a remote or the self timer.
  2. Set ISO (usually for best quality). Don’t use auto ISO.  We want the  camera to vary shutter speed instead of changing ISO when the VND rotates.
  3. I use Aperture Priority mode and select the F-stop (for depth of field, image quality etc.).
  4. Compose with the VND filter at its minimum value (brightest setting).
  5. In bright light, you can use auto focus.  In dim light, you may need to  manual focus so the camera’s auto focus doesn’t hunt when you  darken the VND.
  6. Now, slowly turn / darken the VND until your shutter speed reaches the value you want.  You’ll need to experiment to find what looks best to you, but for water try between .25 and 1 second.
  7. If you can’t get a slow enough shutter, you can close down your aperture, or lower your ISO.

Some things to watch out for:

  • Like much in photography (and life!), you can find very expensive VNDs and very cheap ones. I’ve had good luck with name brand ones in the middle price range.  Don’t buy the cheap ones!  They may not be optically flat or coated, and might introduce color shift problems.  You’ll probably pay more for thinner ones too, which will reduce chances of vignetting.
  • Definitely look for VNDs with coatings to help prevent reflections / flare.  You’re adding four more air/glass interfaces to the front of your lens and you can’t use a lens hood, so coatings will improve performance.
  • Since these filters can be expensive, I recommend buying only one, sized to fit the biggest diameter lens you’ll use it with.  I have a 77mm VND and step down rings to mount it on my smaller lenses.
  • Some VNDs can be rotated too far and will show an ugly cross-shaped anomaly.  If yours does this, watch for it and back off until it disappears.  Some are made with a stop so you can’t rotate them too far.
  • Check your results as you go.  It’s easy to over expose highlights in moving water, so you may need to dial in some negative exposure composition.  Also, if the light getting through is too dim, your camera’s meter may not work well.  In that case you’ll have to change to manual exposure and adjust accordingly.
  • Make several exposures at different shutter speeds so you’ll have distinct looks to choose from when you get home.

Golden beachGolden beach. VND, ƒ/8.0, 26 mm eq., 0.8sec, ISO 200

That’s it – simple, right?  Do you use VNDs?  If so, let me know where I can view your long exposure photos.  And if you have any hints of your own, please share in a comment for everyone.

You can click on these images to see a larger version on Flickr. Thanks for stopping by and reading my blog. Now – go make some photos!

©2019, Ed Rosack. All rights reserved

St. Augustine Postcard

Hello faithful readers!  This is the next entry in the occasional blog category called “Postcards” where  I upload photos of Central Florida scenes – similar to a postcard.

It’s easy to find all of these.  Just use the “Places / Categories” pulldown menu over on the right side of the blog and select “Postcards”.  If you’re viewing the site on a phone, you may not see that menu – in that case, just type “postcards” into the search box.

St. Augustine Basilica

I made this image a week or so ago inside the Cathedral Basilica of St. Augustine. Established in 1565, it is the oldest Christian congregation in the contiguous United States.  Portions of the structure date from 1797, in part due to the durability of the cochina rock used for exterior walls.

I shot this handheld with a 35mm lens at f/2.8, and used ISO 800 to make sure my shutter speed was high enough to avoid camera shake (1/50 sec).  I processed the photo and converted it to Black and White using Lightroom.  You should be able to right click and  download.  I hope you like it!

Thanks for stopping by and reading my blog. Now – go make some photos!

©2019, Ed Rosack. Creative Commons, Attribution-NonCommercial-ShareAlike 4.0 International license

Note:  Any items in my blog that are marked with a Creative Commons license are available in high resolution for you  to download for your personal use.   Please visit this page to see details and restrictions that apply:  https://creativecommons.org/licenses/by-nc-sa/4.0/.


Banishing Broken Links

This post is about blogging, not photography.  So feel free to move on if this doesn’t interest you.  But before you do, here’s an unrelated photo to try to make your visit here worthwhile:

Sunrise SurferSunrise Surfer – An early morning image, from October 2018, near the Cocoa Beach Pier (click for a larger version).

My blog has been up since May of 2007 and I’ve written almost 600 posts through the years.  A few weeks ago, I read an article about broken links and how Google crawls the web and downgrades a site’s search ranking if it finds broken / dead links on web pages.

I knew this, but hadn’t been actively addressing issues.  I’m not a commercial site, and search ranking doesn’t affect any bottom line for me, but – well, we don’t want to be left out of Google do we?

Anyway, I’ve had a plugin loaded on my site called “Broken Link Checker” for a long time.  I was having some server performance issues a while back and deactivated it.  I decided to turn it back on and see what it found.  It was disturbing!

  • > 5100 links total
  • 186 broken or dead links
  • > 900 redirects
  • And a few warnings

I’ve been going through and fixing these.  Here’s what I’ve done:

  • If the site I referenced changed and I can find the new page, I updated it.
  • If I can’t find a new page, in some cases I substituted a different source such as Wikipedia.  (By the way, Wikipedia is amazingly good at keeping their links up – none of my broken links were to them.)  If I couldn’t find a new page to link to (seems to be a common issue for newspaper articles) I removed the link and marked it as “no longer available”.
  • On some problems, I just removed the link if it didn’t really need to be there.
  • How embarrassing!  Some of the broken links were to my own pages!  These had to do with re-organizing categories and tags.  So I went through and fixed these too.
  • I looked at redirects and they don’t seem to be real issues, so I left them alone.

As of this morning (finally!) all of my broken links are gone.

In the future, I’m going to modify my link philosophy:

  • I’m not going to be as eager to insert links.  Web search is pretty good these days and you can highlight and right-click to get info on anything I write about.  And It’ll be current too!
  • I’ll favor using Wikipedia when it makes sense.  There’s less chance those links will break.
  • I haven’t noticed any performance issues with the Broken Links Checker this time.  So I’ll leave it on
  • Broken Links Checker will email me when it finds problems and I’ll fix them as they come up, instead of ignoring them for too long.

Onward to search results dominance!

Thanks for stopping by and reading my blog. Now – go make some photos!

©2019, Ed Rosack. All rights reserved