Category Archives: VARIOUS

Gatorland Postcard

I sincerely hope that all of you are staying safe and well.

This is my next entry in the occasional blog category called “Postcards” where I upload a photo of Central Florida scenes – similar to ones you’d see on a postcard.

It’s easy to find them all. Just use the “Places / Categories” pulldown menu over on the right side of the blog and select “Postcards”. If you’re viewing the site on a phone, you may not see that menu – in that case, just type “postcards” into the search box.

Cattle Egret in breeding colorsCattle Egret in breeding colors

I made this image in June of 2015 at Gatorland in Orlando Florida.  Gatorland is a theme park and wildlife preserve in south Orlando.  The main attractions there are of course the alligators, but wild birds also use it as a breeding area in the spring.   The birds are used to people and you can get some fantastic photos of nesting birds and breeding behaviors. I’d been thinking about buying an annual pass this year, but the pandemic has delayed that – Gatorland is closed for now.  I’ll get one when we get back to normal.

Here’s a link to all the posts I’ve written about it: https://edrosack.com/category/photo-ops-in-florida/gatorland/.  And you can view my other photos from there at this link: https://www.flickr.com/photos/edrosack/albums/72157623039154783.

You should be able to click on this photo to open it on Flickr and then select the download symbol below and to the right of the photo. I hope you like it!

Thanks for stopping by and reading my blog. Now – stay safe out there, and if possible – make some photos!

©2020, Ed Rosack. Creative Commons, Attribution-NonCommercial-ShareAlike 4.0 International license

Note: Items in my blog that are marked with a Creative Commons license are available in high resolution for you to download for your personal use. Please visit this page to see details and restrictions that apply: https://creativecommons.org/licenses/by-nc-sa/4.0/.


Isolation

Anyone can snap a photo.  As photographers, we choose subjects and then compose frames around them so a viewer’s eyes are drawn to what we want them to see.  One thing to think about when we’re out with our cameras is how to isolate the subjects in our images.

Scan the scene when shooting – look for distracting elements and get rid of them.  How?  Sometimes you can’t, but here are some suggestions.

Viewpoint:  Shift a few feet one way or another to hide things.  There’s a much less attractive mailbox just out of the frame below on the left.

A Mailbox on Joe Overstreet RoadA Mailbox on Joe Overstreet Road

Magnification:  We never have enough zoom, do we?  Use what you do have to get close and separate subjects from clutter.  You can also crop later on the computer, but you’ll risk losing some image quality / resolution.

A good morning for a songA good morning for a song – singing Eastern Meadowlark. Joe Overstreet Road

Light:  Sometimes the light is just right to make your subject stand out from the background – take advantage of it!  This can be modified a bit in post processing too.

Shy birdShy bird – A Roseate Spoonbill in the light. Black Point Wildlife Drive

Depth of Field (DOF):  In addition to getting as close as you can and using a long focal length, shooting with a wide open aperture creates a shallower DOF and blurs the background behind your subject.  You may need to shift your position a bit to insure that the entire subject (e.g. both the insect and the bird) are in the plane of focus.

Butcher BirdButcher Bird – Loggerhead Shrikes often kill prey by impaling them on a thorn or barbed wire.  Joe Overstreet Road

Color:  Catching your subject against a contrasting color can help it stand out.  These American White Pelicans with their yellow beaks were very nice to pose for me in the blue water.

American White Pelicans
American White Pelicans. Black Point Wildlife Drive

So that’s a few ideas. If you think about this when you’re out, your photos will improve. Do you have any other suggestions?  Feel free to add them in the comments.

And speaking of isolation, Lynn and I are both generally in good health (thankfully!).  But the CDC says we’re at higher risk from the COVID-19 virus due to our ages.  We’re going to follow their recommendations and stay up to date on developments.

Thanks for stopping by and reading my blog. Now – go out, stay safe – and make some photos!

©2020, Ed Rosack. All rights reserved

Big Cypress National Preserve

Big Cypress National Preserve is a 729,000 acre swamp in South Florida adjacent to Everglades National Park.  It was originally going to be part of that, but instead was established as a national preserve in 1974.

I’ve wanted to visit for years and finally went down a couple of weeks ago.  I stayed at the bungalow Clyde Butcher rents behind his Big Cypress Gallery along Tamiami Trail. This is a “first impressions” blog post, not a guide. I don’t know the area well enough to give you a comprehensive review.

Butcher's Pond 1, colorButcher’s Pond.  Next to Clyde Butcher’s gallery on Tamiami Trail

The bungalow was very nice and provided a good base for exploration.  I do wish there was cell service or that they provided an internet connection – although I guess you could argue that being cut off is part of the swamp experience!

Big Cypress is huge and there are a lot of places to check out.  And even more places if you include Everglades National Park.  For me, the southern portion of the Everglades was just too far away from where I stayed so I concentrated on nearby spots including Kirby Storter Park, Fakahatchee Strand, Loop Road, Shark Valley, and a few others.  There was a lot I didn’t get to – I need to go back!

Pre-dawn stars and cloudsPre-dawn stars and clouds, Kirby Storter Roadside Park

Kirby Storter was only a few minutes away and I hoped to take advantage of dark skies and catch site of the Milky Way from there.  I did manage to glimpse it but clouds rolled in towards dawn and I had to make do with a starry pre-dawn photo instead.  I can tell you that I felt very alone out there in the middle of the swamp at 5am.  It was dark (no moon) and hard to see very far – kinda spooky. But I also felt pretty safe because every time I moved a bit, the crickets went silent.  I figured they’d warn me if anything large got close!

Cypress swampCypress swamp, Kirby Storter Roadside Park

There’s a lovely, short hike along a boardwalk that leads back into the swamp next to some flowing water and ends at a large gator hole.

Fakahatchee Strand - Red-shouldered Hawk PairRed-shouldered Hawk Pair. Fakahatchee Strand State Park

Fakahatchee Strand Preserve State Park was close too.  It’s the largest state park in Florida and Janes Memorial Scenic Drive is an eleven mile dirt road leading from the visitor center back into the swamp.  There’s only about six miles open right now due to damage from Hurricane Irma.  You can drive this yourself like I did, or take a guided tram ride.

I was busy trying to make landscape photos when a lady hawk (the one on the left) started calling in the tree next to me.  I thought she was yelling at me for being too close, but it turned out she was calling for her mate.  He flew in and they had a “conjugal visit” while I rushed back to the car to get my longer lens.  I missed the action, but did get a nice family photo of the pair afterward.

Fakahatchee Strand 4, colorFakahatchee Strand 4, color

There are a great many views of this lovely swamp along the scenic drive.  It took me a long time to go out six miles and back because I stopped so often to photograph.

Loop Road 1, IR B&WLoop Road Cypress and Sawgrass

Loop Road is another scenic area.  Both ends connect to Tamiami Trail and I explored those, but didn’t travel the whole twenty six mile route.  Next time!

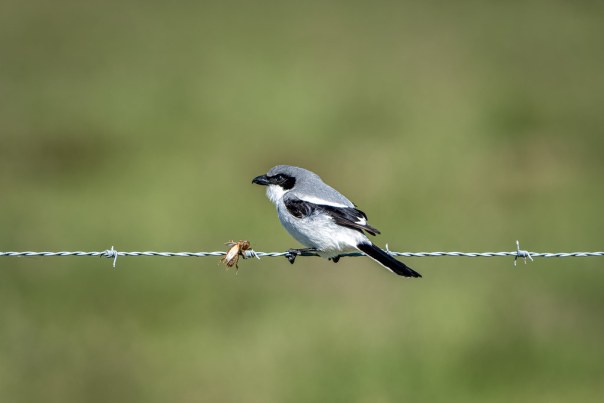
On my visit, I mainly focused on landscape images although I did see and photograph some wildlife – mainly in Shark Valley.  There were alligators, turtles, and a lot of birds –  most were the same ones we see up here in Central Florida although I did sight a yellow crowned night Heron which isn’t very common in my usual spots.  There were also a lot of small birds / warblers that I should have spent some time photographing / identifying.

This was a good time of year to visit.  It’s considered the “dry season” and in additon to the comfortable temperatures, I got zero bug bites even though I didn’t use any bug spray the whole time.

You could spend a lifetime exploring there. I stayed for three nights and was very tired when I got home but only touched the surface.  Things I wanted to do but didn’t have time for: Big Cypress Bend Boardwalk, Corkscrew Swamp, a swamp buggy tour,  a swamp walk, an airboat ride, the Indian reservations and many others.  Things to look forward to!

Cyprress and air plants, IR B&WCypress and air plants, IR B&W

Location scouting is a huge part of good landscape photography.  Sometimes you don’t have the luxury of scouting in advance.  You know that an area is special when you can come back from your first visit with photos you really like.  Big Cypress is extra special – a Central Florida Photo Ops Must Do!

We should all be grateful that we’ve preserved places like Big Cypress and the Everglades and that we’re working to restore them to their natural state.

Two other blog posts about this trip:

A previous post about the Everglades:

Related Flick Albums:

Thanks for stopping by and reading my blog. Now – go make some photos!

©2020, Ed Rosack. All rights reserved

Shark Valley

I’ve just about finished going through the photos from my trip to South Florida.  I ended up  with many images I like – way too many for a single post.  Today, I’d like to complete what I started in the Wild Baby Gators! blog with a few more photos from the Shark Valley area of the Everglades.  Next week I’ll finish my trip report with images from other parts of Big Cypress.

In a couple of spots along the north side of Tamiami Trail a few miles east of the entrance to Shark Valley visitor center, you can cross over the canal and drive along the dirt road on top of the berm. From there you can get a good look at the “River of grass”, stretching farther than you can see.

River of grass 3River of grass – looking north

I tried to stop by Shark Valley on my first afternoon in the area.  But the parking lot was full and there was a line of cars waiting to get in, so I turned around and explored elsewhere.  At 8:30 the next morning I was first in line waiting for the park to open.  I bought a ticket for one of their two hour tram rides and was on the first one to leave.  If you go, arrive early  to make sure you can get in.  I think taking the first tram ride of the day is a good idea too.  Wildlife should be more active / visible and the light is better for photography.

Crowded airspaceCrowded airspace – Glossy Ibis and Roseate Spoonbill in flight.  This was close to a small pond where a bird feeding frenzy was in progress.

There was a lot to see on the ride and the tour guide was excellent.  He knew where to spot things and passed along a great deal of info to everyone.  The tram stops for about 20 minutes at the 65 foot observation tower.  There’s a wonderful view there too.  If you zoom into this next photo, you can see two large alligators floating in the pond.

River of grass 2River of grass 2 – The view looking ~ SE from the observation Tower in Shark Valley

The water and trees around the tower are full of wildlife.  I spotted this Yellow-crowned Night Heron there. I’m going to count this as a life bird (first sighting).  I saw one before, but it was outside the US (in Costa Rica).  I also saw what may have been a  juvenile at Viera Wetlands, but it was an iffy ID.

Yellow-crowned Night HeronYellow-crowned Night Heron

There are lots of turtles and alligators along the way.

Happy togetherHappy together – A pair of yellow-bellied sliders soaking in some sunshine

And you’ll probably see some “circle of life” scenes too.

Lunch timeLunch time – Great Blue Heron with a Florida Gar

We also spotted Cormorants, Anhingas, Great and Snowy Egrets, Tri-colored and Little Blue Herons, White Ibis, Wood Storks, Red-shouldered hawks, a Purple Gallinule, and other birds.  We didn’t see any pythons, but you can tell they’re out there because many of the smaller mammals have disappeared – eaten by these large snakes.

To summarize: Shark Valley is definitely a Central Florida Photo Ops “Must do” location and I’m going to visit again.

You can view my other Everglades National Park photos in this album on Flickr.  And I’ve started to collect photos from the Big Cypress area in this album.

Thanks for stopping by and reading my blog. Now – go make some photos!

©2020, Ed Rosack. All rights reserved

Look in the mirror

Generally (and especially in Florida) clouds are good for landscape photos.  And when  water is part of your composition (like it often is here), wind can add interesting motion effects to longer exposures. If you can’t use those two elements in your images, can you still make landscapes?  Of course, but you may need to use mirrors!

Mangrove Mirror 1Mangrove Mirror 1.  Infrared, Olympus HiRes mode.

Our winter weather fronts bring cooler temperatures and often very clear skies to Central Florida.  And winds can be especially calm in the early morning.  When I run into situations like this, I don’t put my camera away.  Instead I watch for mangrove trees and other reflections.

Mangrove Mirror 2Mangrove Mirror 2.  Infrared, Olympus HiRes mode.

Compositions that minimize the sky and maximize the patterns their branches and roots make in the glassy water appeal to me.

Mangrove Mirror 3Mangrove Mirror 3

How do you approach landscape photography at daybreak, when the wind is dead calm and the clouds are few and far away?

You can view many more of my Florida Landscape images in this album: https://www.flickr.com/photos/edrosack/albums/72157646280743144.  And please click on the photos in these blog posts to view them in higher resolution on Flickr.

Thanks for stopping by and reading my blog. Now – go make some photos, and don’t forget to look in the mirror!

©2019, Ed Rosack. All rights reserved

Keeping up

Photography and image processing software innovation continues at a staggering pace.  It’s hard to keep up!  Companies are coming out with new versions and even completely new programs to compete with the Adobe Photoshop and Lightroom standards.  And Adobe is fighting back with new updates to keep their customers happy.

Bubble Pond, Acadia National Park 2Bubble Pond, Acadia National Park (2).  16×9 crop from a 7 frame IR panorama, processed in Lightroom, Photoshop, and Topaz Sharpen AI 

This is almost all good for photographers.  Competition results in new innovations that genuinely help us with our images.  If you save your RAW source files, you can reprocess a photo and often get improved results.  What’s not to like?

A small, quiet spot in the forestA small, quiet spot in the forest. Along Great Head Trail, returning from Sand Beach. Single frame, processed in Lightroom, Photoshop, Luminar, and Topaz Sharpen AI

There are a couple of downsides I can think of.  First, we usually have to pay for  the changes.  If you use Adobe’s products, their subscription model makes sure you have the latest.  Some other companies are moving to subscriptions too, but many are still charging by the upgrade.  Either way, it takes money to keep up.  You also have to invest your time.  Just knowing what software is coming out takes effort.  And having the software doesn’t do a lot of good unless you understand the new features and when / how to use them.  You have to spend time learning the new software. Time that you could use making photos with your camera ends up being spent in front of your computer.

Bubble Pond, Acadia National Park 1Bubble Pond, Acadia National Park (1). A second 16×9 crop from the same 7 frame IR panorama, processed in Lightroom, Photoshop, and Topaz Sharpen AI.

So is it worth it?  I think so.  If you want to make the best images you possibly can, then you can’t afford to ignore progress.  But of course, it depends on you, your needs, and your available resources.  And it depends on what’s changing in the software too.

Anyway, a large number of recent product releases made me think about this again.  I decided to update one that I often use (Luminar) and skip a version of another (DxO Optics Pro).  After downloading the software, I dug out some photos from the archive so I could play around and learn about the new things.  A friend’s recent visit to Acadia made me re-look at my images from there.  These three photos haven’t been on the blog before and result from processing old images in new software.  Better? Probably.  Revolutionary? Probably not.  Worth the time and money?  I think so.  Your mileage may vary.

And don’t get me started about camera upgrades.  That’s a completely different story!

By the way, Happy Thanksgiving – enjoy spending time with friends and family next week!

I’ve put many more of my images from Acadia National Park in this album: https://www.flickr.com/photos/edrosack/albums/72157646280743144.  And please click on the photos in these blog posts to view them in higher resolution on Flickr.

Thanks for stopping by and reading my blog. Now – go make some photos!

©2019, Ed Rosack. All rights reserved

iPhone 11 Pro – Camera Comments

I’ve been using the iPhone 11 Pro camera for a bit and thought I’d post some sample photos and a few photographer type thoughts about it this week.

This isn’t a comprehensive review – you can find many of those on the web if that’s what you need.  This also isn’t a “should you buy it” post.  That’s a personal decision only you can make.

Ultra-wide

Morning Light on a Majestic OakMorning Light on a Majestic Oak. I think I’m going to like the 13mm eq. FOV ultra-wide lens

The iPhone 11 Pro has three cameras and the ultra-wide is new this year.  It’s a bit limited compared to the other two: It’s widest aperture is f/2.4 so it doesn’t gather as much light.  It also doesn’t have stabilization, it’s fixed focus, doesn’t support RAW format, and doesn’t support night mode.

Wide angle at the mallWide angle at the mall

I’m not sure why Apple designed this camera with those limitations.  But at a 13mm eq. field of view, it truly is ultra-wide.  That’s going to be very handy in a lot of situations, especially where the light is good.  It’ll probably mean I use panorama mode on the phone a lot less.  And I think one of the main benefits of the ultra-wide is the inputs it provides for computations Apple can do.

Portrait mode

Narwhal the kittenNarwhal the kitten helping me test portrait mode

Narwhal modeled for me so I could test the latest Apple implementation of portrait mode.  I think his image above looks great and would be pretty hard to tell apart from one taken with a high end camera and a large aperture lens.

That’s because I corrected some issues with the way the phone algorithms rendered depth of field in the original photo. Things like whiskers and hair are difficult to show correctly.  Look at the image below to see what I’m talking about.  Click on it to open, and then click again to enlarge.

Correcting depth of field flaws

Look at the crop on the left – it’s the Portrait Mode photo produced by the phone.  If you’ve enlarged it, you can see that Narwhal’s whiskers have been clipped by inaccuracies in the algorithm.  Bright highlights and low contrast have confused the depth map info.  The middle photo is with portrait mode turned off.  In that one, all of his whiskers are visible with no depth of field / bokeh effects.  On the right side and in the full image I blended some of the middle image with the left one to show the focus rolling off more naturally.

Portrait mode has improved this year.  You can make portraits with both the wide and tele cameras.  And the depth mapping algorithms are better – but they can still be improved.  You may not notice or care much about these things and compared to previous attempts, the algorithms are better and the results look great.  Important photos could be manually edited to fix them.  If we can do this manually, eventually the software wizards will  figure out how to automate it into the phone algorithms.  iPhone 12 super pro?

Night mode

I complained last year, that other phones had low light modes and Apple didn’t.  They listened to me (ha ha) and added it.

Night mode street scene

I think it captures low light situations very nicely.  And the image stabilization is unbelievably good.  I made this next photo of the constellation Orion in my back yard, hand held!

Orion

Other improvements

There are other changes that I haven’t tried yet and don’t have examples of.

  • If you shoot in landscape mode with the wide (1x) camera, it saves information outside the frame using the ultra-wide.  This allows you to correct perspective distortion or rotate your images after capture without cropping(!).
  • “Deep fusion” is still in beta.  It captures multiple frames and combines them pixel by pixel for the best results.  The demos are super interesting and I’m looking forward to trying it.
What about RAW format and manual control?

So many of the improvements in phone cameras now come through software.  But the hardware has changes too.  In addition to a third camera, the sensors and lenses in the wide and tele cameras are improved.  And (except for the ultra-wide) they have all the RAW format and manual control capability they’ve always had, with a little better output.

A touch of colorA touch of color. 4 RAW frames, stitched and processed in Lightroom / Photoshop

So manual control is still possible.  The question is: “When should I bypass auto mode and use manual?”

With the software getting so good, and so much computation going on in the background, there are more and more reasons to use these cameras in automatic mode.  As a photographer, you’ll need to really understand your phone camera capabilities and be able to wisely choose when to bypass it.  For common situations, I think the answer is becoming “Use auto, most of the time”.

I believe that what I said last year will be true for a just a little longer:

Should you give away your non-phone cameras?  No, not yet.  Phones are still at a disadvantage in some ways:  Lens selection and sensor size are two important ones.  And the interfaces on dedicated cameras are better and allow quicker control.  But in some (many?) cases, your phone is an excellent photo (and video!) tool.  And they’re going to get better.  Just make sure you’re up to date on how to use the latest functions.

Thanks for stopping by and reading my blog. Now – go make some photos!

©2019, Ed Rosack. All rights reserved

Bird population loss

A study released last week in Science Journal reports that the North American wild bird population is in steep decline.  About 29%  of the breeding population (2.9 billion) vanished since 1970.  This includes species we see here in Central Florida.  There are 92 million fewer Red-winged Blackbirds:

Red-winged Blackbird in flightRed-winged Blackbird in flight, Viera Wetlands

And Eastern Meadowlarks declined by ~70% (73 million):

A Messy Molting MeadowlarkA Messy Molting Meadowlark – Joe Overstreet Road, Osceola County

The study is based on multiple independent data sources including bird counts and radar information.  This particular study didn’t investigate causes, but habitat loss and degradation are seen as the biggest overall drivers of the decline.

The news isn’t all bleak.  Raptors have increased by 15 million since 1970 due to  banning some pesticides, and waterfowl gained 35 million because of wetland regeneration.  This shows we can make a difference.

Bald Eagle in flightBald Eagle in flight – Kenansville, Fl.

The loss of birds is consistent with other data showing massive declines in insects and amphibians.  These are symptoms that our environment is not healthy and they should be a tremendous wake up call.

We must do everything we can to help keep our only planet healthy .  How will you answer your children and grandchildren when they ask you what you did about this?

Thank you for stopping by and reading my blog.  Now – go support conservation.  And make some photos.  Before it’s too late.

©2019, Ed Rosack. All rights reserved

#BringBirdsBack

Bracketing vs. Graduated ND Filters

I’d long ago answered this question, but a comment from Frank B. about this image caused me to reconsider some things.

Cocoa Beach Pier before dawnCocoa Beach Pier before dawn

Fair warning:  This post is a little deep into the weeds.  Feel free to look at the photo and move on if it isn’t your thing.  But I think it’s an appropriate subject, since part of the blog’s purpose is “… and how to photograph them.”

What are we talking about?

Bracketing means taking multiple photos of a scene, each with different camera settings (see this Wikipedia entry).  In this case, I made three photos at different exposures so I could capture the entire dynamic range from super dark under the pier to super bright above the clouds.  Making just a single exposure would’ve risked losing detail in the shadows or highlights (or both).

You can also use a Graduated Neutral Density Filter (GND) – an optical filter you add in front of your lens to reduce light in the bright part of the frame (see this Wikipedia entry).  Typically they have a 2 or 3 stop reduction that transitions into clear.

I’d long ago experimented with GNDs and decided not to use them.  I can  mostly reproduce their effect in static scenes by bracketing and then blending the resulting frames in post-processing.  For landscape images bracketing is an easier solution in the field and gives me more control and a better final result.  You can read about one example of my technique in this post (from back in 2011).

But then … Frank left a comment:

… amazing how the clouds remain sharp compared to the water given the time of exposure

And my reply:

Frank, this is a 3 frame, hi-res exposure bracket hand blended in Photoshop. The bottom portion was at f/5 for 25 seconds. The top was at f/5 for 3.2 seconds. So that and distance is why the clouds are sharp compared to the water.

The way I made this image resulted in a huge difference in shutter speed between the water at the bottom and the clouds at the top.  And using the Olympus Hi-Res mode exaggerated the shutter speed differences since it combines 8 separate captures to create each hi-res output file.

If I’d used a GND the shutter speed would be constant throughout the frame and the blur in the clouds would’ve matched the blur in the water.  In this particular case,  bracketing exposure by varying aperture instead of shutter speed would also make the motion blur consistent.  I’ve never done that since it seemed like it would lead to other issues (inconsistent focus / depth of field).  It’s something to think about and maybe try in the future for a setting where consistent motion blur is important.

Thanks for the question Frank!  Photography is fascinating.  There is so much to think about and still left to learn.

And thanks to everyone else for stopping by and reading my blog (especially if you read all the way through!). Now – go make some photos!

©2019, Ed Rosack. All rights reserved

Take the shot? Or not?

Editor’s note:  For everyone in The Bahamas, here in Florida, and up and down the east coast of the US – please keep an eye on hurricane Dorian, get prepared, and stay safe!


I’ve driven by this tree many times – every time I go around Black Point Wildlife Drive in Merritt Island National Wildlife Refuge.  I like its isolation and the reflection it makes in the usually very still water.

Lone pine between the canal and roadLone pine between the canal and road

I saw and admired it again on my visit a few weeks ago, but I almost didn’t make this image.  Why not?  Because I thought I’d already made that very one before and didn’t need another.  Fortunately, I wasn’t in a hurry, so I stopped and made a two frame vertical panorama with my IR camera.

When I got home, I tried to find the photo I thought I remembered.  Here are two of that same tree that I found in my archives.  This first one is from nearly the same spot:

Clear day, calm water 1Clear day, calm water, January 2011

And this one is from the other side:

Left at the lone pine treeLeft at the lone pine tree, August 2018

I like the newest photo the best.  I’m glad I went ahead and made it!

On the other hand: When Kevin M. and I were down in Osceola county, we saw two or three Bald Eagles.  When I was young, Bald Eagles were rare and I never saw one in the wild until I moved to Florida and started paying more attention to wildlife.  Now they’re getting much more common but I still get a thrill whenever I see one.  One of the eagles was sitting on a pile of dirt a little off the road.  Kevin asked if I wanted him to stop for a photo and I said no.  I have quite a few Bald Eagle photos that I like (e.g. this one), and the setting that day just didn’t look like it would make a good photo.  It would probably have sat on my hard drive or been deleted when I went through the photos.  Why make it?

Take the shot or not? Like many things, it depends.  I suppose the moral of this story is: “When in doubt, make the photo.  But don’t make every photo.”

Thanks for stopping by and reading my blog. Now – go make some photos, or not!

©2019, Ed Rosack. All rights reserved