Category Archives: VARIOUS

Look Again

I drive past this place all the time.

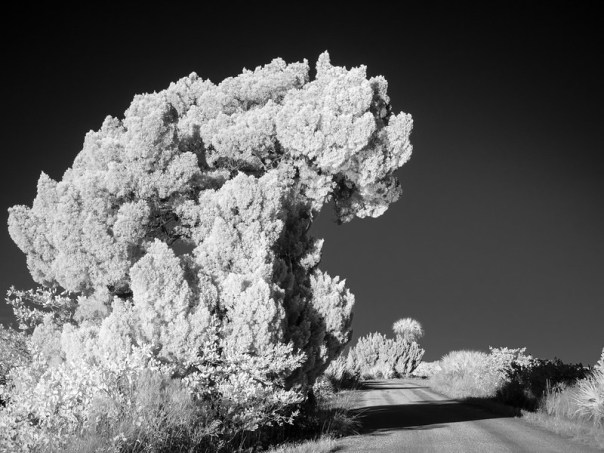
The road less taken
The road less taken (black and white, infrared; two image vertical panorama blended manually)

I’ve made some photographs there, but haven’t actually stopped for several years.  It’s changed tremendously, and I like how the overgrown road looks now in infrared.  A little spooky.

Places change.  Even if you think you know a site, go back once in a while.  It might look different.  Or you might have an infrared camera with you next time.

Thanks for stopping by and reading my blog. Now – go make some photos!

Monochromatic HDR Photography

If you’ve looked through this blog or my Flickr stream, you know I like Black and White photography.

B&W with film used to be simple.  Get some Tri-X film, put it in your camera, and make exposures. Take the film to the drug store and wait to get your prints back.

OK, it’s never been all that simple. If you’re really hardcore, you get out your chemicals, develop the film yourself and print your best ones.  And if you were really, really hardcore – you could dodge and burn while printing to decrease and increase exposure in specific parts of the print.

You can still do all that.  But many people today use digital cameras for B&W photography.  And things are still as complicated as you want to make them.  You set your camera to color mode (yes color, unless you have a Leica M Monochrom camera) and RAW format and make exposures. You load the resulting files into your favorite processing software and adjust / convert the color images to B&W.  Then you print carefully to maintain and display all the tonality present in your carefully crafted image.

Along the way, you’ve got to make many decisions on what software to use and how to use it.  It’s very easy to get lost and see only trees, no forest.  And if you want the best results, you need to know what tools are available and how to use them.

Composing

Composing – A recent photo I made and converted to B&W

I purchased and read Monochromatic HDR Photography by Harold Davis.  I’ve been a fan of his for a long time and I admire his photographic expertise and creativity.  It’s a real treat to read this book and follow along as he makes some absolutely lovely B&W images.  He covers info that will help beginners as well as experienced photographers and it’s not just post-processing technique.  He also talks about the reasons behind choices and creative aspects.

I won’t give away the whole book.  It’s a good one and covers the subject well, with a tremendous amount of information that everyone could use.  If you’re interested in B&W, you should buy and read it.  Basically, Harold’s work flow consists of:

  • Capturing the image as a set of bracketed exposures to make sure you preserve all the tonality that’s present in the scene
  • Converting the bracketed sequence into the best quality, color, high dynamic range image possible
  • Making multiple passes of B&W conversion on the color HDR file and saving them.  With each pass you can vary tonality, contrast, detail, etc. to enhance parts of the image.
  • Using layers to blend the different B&W versions into a single “magical” result

I’ve been trying out his ideas and the photo in this post is a recent example.  Below are some intermediate steps so you can get an idea of how this works.

pass 1Step 1:  I like the general look, but thought the trees should be darker

pass 2Step 2: I like the tree in this version, but the fern, photographer, and parts of the canopy are too dark 

pass 3Step 3:  Fixing the exposure / contrast of the photographer

finalFinal:  All layers blended together to create the version I posted on Flickr.  I like the sky and canopy glow, the dark tree, the bright ferns and the photographer’s appearance compared to the background.

Although I have a long way to go to even get close to Harold’s level, I really like his approach.  There are a great many advantages and the only disadvantage I can think of is that it takes time.  But if you have a scene that you want to render into the best B&W image possible, this is a great way to do it.  And Monochromatic HDR Photography by Harold Davis is a wonderful guide to “Shooting and processing Black & White High Dynamic Range Photos”.

Central Florida Photo Ops Book Review Rating:  5 star, must read!

Thanks for stopping by and reading my blog. Now – go make some photos!

©2014, Ed Rosack. All rights reserved.

Lessons from a photogenic place

There were a few lights in the parking lot way back behind the sand dunes and the clouds were thick and low, making it so very dark on Marineland Beach south of St. Augustine, Florida that my first few exposures didn’t even register on the sensor. I kept raising exposure times and ISO until I was able to capture this:

99 seconds in the dark
99 seconds in the dark – ISO 400, 99 seconds @ f/8; Marineland Beach, about 45 minutes before sunrise.

It sure didn’t look this way to my eyes.  I couldn’t see much at all and had to use my head lamp to compose and focus.

When I got home and processed the photos, they reminded me of some things that might be useful to others.

Pre-visualize before, during, and after you press the shutter

You should always try to pre-visualize the photo you’re making before you compose and shoot – and it’s a delightful feeling when the image turns out just like you imagined.  But this is often harder than it sounds.  Especially if you can’t see what you’re photographing.  There’s nothing wrong with adjusting your vision as you go.  This is a wonderful advantage of digital cameras that we’d be foolish to ignore.  Check your results on the LCD during the shoot and adapt as necessary.  In this case, I knew exactly what I needed to change when I first looked at my (black) LCD.  I needed more exposure!

Pre visualization is great, but there’s also nothing wrong with post visualization.  What I mean is to try as many things as you can think of while you’re there and sort it out later when you get home.  Try HDR, panoramas, high tripod, low tripod, and focus stacking.  Use different  focal lengths, shutter / aperture combinations, and positions / directions.  Exploit changing weather / light as time goes on.  Capture them all and give yourself a better chance to come out with something you like.

Shutter speed

Shutter speed is a critical variable when photographing moving water.  The 99 second exposure above gave me very smooth and milky looking water, nicely outlining the rocks.  A 1/1000th second (or faster) exposure can freeze drops of water.  In between, you can find other speeds that look very different from the extremes.  Capture the scene with different shutter speeds when possible.  In this 1 second exposure, I like the added interest from the flow patterns in the water.

Marineland Beach and cochina rocks
Marineland Beach and coquina rocks – ISO 100, 1 second @ f/4 with 8 2/3 stop neutral density filter, ~30 minutes after sunrise.

High Dynamic Range (HDR) processing and ghost removal

There are so many controls and sliders in HDR software that it’s hard to know which ones to change.  Most HDR software has an option for removing “ghosts” (differences between multiple frames for anything moving in the image) and I think it’s a critical setting.  HDR Efex allows me to select the baseline frame I want to use as well as the amount of ghost removal to apply.  I like to experiment with these and select the combination that looks best.  In the image below, there was only one  setting that showed the breaking wave. And I think the wave definitely adds to the image.

Golden rocks and sand
Golden rocks and sand – 5 image bracket (-4 to +4 stops), almost an hour after sunrise.

Don’t leave too soon

I made these three images (and more!) over a period of 90 minutes.  The changing light provided different looks and opportunities to photograph this place.  It’s worth getting there early and staying for a while.

Don’t get overwhelmed

When you visit a beautiful place, especially for the first time – it’s easy to be overwhelmed and forget about everything except pressing the shutter button.  It helps to visit multiple times. The first time, it’s hard to see all the possible compositions until you get over the novelty and excitement. When you can relax and enjoy the experience you can open your mind and get in the zone.  Then you’ll make images you’ll be happy to share with others.

You can see more of my photos from Marineland in this set on Flickr.

Thanks for stopping by and reading my blog.  Now – go make some photos!

©2014, Ed Rosack. All rights reserved.

Get Your National Park Service Senior Pass

I drove over to Merritt Island National Wildlife Refuge last Friday to scout for new places to launch my kayak. I’d never been to the Beacon 42, boat ramp before, so I stopped there first.

Beacon 42 boat ramp
Beacon 42 boat ramp, before dawn.  Venus in the upper right, reflecting in the lower right.

It looks like a great place to launch from, with easy access to Mosquito Lagoon in the distance to the east.

I also went by the Visitor’s Center since I needed to renew my MINWR annual pass.  The very nice man at the desk asked me how old I am.  When I told him I’d be 62 next month, he told me to come back then and get a senior pass.  I’d heard about this before but didn’t know it started at age 62.  And that it’s a lifetime (not annual) pass!  And that it gets you in to more than 2,000 federal recreation sites including national parks, national wildlife refuges, national forests, and areas managed by the Bureau of Land Management and Bureau of Reclamation!  It’s quite a deal –  I’ll be back there next month to get mine.

I did make a few more photos that day.  Here’s one more:

Reflecting mangroves
Reflecting mangroves: Something about mangroves always seems photogenic to me. Especially in mirror like water.

Thanks for stopping by and reading my blog.  Now – if you’re a US citizen age 62 or older – get your pass.  Then go make some photos!

©2014, Ed Rosack. All rights reserved.

The Senator Saga – another update

The Senator” is the nickname of what was a 3500 year old Cypress Tree in Big Tree Park in Longwood Florida.  Sadly, it burned down in January of 2012 when a drug addict lit a fire in the hollow at the base of the tree because “it was dark and she wanted light to see the drugs she was using.”.  The culprit confessed and is expected to be sentenced shortly to either probation or a few months in prison.
I’ve written several blog articles about this and I hope you’ll forgive me for writing one more:
The latest chapter in this story is even more personal and began in December of last year when someone posted a comment on this  photo of the Senator on Flickr asking if I’d be willing to sell a copy of the image.  Tony Seifred and I exchanged a few emails, and to make a long story short we also ended up exchanging gifts.  I gave Tony copies of two photographs of the Senator and he gave me a piece of the tree itself!  I’ll let Tony tell his side of the story:
“Back when the tree burned, NPR covered the story the following morning.  Within an hour I was cold calling county personnel and getting passed from one person to another.  I was trying to encourage them to make offerings to school systems for educational purposes.
After many months I received an email that the decision had been made to take applications for remains.  I contacted my local schools and museum trying to get them to apply.  I even provided the applications.  No one applied.
So I decided to try on my own.  Eventually I did receive a piece of the outer part of the tree, but pick-up had to be in person.  The story after that is long and convoluted but eventually did find someone there to accept payment to collect and ship the piece. Upon arrival the box was open and the piece had clearly been out.
Despite the rather expensive UPS store packing.  Some pieces were broken off and still inside the wrapping. I am gifting you the largest of those pieces.”
Kudos to Tony for pursuing this and making it happen.  I had the piece mounted together with the photo I made before it burned.  Here’s how it looks:
A shadowbox display of a photo of the 3500 year old Cypress tree in September of 2011 before it burned along with a small piece of the remains from after it burned down in January of 2012.
A shadow box display of a photo of the 3500 year old Senator Cypress tree in September of 2011 along with a small piece of the remains from after it burned down in January of 2012.
This means a great deal to me and I’ll treasure it as a reminder of visits to the Senator before the tragedy.  I’m exceptionally grateful to Tony for his generosity in sharing with me.
Thanks for stopping by and reading my blog.
©2014, Ed Rosack. All rights reserved

Blue Spring State Park

Intro / Description

There’s been a lot of news here recently about all the Manatees at Blue Spring State Park in Orange City, Florida – so I decided to go over and look for myself.

Many Manatees Around 20 Manatees in this one photo – There were more than 200 there on the day I went and the count’s been over 330 on some recent days.

Louis Thursby bought Blue Spring in 1856 and ran a steamboat landing.  The steamboats shipped people and goods up and down the St. Johns River and stopped at the landing until the 1880s.  The area became pretty run down until the state purchased the land in the 1960s and established the park.

There’s lots to do:  Plenty of picnic areas;  Hiking and nature trails; Cabins and a campground for overnight stays; Canoes and kayaks to rent;  And you can even take a River Boat tour right from the park. We’ve been several times in the past but I hadn’t visited in years.  It brought back very fond memories of tubing down the run from the spring and of our kids shivering in the 72 degree water, but enjoying it so much they refused to get out.  When I used to scuba dive (a very long time ago), I dove to the bottom of the spring.  In retrospect, that was at least a little reckless – people have died in there.

Info for Photographers

Photo hints:

You can’t go in the water when the Manatees are there.  But a lengthy boardwalk running from the St. Johns up to the spring  provides many vantage points for photos.  The Manatees are all along the run, but many congregate in the swimming area where you can get very close.

You must bring your Polarizer to cut the reflections so you can better see the manatees under the surface.  Remember this will block a couple stops of light.  And since the water is in shade in many places you may be a little starved for light.  A camera / lens with vibration reduction / optical stabilization and good output at higher ISOs (~640) will come in handy.

Take a breath

Take a breath – A manatee surfaces at Blue Springs State Park

Tripod/Monopod: They’re allowed, but crowds could make tripods a problem.  I left mine at home.

Lenses:

I used a 24 – 120 f/4 lens and was happy with it.  I really didn’t want to switch lenses (and polarizers) so the focal length range on this came in handy.  At times I wished for a little more reach but I could usually find another Manatee closer to me.  I also wished for a wider aperture (f/2.8?), but the stabilization made this lens my best choice.

Best time to visit: Visit during a wintertime cold snap for the best chance of seeing Manatees.  They can draw a crowd and the park is closed early to new arrivals if it fills up.  Go on a weekday or get there very early on a weekend to make sure you get in. For other activities, you’ll  have to work around their schedule – all water activities are prohibited when there’s a Manatee in the water.  For swimming, tubing, snorkeling / diving,  and kayaking in the spring run go when they aren’t there (March 15th – November 15th). Other: Manatees are the main attraction in the winter, but there are other animals there too.  I’ve seen Alligators, wild pigs, and common Florida birds  (e.g. Herons, Egrets, Anhingas, Limpkins, Wood Storks, Red Shouldered Hawks, and Vultures).  Other folks have reported some not so common Florida Birds like Florida Scrub Jays and Barred Owls, – so keep your eyes open! And there’s a three-story home built built by the original owners that’s worth a visit.

The Louis P. Thursby House The Louis P. Thursby House was built in 1872 at Blue Springs State Park

Summary

Manatees are on the endangered species list.  Blue Spring provides a unique opportunity to see these large animals up close.  If you’ve thought about going to Blue Spring, now’s the time.  If you haven’t thought about going to Blue Spring, now’s the time! You can find out a lot about Manatees at the Save the Manatee Club  website, including updated reports on conditions and counts at Blue Spring on this web page.

My Gallery /  Flickr photo set:  Blue Spring on Flickr
Website:  http://www.floridastateparks.org/bluespring/
Address / Phone: 2100 W. French Avenue Orange City, Florida 32763
(386) 775-3663
Central Florida Photo Ops Rating: A Central Florida Photo Ops Must Do!

Thanks for stopping by and reading my blog.  Now, go make some photos! ©2014, Ed Rosack. All rights reserved.

Infrared updates

These two posts on infrared photography seem to get a lot of hits:

Since they’re from a while back, I thought I’d update you on a couple of things.

Ebbing tideEbbing tide – The outgoing current cuts a temporary channel through the beach (Little Talbot Island State Park).  IR, B&W.

I’d been using an Olympus E-PL1 camera, modified for IR by  http://www.lifepixel.com/ and I’ve been pleased with the output.  But it uses a first generation 12 MP, micro 4/3 sensor and requires care to minimize noise.  I also have an Olympus E-PL5 with a 16MP current generation sensor.  It has much better noise characteristics and additional resolution, so I decided to have it modified to upgrade my infrared capabilities.

I was very happy with the service from LifePixel, but this time, I chose Precision Camera to do the mod.  They also did a fine job, were very prompt and even a few dollars cheaper.

One change I made was to select a 665 nm filter instead of 720 nm.  What this does is pass a bit more of the visual spectrum along with the IR light.  This gives you more flexibility in post processing.  You can still process for the IR B&W look, but with the extra visible spectrum light, false color post processing is easier. 

At restAt rest – Driftwood on the beach (Little Talbot Island State Park).  IR, false color.

When I process RAW files from the E-PL1, I can easily adjust white balance in Lightroom.  With the 665 nm filter on the E-PL5, I couldn’t get to a neutral white balance until I created a custom camera calibration profile for it using Adobe’s DNG Profile Editor.  You can read more about this here (link no longer available).

The Road Under the Red Cedar Tree
The Road Under the Red Cedar Tree (Black Point Wildlife Drive in Merritt Island National Wildlife Refuge).  IR, B&W.

I made the photos in this post with the newer camera.  There’s less noise, the 665nm filter is more flexible in post, and the extra pixels are nice to have.  I like how it’s working so far!

You can see larger versions of these and other examples of my infrared photography in this set on Flickr.

Thanks for stopping by and reading my blog.  Now, go make some IR photos!

©2014, Ed Rosack. All rights reserved.

Marineland Beach

Intro / Description

Historically, coquina’s been used as a building material.  The Castillo de San Marco in St. Augustine and Bulow Plantation in Flagler Beach are made of it.  But today I think the best use of coquina is for photography – it makes a great foreground in landscape photos!

Marineland Beach morning 3
Marineland Beach morning – A colorful, brisk daybreak on the rocks (48mm, ISO 50, f/16, 3 seconds)

Several locations on the Atlantic coast of Florida have deposits of coquina rocks exposed on the beach.   Three that I know of are:

  • Washington Oaks Gardens State Park (Palm Coast, Fl)
  • Blowing Rocks Preserve (Jupiter Island, north of West Palm Beach, Fl)
  • Marineland Beach (south of St. Augustine, Fl)

I’ve mentioned Blowing Rocks Preserve before and I haven’t been to Washington Oaks in a long while, so this post is about Marineland Beach.

Info for Photographers

Photo hints:

This is a terrific sunrise site.  There’s public parking right on the beach and the area isn’t closed at night, so you can arrive as early as you want to.  If you do arrive before dawn, be careful – the footing on or close to the rocks is tricky in the dark.  A misstep can result in broken camera equipment or broken photographers.

Bring a flashlight (or use your cell phone).  Just be mindful of any other photographers nearby – you don’t want to spoil their images with your lights.  And know how to use your camera in the dark so you don’t have to fumble with the flashlight – it will save you time and aggravation.

Bring a cable or remote release to help avoid camera shake.  I usually use manual focus, at least until it’s bright enough for my camera’s autofocus to work.  Many cameras will have a “live view” mode that lets you enlarge around the moon or a distant light so that you can carefully focus on infinity.  If you don’t have live view, try using the markings on your lens.  Just set it to the infinity mark and back off a little.  How much?  Experiment before hand.  If you’re stopped down to f/8 or smaller, depth of field should help.

Before dawn and sunrise are very good times to shoot in RAW format.  RAW will give you extra dynamic range to help control contrast in post processing.  Also, learn about “long exposure noise reduction” and consider turning it on.  For exposures over a second or so, it does well removing noise in camera (at the cost of some extra time after you make the image).

Tripod/Monopod:

Yes – you must bring yours! You can even put your camera on it when you’re not using it for a walking stick!  And make sure you always know where it is in the dark so you don’t knock it over.

Marineland Beach morning 2
KM on the rocks, working the scene (120mm, ISO 100, f/8, .4 seconds)

Lenses:

You can use a variety of lenses.  I’ve added the focal length to the captions for the three photos in this article.  Don’t change lenses on the beach.  It’s often windy and you don’t want salt spray or sand inside your camera.  Choose a versatile zoom lens and leave it on, or retreat to your car to swap to a different one.

Coquina rock sunrise
Coquina rock sunrise (14mm, ISO 100, f/11, 1/8th sec)

Best time to visit:

Sunrise occurs later in the winter and gives you more time to get to this beach.  And check for high tide – it’s best for good water action near the rocks.

Other:

Wear good shoes.  Flip flops could be a problem for your toes on the rocks in the dark.

Make sure you keep an eye on the waves.  Every so often, a larger one will come along.

Summary

Marineland Beach is a wonderful place for landscape and sunrise photos.  You can see larger versions of the photos above if you click on them.  And this set on Flickr has several more photos I made there.

My Gallery /  Flickr photo set:  Marineland Beach on Flickr
Website:  None
Address / Phone:
Just south of Marineland at
9600 N Oceanshore Blvd
St Augustine, FL 32080
Central Florida Photo Ops Rating:  A must do sunrise spot!

Thanks for stopping by and reading my blog. Now – go make some photos!

©2014, Ed Rosack. All rights reserved.

Ho, ho, ho – Merry Christmas!

I hope all of you have a wonderful Christmas holiday and a joyful and prosperous New Year!

Merry Christmas to all My Flickr friends!

Santa inbound through the inlet

Thank you so much for reading my blog this year. Now – get back to your family and enjoy the holidays!

©2013, Ed Rosack. Some rights reserved (Creative Commons, Attribution-ShareAlike).  Santa’s image courtesy of Tsar Kasim:  www.flickr.com/photos/tsarkasim/4192121818/

My Favorite Photos from 2013

Happy Holidays!  I hope that all of you, your families, and your friends have a joyful and happy holiday season!

The end of the year is a good time to review results and contemplate how to improve any endeavor, and photography is no exception.  I’ve put together these “Favorite photos of the year” posts since 2009.  This is a hard process for any photographer.  For me, it’s difficult to separate my opinion about a photograph from emotional connections that I might have with the subject, scene, or situation.  But making this effort is important and part of the learning process.  I don’t claim to be objective –  these are simply the photos that I like best.  Feel free to disagree, but I hope you’ll enjoy looking at the ones I’ve picked.

You can click on each of these to go to Flickr and see a larger version.  Or you can click on this link to view the complete set on Flickr.

My number 1 favorite photo of 2013:
A dream, gone

 A dream is gone, in the harbor, at dawn; Cocoa, Florida; October.  

I have a thing for sunken boats and when I briefly glimpsed this one while out with a group, I had to go back later and make a photo.  See this post for more info.

My number 2 favorite photo of 2013:

Cloud Gate (AKA "the bean")

 Cloud Gate (AKA “the bean”); Chicago’s Millennium Park; Chicago, Illinois; September.  

I made many photos that I like during my first visit to Chicago last September.  This one is my favorite from that trip.  See this post for more info.

My number 3 favorite photo of 2013:
Partial eclipse of the sun

 Partial eclipse of the sun; Cocoa Beach Pier, Florida; November.

I almost didn’t get to make this photo since I was late finding out about the eclipse.  It’s a bit different from most sunrise photos I make because I used a long telephoto lens to emphasize the sun instead of a wide-angle lens.  The three people watching with me from the end of the pier were a bonus.  See this post for more info.

My number 4 favorite photo of 2013:
You otter not interupt me

You otter not interrupt me; Viera Wetlands, Florida; November.  

This river otter was having a morning dust bath on the dirt road through Viera Wetlands.  It stopped and watched me for a bit when I got out of my car to make this photo, but then ignored me and finished before sliding back into the water.

My number 5 favorite photo of 2013:

Brewing storm

 Storm clouds over the Everglades; Everglades National Park, Florida; April.

We had a wonderful expedition to the Keys, Everglades, and Dry Tortugas in April.  This photo of a pine tree and grass reflecting from the inches deep water in the Everglades “river of grass” is my favorite landscape from that trip. See this post for more info.

My number 6 favorite photo of 2013:
Reading

Reading; St. Augustine, Florida; August.

St. Augustine is full of photo ops.  I really liked the symmetry of the columns in this scene and how they led my eye towards the man reading on the bench.  See this post for more info.

My number 7 favorite photo of 2013:
Sea oats

Sea oats; Howard Park, Tarpon Springs, Florida; August

I noticed this scene while wandering around not expecting to find anything to photograph.  Another lesson in “keep your eyes open”.

My number 8 favorite photo of 2013:
Resting behind mom

 Resting behind mom; Lowry Park Zoo, Tampa, Florida; March.

We spent time in “Primate World” watching the family of Orangutans.  The young one (I think this is RanDee, born in August 2008) was full of energy, swinging all around on the platforms and ropes.  The adults watched her with very human-like  ”where does she get the energy” looks.  Finally, RanDee rested for a bit behind her mom (DeeDee) and I was able to make this photo.  See this post for more info.

My number 9 favorite photo of 2013:
The Chapel on the Rock (Saint Catherine of Siena Chapel)

The Chapel on the Rock (Saint Catherine of Siena Chapel); Allenspark, Colorado; July.

This is south along Route 7 out of Estes Park on the grounds of the Saint Malo Retreat.  We had no idea it was there, but when we drove by and saw the scene, I had to stop and photograph it.  It’s a multi-photo, hand-held panorama processed in Photoshop and Lightroom.  See this post for more info.

My number 10 favorite photo of 2013:
Not sleeping

Not sleeping; Big Cat Rescue Sanctuary, Tampa, Florida; August.

To me, this photo symbolizes what we learned about the plight of captive large cats and primates while visiting two rescue organizations near Tampa.  See this post for more info.

If you’d like to see my favorite photos from earlier years, click on these links: 200920102011, and 2012.

I hope you’ve had a great photo 2013 too. If you send me a link or leave one in the comments, I’ll be sure to take a look at your favorites.  Thanks for stopping by and reading my blog.  Now – go make some more favorites of your own!
©2011 – 2013, Ed Rosack. All rights reserved