Tag Archives: moon

Venus and the Moon Over the Marsh

I stopped by the St. Johns river at the SR 50 boat ramp before sunrise recently. The sky was a bit plain, but there were a few clouds low on the horizon with some pre-sunrise color showing. And Venus was visible below and to the left of a waning crescent moon, which added some interest. I made a few photos hoping to capture what I was seeing.

Venus and the Moon over the MarshVenus and the Moon over the Marsh

This image is a four frame panorama that I stitched together in Photoshop. Separate exposures of the sky and foreground helped me record a wider field of view and control the enormous dynamic range of the light. I like the way it turned out. If you click on it, you’ll go to Flickr.com where you can see a larger version as well as zoom in.

The St. Johns is the longest river in Florida and there are a huge number of scenic photo ops along its 310 mile length. I’ve collected a few of my photos of it in various spots. You can view them in this album: https://www.flickr.com/photos/edrosack/albums/72157624991879878. And you can see some associated blog posts at this link: https://edrosack.com/category/photo-ops-in-florida/st-johns-river/.

Thanks for stopping by and reading my blog. Your visits, comments, and likes are always welcome and a big motivator for me. Stay positive, be kind, take care of yourselves and each other. And if you can — make some photos!

©2022, Ed Rosack. All rights reserved

T-Mount Try Out

The T-Mount system was devised by Tamron in the 1950s to allow their lenses to be used on many different cameras. It’s also the system used to attach a camera to the prime focus of a telescope. I’d never tried it, so I ordered a T-Ring and Sony adapter and gave it a go.

All of these images were made with a Sony A6600 APSC camera mounted on a NexStar 6SE telescope at prime focus using the T-Mount adapter. I captured multiple frames for each and processed them with astro photo capabilities added recently to Affinity Photo.

In prime focus astrophotography, you’re using the telescope as a lens, mounted directly to your camera. There’s no eyepiece involved, although you can insert additional optics into the light path. I used three different configurations.

1. Prime focus, with a Celestron f/6.3 Reducer Corrector. Equivalent focal length = 1.5 x 1500 x 0.63 = 1418mm

In the first image I used a Reducer / Corrector. This both widens the field of view / lowers the focal length, and flattens the field to enhance sharpness at the edges. This worked OK, but did have some obvious vignetting that was hard to deal with in post processing.

Luna 2.Prime focus. Equivalent focal length = 1.5 x 1500 = 2259mm.

Image 2 is the same setup, but straight from the telescope to the camera. There was no vignetting and I think the image quality is very high. The featured image at the top of this post is a crop from this photo. (Note: This one is posted on Flickr and is worth a click to see in greater detail. Click it twice when you get there to enlarge it.)

3. Prime focus with a Meade 2x Barlow lens. Equivalent focal length = 1.5 x 1500 x 2 = 4500mm

And finally, image 3 uses a Barlow lens, which is like a 2x extender. The image quality in this one is not as good. That could be due to degradation from the Barlow, a slight mis-focus, or vibrations / motion (or all three!).


Conclusions:

  • Check and double check all settings and adjustments.
  • These are longer focal lengths than anything I’ve ever tried before. Technique is super important and it’s hard to know if you’ve messed up until you get things on the computer later.
  • The straight prime focus method works very well. The image quality is the best I’ve gotten through the telescope, It’s better than the afocal approach (camera lens through an eyepiece) I used for this post.
  • The reducer / corrector works OK, but I’ll probably shy away from it unless I need a wider field of view. And if that’s the case I think I’d try using piggy-back photography first.
  • The 2x Barlow approach is challenging. The magnification makes any focus or motion issues much worse. This should probably be reserved for planets, and used as a second option to straight prime focus or piggy-back with a long telephoto lens.
  • There is a lot to learn about astro photography!

Thanks for stopping by and reading my blog. Take care of yourselves and each other. And if you can – make some (astro) photos!

©2021, Ed Rosack. All rights reserved

The Telescope

Comet Neowise and the Great Conjuction in 2020 made me think about the telescope I’ve had in the closet for many years. I’m happy with the images I made of those two events, but I regret not trying to use the scope to photograph them.

I’d only ever used it for observing. Photographing through a telescope requires a much higher level of knowledge and technical skill. In addition to knowing how to set up and align the scope and camera, you have to understand and balance many more factors: camera (ISO, aperture, exposure time, focus, …), astro (atmosphere, alignment / tracking, field rotation, …) and post processing. So I thought I’d try a couple of shots to see what it could do.

Moon
Earth’s natural satellite. Using a Sony DSC-RX100M3 camera (1″ sensor), afocal through Celestron NexStar6 SE scope and 40mm eyepiece; Thirteen frames, manually aligned in photoshop and blended with smart stack mode median.

I used the moon to get everything set up and tested. Next I wanted to try to photograph a Deep sky object. They’re plentiful, but harder to find or even see. I picked the Orion Nebula as my second target – it’s probably the easiest DSO. Even here in my back yard, Orion’s belt stands out.

Orion Nebula
Orion Nebula. Same setup as above, using six frames instead of thirteen.

I know these aren’t Hubble level images or even very good amateur astronomer images. But I’m pleased with how they turned out. I want to continue exploring photography with the telescope and see how well it can work in my urban (and light polluted) environment. If I make some progress, I’ll share the images with you.

Thanks for stopping by and reading my blog. Take care of yourselves and each other. And if you can – make some (astro) photos!

©2021, Ed Rosack. All rights reserved

Sandford Sunrise Stroll

I haven’t mentioned the Photography Interest Group in a long time. There hasn’t been much activity, and to be honest the expeditions have always been few and a little haphazard. But anyway Kevin K. organized an early morning photo excursion last Friday and we managed to gather five of us in one place.

We met in downtown Sanford, Florida at the Monroe Harbour Marina for a socially distanced photo walk. Kevin M., Mahesh S. and Lutfi S. joined us too. Here are a few of my photos from that morning.

I arrived a bit early and made this image while waiting for the others. Once I got home, I was curious about the very bright star above the moon and discovered it was the planet Mars.

Moon, Mars, and stars: before dawn at the marinaMoon, Mars, and stars: before dawn at the marina

When everyone was there, we wandered around the area. Calm water and colorful skies made for a nice dawn image looking eastward through the moorings.

Sanford sunriseSanford sunrise.

And westward, the Harvest Moon was setting along the river.

Setting moon and reflectionSetting moon and reflection

Zooming in searching for details, I discovered a Halloween themed sailboat:

Ghost shipGhost ship

Masks, no handshakes (or even elbow bumps), and 6 foot distances made it seem a little strange. But ignoring that, it was almost like old times – seeing friends, catching up on each other’s lives, and making a few photos too. Definitely good for the soul.

On the way home, I drove by Marl Bed Flats again and the standing water there still looks pretty widespread. So no changes in this year’s sunflower forecast – sorry.

Thanks for stopping by and reading my blog. Stay safe, take care of yourselves, your friends, and your families. And if you can, make some photos – with your socially distanced friends!

©2020, Ed Rosack. All rights reserved

Moon Shadows – August 21, 2017

Did any of you notice the solar eclipse in the US last week?  Here at Central Florida Photo Ops HQ we certainly did!  And even though the full moon covered “only” ~85% of the sun, it was still an awe-inspiring show.

Our experience in Winter Springs started with heavy rain and thick cloud cover, but the sky quickly cleared and from then on we had an amazing view.  I put together this time-lapse movie with ten photos I made at about ten minutes intervals :

To set up my camera, I first focused manually on a very distant tree and taped down the focus ring.  Then I spent some time figuring out exposure so detail on the sun’s surface would show.  The sun is really bright!  I put two stacked neutral density filters in front of my lens to cut the light by about 11 stops.  I ended up shooting in manual exposure mode at ISO 64, f/16, and 1/1000 sec at 800mm equivalent focal length.   For insurance, I also bracketed around that base exposure.  Luckily there were a few sunspots to see:

Sunspots on the surface

We had two other roving photographers on assignment to help document the eclipse.  Kevin McKinney was in Orlando south of us.  He noticed the sun shining through a tree and made the photo below.  Small openings between the leaves were acting as pinhole lenses and focusing multiple images of the crescent sun on the ground.  I’m glad he noticed this, I didn’t think to look:

Eclipse 2017 - thanks to the trees for my only photo opEclipse 2017 – thanks to the trees.  ©Kevin McKinney, 2017, all rights reserved.  Used with permission.

Howard Thomas (our other roving photographer) braved scarce hotels and huge traffic jams to report from Santee, South Carolina along the path of totality.  He made these next three photos:

The Sun’s atmosphere is 300 times hotter than the surface.  A total eclipse is one of the best ways to study the corona.  ©Howard Thomas, 2017, all rights reserved.  Used with permission.

Total eclipse and the star Regulus (upper left corner – click to see larger).  ©Howard Thomas, 2017, all rights reserved.  Used with permission.

Baily’s beads, or the Diamond ring effect, is visible during a total solar eclipse. The rough terrain on the edge of the moon allow beads of sunlight to shine through in some places. ©Howard Thomas, 2017, all rights reserved.  Used with permission.

Eclipses are fun to think about.  They’re such a huge coincidence!  The Moon is 400 times smaller than the Sun, and the Sun is 400 times farther way.  So they’re the same apparent size in the sky – that can’t be very common in the universe.  We don’t see one very often because the Moon’s orbit tilts with respect to Earth’s orbit around the sun.  And since the moon is slowly moving away from the earth, the geometry will be ruined after another billion years.

You can click on any of these photos to look at larger versions.  I hope you were able to see this stunning event and get some photos of your own.  If not, the next one in the US is in 2024.

Thanks for stopping by and reading my blog.  Now – go be amazed by rare natural phenomenon.  And make some photos!

©2017, Kevin McKinney, Howard Thomas, and Ed Rosack. All rights reserved

In the yard

Good morning, good readers!

I’ve been busy recently learning all about the Raspberry Pi computer and using it on a project for our home.  It’s incredible how much capability you can buy today for $35.  Anyway, the project (especially learning to code in Python!) has left me with little time for photo excursions.  So this week I’ll have to show you some photos I managed to make from our yard.

I made this first photo standing on our front walk, just before last month’s full moon.  I like the way the sun was hitting the clouds.  It’s a single frame, handheld, and slightly underexposed to keep detail showing on the moon.

Pretty moon tonightPretty moon tonight

Lynn put a small statue of St. Francis in our front flower garden.  This brown anole likes to bask there in the morning sun.

St. Francis and the lizard 2St. Francis and the lizard

And last, an update on our backyard visitors.  The cardinal pair built a nest on our neighbor’s patio and raised one chick that’s now fledged and fully grown.

But for the last couple of weeks, we haven’t seen too many smaller birds in the yard.  Perhaps it’s due to this:

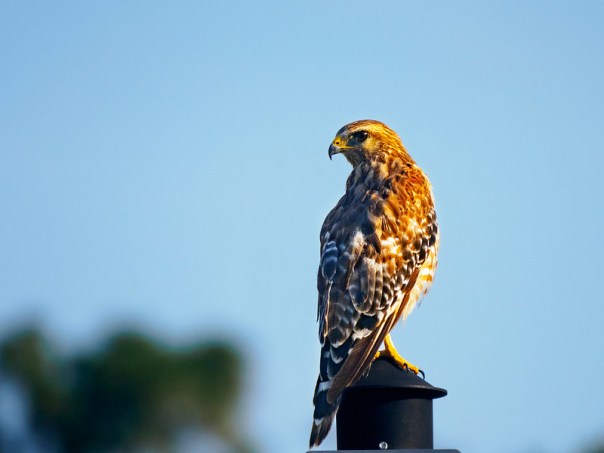
The hawk on the lamp postThe hawk on the lamp-post

I’ve seen this Red-shouldered Hawk sitting on the lamp-post on several mornings recently.  It doesn’t seem to scare the lizards, but small birds don’t like having it around.

By the way, the basics of my Raspberry Pi project are working, so I should  have more time now for photography.

Thanks for stopping by and reading my blog. Now, go make some photos!

©2016, Ed Rosack. All rights reserved.

Blue Moon and Sunrise at Ponce Inlet

I met Tom M. at Ponce Inlet last Friday at dawn.  We arrived at 6 am when the park opened and were the first ones in.  We didn’t see anyone else for about 30 minutes.  I was surprised by how few people were there.  I guess it helps to go during the week instead of on weekends.

I thought I’d share three photos along with some details on how I made them.

The moon was full on Friday for the second time in July and was just setting as we got out on the jetty.  I found this vantage point to highlight the “Blue Moon” over the water along the rocks.  This is a two exposure composite that I blended manually using layers and masks in Photoshop.  I exposed the top part for the moon (ISO 50, f/11, 1.6 sec.) and  the bottom part for the water (ISO 50, f/11, 5 sec.).  I used my Nikon 24 – 120mm f/4 lens at 120mm – it’s very versatile for these kinds of outings.

Blue Moon decendsBlue Moon descends

I liked the way the area just north of the jetty looked, with the sun and clouds above the water and rocks.  I made a few exposures, and then waited for the sun to rise a bit more so it would be behind the clouds and the light would be less harsh.  I saw a pelican flying by and managed to catch it just about under the sun (52 mm, ISO 100, f/11, 1/100 sec.).  I thought it would look better with silky smooth water, so I made one more exposure using an 8 2/3 stop Neutral Density filter to slow my shutter speed (52 mm, ISO 100, f/11, 8 sec.).  This image was also blended manually using layers in Photoshop.  I did have some issues with color balance.  The ND filter added a yellowish tint to the bottom that the top didn’t have.  So I adjusted it to match as closely as I could before blending.

Ponce SunrisePonce Sunrise – Early morning, just north of the jetty at Ponce Inlet.

For comparison, here is one of the photos I made about 5 minutes earlier when the sun was lower.  This is a single exposure (50 mm, ISO 100, f/11, 1/100 sec.).  I made a burst of several and picked one that best showed the sun highlighting the spray on top of the breaking wave.  I like the framing on this one better too as I can see the sun reflecting off the jetty wall.  The colors are more orange since there’s more of the sun showing through the clouds.

Ponce Sunrise too
Ponce Sunrise too – Same place as the previous photo, and a few minutes earlier.

I’m not sure which one of these sunrise images I like best.  I’m leaning toward the second one.  Too bad the Pelican wasn’t in place when the wave broke!  Which one do you like?  Have you tried any techniques like this?

On a side note, I used my Nikon D800 camera that I’ve had for more than three years to make these.  A couple of weeks ago, Nikon sent me an email and offered to clean and inspect it and fix anything they found wrong – for free!  I took advantage of the offer, got it back, and was anxious to test it out.  It seems to work fine and it’s nice to know it’s still in good shape.  Thanks Nikon!

You can see more images from Ponce Inlet in this set on Flickr.  Thanks for stopping by and reading my blog. Now – go make some photos!  And do it more often than “once in a blue moon”!

©2015, Ed Rosack. All rights reserved.

Melbourne Beach Turtle Walk

I didn’t put much effort into this photo of last Saturday’s super moon  – so the result isn’t that exciting.

Super moon over Melbourne Beach

Super moon over Melbourne Beach – The full moon and sparse clouds helped get our shutter speeds up just a little during the turtle walk.

What did excite me was what the super moon illuminated.   Kevin M. and I attended a turtle walk led by the Sea Turtle Preservation Society in Melbourne Beach, Florida – what an incredibly awesome experience!  NOTE:  this was an FWC Permitted activity that should not be attempted personally.

Loggerhead sea turtles are endangered in the US and many other countries.  They seem to be making a comeback recently since “turtle excluder devices” were required on fishing nets starting in the late 1980s.  They’re found over most of the world, although the east coast of Florida is a prime nesting area.  Nesting season peaks here June and July.  Last year, Florida recorded 58,000 nests with many of them in Brevard County.

I’ve spotted sea turtles  off shore on the surface before, but until Saturday I’d never seen one on the beach.  Since they’re endangered, it’s illegal to approach or harass them in any way.  But there is a way to see them up close on shore.  The Sea Turtle Preservation Society has a Florida State permit to conduct Turtle Walks for the public several nights a week during nesting season at three different locations in South Brevard County. They give a presentation with lots of good background on sea turtles.  During the presentation, people from the organization scout the beach looking for a nesting Loggerhead. When they find one, they lead the group out to observe.

Loggerhead sea turtle laying eggs
Loggerhead sea turtle laying eggs – The guides keep everyone behind the turtle where she can’t see them and put a small red light in the nest to illuminate the eggs.

There are some rules for the walk:

  • Stay with and obey the guides.  They’ll lead you to the nest along the water line after she starts laying eggs.
  • No lights at all are allowed, including cell phones and especially flash photography.
  • No noise.
  • Everyone is kept behind the turtle out of her line of sight.
  • When she’s done, the guides will move the group to one side away from her path back to the ocean.
  • Stay off the outgoing turtle tracks.  Researchers use them the next morning to count nests.
  • If you go, check with your group for their rules.  They may be different.

This is very tough photography assignment.  In fact it’s much more of a Central Florida Nature Op than a Central Florida Photo Op.  But if you want to try to make some photos, here are some hints:

  • The group we went with says they see turtles on 90% of their walks.  I’m not sure what it’s like with other groups.  You might want to ask before you go.
  • Check with the leaders of the group you’re going with about photography.  Rules seem to vary and some groups don’t allow any photography at all.
  • Schedule your walk to take advantage of conditions.  The beach is very dark.  Hotels and homes in the area are even required to keep their lights off during nesting season.  You’ll have a bit more light if you go during a full moon and when there’s minimum cloud cover.  Also, The turtles seem to prefer coming ashore at high tide.  Our walk was just after.  We were also fortunate to have a 10 mph east wind that kept us very comfortable and insect free.  I wasn’t even sweating at the end of the walk – and this is Florida – in late June!  But if the wind is too strong, you’ll have to watch out for tripod vibrations.
  • Other than the small flashlight in the photo above, all the other photos in this post were made with just ambient light well after sunset.  You’ll need a tripod and fast lens.
  • Be careful with your tripod.  The group was pretty large the night we went and I worried about hitting or tripping someone in the dark (I didn’t).
  • Bring a fast lens.  Kevin and I both used 50mm f/1.8 lenses and shot with them wide open.  This was a pretty good focal length for the subject distances.
  • The moon was very bright – I shot at ISO 800, f/1.8 and my shutter speed varied around 1 second.  If you go at another time of the month, your shutter speeds may be even slower.
  • Your tripod will help stop camera motion, but you’ll need to time your shots to minimize turtle motion.
  • The crowd was pretty large and I had to maneuver to get a clear view with my camera.  Be courteous.
  • Make sure you can work your camera controls in the dark.  You need to know how to at least change to manual focus and adjust the ISO without a flashlight.
  • Turn off your auto focus assist light and auto photo review – no lights, remember?
  • Auto focus was very difficult.  The only time it worked at all was on the guide’s red flashlight in the nest.  The rest of the time, I used manual focus and guessed since it was so dark.  You’ll need to take your chances and hope for some sharp shots.  Since it was so dim, I found the optical view finder on my Nikon easier to use than the EVF on my Olympus.  Your mileage may vary.
  • Depth of field will be very shallow.  Try to focus on the middle distance of your subject and if possible compose with the long axis of your subject parallel to the camera.
  • Surprisingly, shadows can be an issue.  There were times when people blocked the moon and shadows on the turtle were pretty dark.  Move around to find a better point of view.

Turtle walk crowd

Turtle walk crowd

When she’s done laying her eggs, she buries them and disguises the nest.

Loggerhead sea turtle laying eggs

Loggerhead sea turtle covering nest

And then heads back out to sea.

The Epic Journey Continues

The Epic Journey Continues – Loggerhead Turtle returning to the ocean.  Photo by Kevin McKinney (used with permission).

As you can probably tell from my write-up, I really enjoyed this outing.  It was wonderful to witness a natural event that’s been on going for 165 million years.  A big shout out and thank you to Kevin’s wife Traci.  She’s the one that recommended we go on the turtle walk.  And thanks to Kevin for scheduling it on the perfect night.

If you want to know more, here’s a couple of links to recent sea turtle news:

http://www.floridatoday.com/article/20130624/NEWS01/130624007 (sorry – no longer available)

http://www.orlandosentinel.com/news/os-loggerhead-turtles-thriving-20130623,0,6384714.story (sorry – no longer available)

As usual, you can see a few other photos from the trip in my set on Flickr, and in Kevin’s set.

Thanks for stopping by and reading my blog. Now – go witness some nature, and (if you can) make some photos!

©2013, Ed Rosack. All rights reserved.

PIG Tales 1

I belong to a camera club called the Photography Interest Group (the “PIGs). Our members vary in their photographic background and experience (as well as in age, gender and cultural background, by the way).  A couple of us have used SLRs since the film days. Some of the others in our group are beginners with their first Single Lens Reflex camera. But we all love photography.

The “senior PIGs” often get questions about why we do things a certain way, or how to do a specific thing. I think it might be interesting to others if I post the questions and answers. When a junior PIG want to know, others may want to know too. So this post is the first of what may become a series. We’ll see how it goes.

Q. How do you make photos at night?

One member of our club has a trip planned to Yosemite. He (let’s call him “Donuts”) wants to do something a little different and make photos after dark. Do you need special equipment? What settings do you use? How do you focus when you can’t see anything?

Now before we get started, we’re talking about outdoor, landscape and nature photos, not your regular dinner party photos. That would be a completely different post – somewhere else.

A. Slowly and carefully

I’ll write this for people with DSLR cameras. Most of the principles will apply if you have a point and shoot, but your camera may not have the controls or flexibility you’ll need. Still, you should experiment – you may discover some good work arounds with the equipment you have.

1. Night Landscapes

Night landscapes can be different and add some interest to your portfolio.

Moon rise at sunsetMoonrise at sunset, a pasture near Orlando Wetlands Park – Base exposure: f/8, 2 seconds, ISO 200. Second exposure (for moon): f/11, 1/25 sec, ISO 200.

  • Use a tripod to steady your camera. Hand holding a camera at night just won’t work — unless you’re only trying to make sunset silhouettes.
  • Compose carefully. All the normal landscape concepts still count for night photography. Composition (e.g. the rule of thirds), and having something of interest in the foreground as well as the middle and far distance will help your photo. You might want to use a bubble level in your camera’s hot shoe so that you can make sure your shot is level.
  • Focus carefully. The light level might be too low for your camera to focus automatically. If your camera has a live view mode, it can be a great help for manual focus at night, since you can zoom in to see detail. If not, you can estimate distance and set your lens manually. If you’re using a wide-angle lens, depth of field will help you. You can also stop your lens down to give more depth of field (f/11 or f/16) and make the focus less critical. Try focusing 1/3 of the distance into the frame if the main subject is close to the camera, and 2/3 in if the main subject is far away. Again, you may want to set your camera / lens to manual focus after you get it adjusted properly.
  • You’ll need a remote release too so you can avoid shaking the camera when you press the shutter release. For many exposures, the light may call for an exposure longer than your camera’s longest shutter speed (typically 30 seconds). In this case you’ll need to put your camera in Bulb mode and use the remote release to time the exposure by hand (more on this later).
  • Exposure is tricky. Your camera’s auto exposure mode may work, but will probably make the scene too bright. You can adjust this a bit in post processing to make it look more like a night scene. You can also chimp your shots to make sure you’re in the ball park and the result is close to what you want.  If not, use your exposure compensation – usually to dial in a bit less light.
  • Here’s one trick to try for determining proper exposure for very low light situations: Set your camera’s ISO as high as it will go and make a photo. Chimp the shot to see if it’s exposed the way  you want. Then set your ISO back to its base value to get the highest quality photo and slow down the shutter speed by the same ratio as the ISO change. For example, if your exposure looks correct at f/8, 4 sec. @ ISO 3200, then it should also be correct at f/8, 64 sec @ ISO 200 (4*3200/200 = 64).
  • Many DSLRs limit the slowest shutter speed to 30 second. How do you make an exposure of 64 seconds? Use manual mode. Set your aperture, and use Bulb for the shutter speed. Hold the shutter open with your remote release and manually time the exposure.
  • Long exposure noise reduction: With any exposures over a second or two, sensor noise will probably be an issue. I use Nikon’s long exposure noise reduction in these situations. When turned on, the camera will take a second exposure with the shutter closed to measure noise and then subtract the noise out from the first exposure. Try it on your camera – it works well on mine
  • For more advanced projects, stars (and the moon) will leave trails in any exposures longer than a few seconds. One nice effect is to scout a good landscape scene to the north and make a very long exposure. The circular star trails will be centered around the north star. You can also make spectacular photos under a dark sky by placing your camera on an equatorial mount so that the camera follows the earth’s motion. I’ve seen beautiful photos of the Milky Way behind spectacular scenery made this way.

2. Shooting the moon

The moon is interesting and one of the easiest astronomical objects to photograph. But it isn’t easy. You’ll need to set up carefully, expose correctly and have your camera as still as possible. Your photographs will benefit from as much magnification as you can get.

The Earth's satelliteThe Earth’s satellite – f/11, 1/50 sec, ISO 200 (click the photo to go to Flickr, where I’ve uploaded the full res, uncropped version).

  • Use a tripod to steady your camera. Hand holding a camera to make a photo of the moon might work if you have very good image stabilization in your camera or lens. But with a high zoom ratio, hand-held photos will hardly every work out, especially when you zoom in so you can see some detail.
  • Zoom in so you can see some detail. A 300mm lens on a crop sensor camera (~450mm equivalent) should allow you to make a decent photo. Much smaller than that and you’ll need to crop the result a bit – which will lower the quality. I made the photo above with my Sigma 150-500mm zoom at 500mm (750mm equivalent) on a Nikon D90. It’s uncropped and doesn’t fill the frame, but this combination does yield some nice detail.
  • Focus carefully. You might want to set your camera / lens to manual focus after you get it adjusted properly. Don’t bump it later, and don’t forget to put it back in auto focus mode when you’re done.
  • Your camera most likely will not expose the moon correctly. With a lot of dark sky in the frame, the moon will probably come out way over exposed. For your exposure, use your camera’s spot metering function and then set your exposure compensation to about -1 EV. Chimp the result and adjust as necessary. If you don’t have a spot meter, then try using the “sunny 16” rule in manual exposure mode and adjust from there. For those of you that haven’t ever shot with slide film and a manual exposure camera, this rule of thumb says that for bright sunlight, your exposure should be f/16 at a shutter speed of 1/ISO. Since the moon is lit by the sun, this rule of thumb will get you close to a good exposure.
  • You can do even better if you have access to a telescope. It’s relatively easy to use a point and shoot camera to take a photo through the eyepiece of a telescope like I did below. If anyone is interested in this, I can provide more information.

Hand held, autoexposure, Nikon Coolpix P1 through the telescope eyepiece

I’m sure you’ll come up with more ideas as you practice this. Good luck, Donuts. And don’t forget your flashlight and bug spray.

©2010, Ed Rosack. All rights reserved.

Lake Jesup Conservation Area Wildflowers

Intro / Description

I’ve posted once before about wildflowers on the north-west shore of Lake Jesup.  They bloom this time of year and I’ve photographed them since 2006, mostly from the side of the road.

Lake Jesup Wildflower Panorama
October 10, 2006: Lake Jesup Flowers and Sunrise. 4 shot panorama, assembled in Photoshop; Nikon Coolpix P1, ISO 50, 126mm eq. focal length, f/5.2 at 1/30 sec.

In 2008, the area was completely under water and there were no blooms.

DSC_6211_2_3Enhancer
August 31, 2008: Lake Jesup flood waters from tropical storm Fay; Nikon D80, ISO 100, Nikon 18-70 lens at 18mm, f/16, three exposures combined with Photomatix

All year, I really hoped that the flooding hadn’t killed the flowers permanently. Once the water receded, I did a little exploring and found a park and a path out into the blooms through the Lake Jesup Conservation Area.  About two weeks ago, I revisited the park and made these photos.  As you can see, the blooms came back from the flooding.  If anything, there are more than ever.  If you are into flower photography, you have to ask yourself why you’ve never explored this wonderful place in late September.  Get ready for next year!

_DSC3626nx2-PS-Phototools
September 28, 2009:  Lake Jesup flowers and moon; Nikon D700, ISO 200, Nikon 24-70 lens at 62mm, f/16 at 1/50 sec

Here’s a close in photo of one of the blooms.  There are so many different types of wildflowers, that Identifying them isn’t easy (for me anyway).  These are in the Aster family and resemble Black Eyed Susans, but are taller than the 14 – 36 inches my book says Black Eyed Susans should be.  If you recognize them and can supply a positive ID, please let me know in the comments.

1/24/2010 update – These are most likely Narrowleaf Sunflowers, also called “Swamp Sunflowers”.

_DSC3667
September 28, 2009: Lake Jesup flower closeup; Nikon D700, ISO 200, Nikon 24-70 lens at 70mm, f/4 at 1/500 sec

Photo Hints

This web page has directions on how to get to the Marl Bed Flats part of the conservation area, where I made these photos.  It’s a short hike over flat ground from the parking area to where the flowers are.

The plants are fairly tall and the blooms range from a few feet off the ground to as high as 6 feet.  A tall tripod will be helpful to get your camera above the vegetation. Bring a wide-angle lens to take in the incredible vista of  so many flowers in one place.  You might want to carry your macro lens too.

Get there early for calm winds. I was a little leery of walking out there in the dark, so I passed on sunrise shots this year.

If you plan to do this, you should scout the area and the time-line before hand.  The blooms last a couple of weeks, but they are definitely better in the middle of the period than at either end.

Summary

Website: http://www.sjrwmd.com/recreationguide/lakejesup/index.html
Address: Off of Oakway loop
Sanford, Florida
Central Florida Photo Ops Rating: Nothing here until late September – then, WOW!

You can click on the photos in this post to go to Flickr, where you can look at a larger version. I’ve also posted several more photos in my Lake Jesup Wildflower set.

©2009, Ed Rosack. All rights reserved.