Tag Archives: macro

The year in review: My favorite 2011 Photos

I hope that all of you, your families, and your friends have a joyful and happy holiday season!

Photographer Jim Goldstein has an annual tradition of organizing a “best photos of the year” listing.   So it’s a good time to put together my own third annual “Favorite photos of the year” post.  You can revisit 2009 here, and 2010 here.

Again in 2011, I’ve been blessed with a huge amount of photo opportunities. The 2011 folder on my hard drive takes up about 178 GB of space. Wow – good thing storage is so cheap now days!  I’m still using the following system to rate my photos.  The numbers in parentheses are the counts for 2011 .

  • 1 star   – The photo is interesting (262)
  • 2 stars – The photo is worth showing to others (400)
  • 3 stars – The photo is the best of (or one of the best of ) any given photo shoot (81)
  • 4 stars – My favorite photo of a year (1)
  • 5 stars – My favorite photo ever (none, I’m not done making photos yet!)

Photos without stars are seconds or not so good versions of other photos. I usually keep them, but they probably won’t get any more attention. I’ve been using this system consistently, and it seems to work for me. I’ve reviewed my 2011 photos and selected what I think are my best.  Of course, this is all subjective and my opinion only. Feel free to disagree, but I hope you’ll enjoy looking at the ones I’ve picked.

You can click on each of these to go to Flickr and see a larger version.  Or you can click this link to go to the set on Flickr.

Here we go.  I have 3 mammals, 3 birds, 2 landscapes, and 3 miscellaneous subjects …

Bobcat in Tree, Circle B Bar Reserve
November:  Bobcat in Tree, Circle B Bar Reserve. I’ve seen Bobcats in the wild before, but I’ve never been able to take a good photo of one. We saw this one resting up on a branch and it posed for a while. In this image, I think it was trying to figure out how to get through the crowd of humans at the base of the tree. More info: https://edrosack.com/2011/11/24/landscapes-and-bobcat-at-the-circle-b-bar-reserve/


Baby mountain goat
July: Baby mountain goat, Mt. Evans summit, Colorado. There were several families of mountain goats on the way up and at the summit. This little one posed for me so I could frame him against the out of focus mountains in the background. It’s amazing to watch them scramble from rock to rock and never slip. More info:  https://edrosack.com/2011/07/10/mount-evans-redux/


Young deer at Viera Wetlands
September: Young deer at Viera Wetlands. View large and check out the eyebrows and whiskers! More info:  https://edrosack.com/2011/09/04/late-afternoon-at-viera-wetlands/


Barred Owl watches photographers
January: Barred Owl watches photographers. More info:  https://edrosack.com/2011/01/30/catching-up/
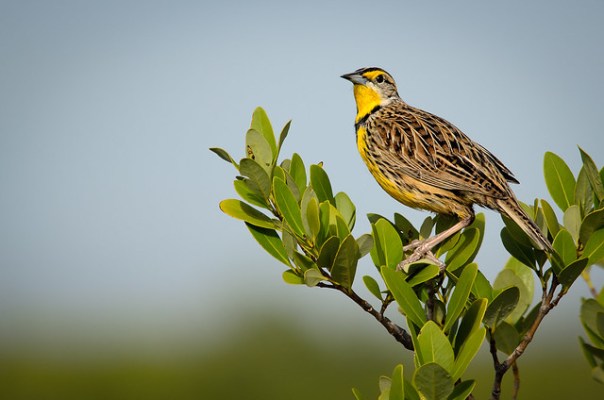

Eastern Meadowlark
December: Eastern Meadowlark, Blackpoint Wild Life Drive. More info: https://edrosack.com/2011/12/17/merritt-island-scouting-report-saturday-december-10/


Florida Scrub Jay watches us
June: Florida Scrub Jay watches us.  One or two birds in this Scrub Jay family were real posers. And one of those was a “dive bomber”. It flew at our heads a few times trying to discourage us. More info:  https://edrosack.com/2011/06/19/a-summertime-visit-to-minwr-blackpoint-and-scrub-ridge-trail/


Sunrise at the Circle B Bar Reserve
November: Sunrise at the Circle B Bar Reserve. More info:  https://edrosack.com/2011/11/24/landscapes-and-bobcat-at-the-circle-b-bar-reserve/


It was a little cloudy this morning
December: It was a little cloudy this morning. Blackpoint Wild Life Drive. I’ve enjoyed playing with an Infrared modified Olympus EPL-1 camera.  More info: https://edrosack.com/2011/12/17/merritt-island-scouting-report-saturday-december-10/


Tomb of the unknowns, Arlington National Cemetery
March: Tomb of the unknowns, Arlington National Cemetery. I’d never been to Arlington before this trip. As a US Navy Veteran and a patriot, I have to admit it made a huge impression on me. More info:  https://edrosack.com/2011/03/19/washington-dc/


Flavia, in color
December: Flavia, in color. American Photo Model Shoot, Orlando, 12/3/11.  My first time photographing models was a real learning experience.  More info:  https://edrosack.com/2011/12/09/orlando-american-photo-model-shoot-workshop-december-2011/


My Grandfather's Pocket Watch
June: My Grandfather’s Pocket-watch. After the Orlando Watch Company repaired it, it’s working fine.  This is a 1921 Elgin pocket-watch, marked Wadsworth Referee 20 year 5069868.  More info: https://edrosack.com/2011/06/25/grandfathers-pocket-watch/


I hope you’ve had a great photo 2011 too.  Thanks for stopping by and reading my blog. Now – go make some more photos!
©2011, Ed Rosack. All rights reserved

Grandfather's Pocket Watch

Not all of your photo ops need to be outdoors and wildlife or nature related.  In fact, there’s some wildlife that probably shouldn’t  be photographed.  And what if you can’t get out because the weather’s bad, or you stubbed or broke a toe?  Well, you can look for a photo-op closer to or even inside your home.  Here’s a set of photos I made to document a watch passed down to me from my Uncle.

This is my Granddad’s Elgin pocket watch.  The model number (marked inside the front cover) is “Wadsworth Referee 20 year 5069868”.  Based on the movement serial number, it was made in 1921. We don’t really know the history on this watch, but we do have some documents from my Grandparents’ wedding and think that my Grandmother gave this to him on their 10th wedding anniversary.

1921 Elgin ” Wadsworth Referee 20 year” 5069868, Serial number 25010969

We’re also not completely sure about the spelling used to engrave his name.  It could be that this was an accepted alternate before Rosack was standardized with the “ck” ending.  It’s more likely a mistake, in which case I bet my Grandmother wasn’t too happy about it.

Inside back case, with engraving

Here’s what the movement looks like.  When thinking about how to show this, I wanted to do something more than a straight on standard macro photo.  So I positioned the watch movement at an angle to catch its reflection in the back case and made the final image using Helicon Focus software and the techniques I described here.

My Grandfather's Pocket WatchMovement macro-photograph (click on this image to get to a larger version on Flickr)

We wanted a nice case to display the watch and found this one.  One issue with making this photograph was dealing with reflections in the glass.  I was able to reduce them by using a polarizing filter, making multiple exposures and moving the lighting between some of them.  Then I combined the results in Photoshop to get this final image.  I like the way the lighting places the emphasis on the watch, but lets you see what the case is like.

You can buy pocket watch glass display cases

We did take the watch into a local watch repair place (not this one, the place we took it didn’t have such a nice sign).  They cleaned and repaired it and it now works fine.  The only problem seems to be a weak spring – it keeps great time, but not for a whole day.  The repair cost was about equal to the watch’s resale value, but to us of course the watch is worth much more.

Elgin watch jeweler sign – it’s fun to watch for related photos while you’re out and about

It was fun learning about this watch, getting it working and making these images.  Do you have something similar you could document?

Thanks for stopping by and reading my blog. Now – go make some photos!
©2011, Ed Rosack. All rights reserved

Macro photography – D7000 or D700?

There are many kinds of photography. I tend towards landscapes, birds & wildlife, and sometimes macro. When I was using a Nikon D90 and a D700, it was pretty easy to decide which camera to use for what. They had roughly the same number of pixels and well known ISO performance. I would use the D90 as my primary bird and wildlife photography body (especially in good light), and the D700 for almost everything else.

Now that I’ve swapped the D90 for a D7000, these questions have become a little harder to answer. The D7000 has better ISO performance than the D90, and more pixels than the D90 or the D700. Clearly, the D7000 is still a very good first choice for bird & wildlife (unless they’re especially cooperative and close), even more so than the D90 because of its improved autofocus and resolution. And in dim light, the D7000’s ISO performance should make it even more useful than the D90, although not as good as the D700. Using the camera now for a couple of weeks has confirmed all this.

But what about landscape photography and macros? This isn’t as easy a question. They’re most often done with a tripod and therefore ISO performance isn’t a factor, so you can use the camera’s base / optimum ISO (D7000 @ ISO 100, D700 @ ISO 200). Which body to use probably comes down to magnification and depth of field vs. diffraction. I hadn’t had a chance to explore using the D7000 for macros, so I decided to do a little experiment today.

My subject is a rosebud from our front garden (by the way, if you know what kind of bugs those are on our rose bush, let me know). The setup was fairly simple: Tripod mounted camera, using the Nikon 105mm f/2.8 VR macro, and a Neewer LED ring light with the rose against a black background. I used matrix metering, with an exposure bias of -3EV to avoid blowing out the red channel (every digital camera I’ve owned – including the D7000, has overexposed red roses). I tried to keep the positions / setup as close as possible but unfortunately, I had to go back and re-take the D700 photo and it isn’t exactly positioned the same. I used an aperture of f/11 with the D7000 and f/16 with the D700, since those values should give the most depth of field without any degradation due to diffraction. I also used the cameras’ base ISO settings. I then ran the two photos through Capture NX2 with the exact same adjustments ( daylight White Balance, vivid Color Control, Noise Reduction off, and Unsharp Mask set to 30/5/2) and created a .jpg of each.

Rosebud:  D7000, ISO 100, Nikon 105mm macro, 1/20 sec @ f/11Rosebud: D7000, ISO 100, Nikon 105mm macro, 1/20 sec @ f/11

Rosebud:  D700, ISO 200, Nikon 105mm macro, 1/13 sec @ f/16Rosebud: D700, ISO 200, Nikon 105mm macro, 1/13 sec @ f/16

So what conclusions did I draw from this? With a sharp lens, using base ISO, the D7000 makes full use of all of it’s pixels and therefore has very good resolution when compared to the D700. For macro photography, the extra magnification, pixels, and increased apparent depth of field will almost always be an advantage. So my first choice for macro photography now will be the D7000.

What about landscapes? That adds a couple more things to consider (e.g. dynamic range, field of view), so it needs some additional thought and experimentation. I’ll let you know what I find out.

Note: A click on the photos above, will take you to Flickr where you can select Actions / View all sizes to see full resolution JPGs.

©2010, Ed Rosack. All rights reserved.

A Focus bracketing / stacking experiment

This post is not my usual Central Florida Photo Op entry. Instead I want to cover a technique and some software I’ve been experimenting with.

One macro photography challenge is to get the desired portions of the subject in focus without using such a small aperture that the image quality is degraded by diffraction effects. One solution is to combine multiple images focused at different depths within the frame to extend depth of field. In this post I’ll talk about how to do this, including software that can be used to automate the process. I’ve posted one focus bracket image before in this blog. That image was created manually. Using software to help is much easier.

Note: double click any of these images to view them on Flickr, where there is a larger version available. You can also visit the entire set at this link or view a slide show at this link.

Dry Backlit Orchid - focus bracket at f/8Back-lit Orchid – 15 separate captures at f/8.

As with all macro photography, good technique remains important. Focus bracketing will not make up for poor composition and exposure or sloppy camera handling. But for stationary subjects focus bracketing can give the photographer complete control over depth of field, background appearance / bokeh, and help optimize image quality. I used a program called Helicon Focus for this experiment. I think you can accomplish the same thing using Photoshop CS4, but I don’t have this latest version, so I haven’t tried. Helicon Focus is available as a fully functional 30 day trial download, so you can experiment with it too.

The Helicon Focus web site has a lot of information on how to use their software. To learn more, browse these links:

Here are some of my additional hints based on what I learned while evaluating the software.

  1. Use good macro and general technique
    • As for any type of bracketing, a sturdy tripod will help make sure all images are aligned.
    • Use a cable release or remote so you don’t jar the camera.
    • Use the mirror lock up function on your camera with low shutter speeds
    • Know your lens and camera.
      • Which aperture has the best image quality? (Usually ~ 2 stops down from wide open)
      • Make several test images at a different apertures. Use them to select the aperture to use with the focus bracket series. You can also use one of these later if you like the background bokeh better than in the focus bracket result.
      • Where does diffraction start to affect the image quality? (About f/11 for full frame cameras and ~f/8 for APS C size sensors
      • Don’t forget about composition.
        • Eliminate unnecessary image content
        • Remember (or not) the Rule of Thirds
        • Isolate the subject and make sure the background isn’t distracting (e.g. bright spots)
  2. When you’re ready to start the focus bracket capture, set your camera in manual focus and exposure modes. Also set your camera to a manual white balance, or do this post capture if you use RAW.
  3. Make a series of captures working from far to near and varying the focus slightly closer for each one. I found that the smallest movement of the focus ring that I could make worked best.
  4. I saved the images in RAW format and processed them through Capture NX2 in batch mode to apply the same pre-processing edits (overall lighting adjustment, some highlight recovery, a little dodging and burning and some basic sharpening) to each photo. I also used NX2 to convert the RAW images to TIFF format.
  5. Then I ran the TIFF images through Helicon Focus. By the way, it is Intel i7 aware and so it runs pretty fast on my iMac. The only change I made to the default settings was selecting Lancos8 resample quality.
  6. My resulting composite image had a few areas that could be improved by cloning from one of the source images. Helicon Focus supports this with a “resampling” mode which allows you to clone from any of the source files into the final before saving.
  7. Once I had the final composite output saved, I opened it in Photoshop. Since I liked the bokeh of the f/36 image, I cloned from that background into the composite – and I was done, except for importing into Lightroom where I added some clarity and adjusted contrast.

Here’s a series of images to illustrate.

Wet Backlit Orchid at f/5.6Wet Back-lit Orchid at f/5.6. At this aperture (2 stops from wide open) the lens optical quality is very good, but the depth of field is shallow. Parts of the flower and the stem are not in focus. The background is completely blurred out.

Wet Backlit Orchid at f/36Wet Back-lit Orchid at f/36. At this very narrow aperture, the depth of field is maximized. The out of focus leaves and background are pleasing. But the small aperture is causing diffraction to degrade the optical quality of the capture.

Wet Backlit Orchid - focus bracketWet Backlit Orchid – focus bracket. In this composite photo made using the Helicon Focus program and 16 individual captures at f/5.6, the depth of field covers the entire flower and stem and the background is completely blurred. The optical quality is improved since the wider aperture does not suffer from diffraction.

Wet Backlit Orchid - focus bracket with small aperture backgroundThe final image: Wet Back-lit Orchid – focus bracket with small aperture background. You can completely control the background. If you prefer the bokeh / background of the f/36 image, selectively clone it into the focus bracket image.

Conclusions: Focus bracketing is a useful technique that can give photographers a tremendous degree of control over depth of field in situations where the subject matter is still and there is time to set up, capture and process for it. If you add a manual step to the final output, you can selectively enhance the bokeh. Helicon Focus runs well and does what it is supposed to – make this process easier.

©2010, Ed Rosack. All rights reserved.

Sunday morning macro: flowers in the mall parking lot

Lynn and I were at the mall yesterday and noticed some new flower beds. I just got a 60mm f2.8D micro Nikkor lens for my D80, so I went back this morning to see how well it works. This is the first true macro (1:1 magnification) lens I’ve ever had. I like it a lot, but it will take a while to get used to.

Macro flower

Some observations:
– Focus is very critical at high magnification ratios, since the depth of field is so small (even at f16 or f22). The auto focus works well, but it’s difficult to get it exactly on what you want. The D80’s ability to select which focus sensor to use helps.

– Camera shake is worse at high magnifications, too. I took most of these handheld, and using a shutter speed of 1/focal length (x1.5 for the sensor size factor) wasn’t fast enough to freeze my motion. Luckily, it was bright enough that I could use a fairly high shutter speed at f16.

Today’s flower photos are here.

©2007, Ed Rosack. All rights reserved.