Tag Archives: astronomy

Merritt Island National Wildlife Refuge, 1-12-14

Kevin M, Robert W, Tom M, Lutfi E, and I met at Parish Park in Titusville last weekend for a photo excursion.  We got there well before sunrise and had time for a few night photos.

Stars above the causeway at Parrish Park
Stars above the causeway at Parrish Park – Looking SW, before dawn.

When we’d all arrived, we carpooled over to East Gator Creek Road for sunrise.  Since it was so clear before dawn, I didn’t think it would be very good.  But once again, Mother Nature surprised me, and a set of clouds moved in to add interest and color to the sky.

Passing storm
Passing storm

After daybreak, we drove on around East Gator Creek Road and then Black Point Wildlife Drive looking for birds.  We didn’t have to look too hard – they’re out force!

We saw many species and huge numbers of some of them.  White Pelicans were especially plentiful, both foraging in the water and soaring above us.  There were other huge formations of ducks flying over, but they were too high for me to ID.  One smaller flock flew very low right down the road.  I didn’t see them coming and the noise when they passed startled me.

We also saw Ring billed Gulls, a Bonaparte’s Gull, a some Forster’s Terns, Least Terns, a Black Skimmer, Northern Shovelers, Northern Pintails, Blue winged Teals, Lesser Scaups, Red Breasted Mergansers, Hooded Mergansers, Pied billed Greebes, Greater Yellowlegs, Sandpipers, Killdeer, Roseate Spoonbills, a Bald Eagle, Ospreys, Loggerhead Shrikes, Savanah Sparrows, Red winged Blackbirds, White Ibis, Glossy Ibis, Wood Storks, Reddish Egrets, a White Morph Redish Egret, Great Egrets, Snowy Egrets, Great Blue Herons, Tri-colored Herons, Belted Kingfishers, and maybe a few others.

Cooperative Loggerhead Shrike

Highlights also included a very cooperative Shrike that sat still while we all made way too many photos of it, a bald eagle that flew right overhead, and two life birds for me (the Bonaparte’s Gull and Greater Yellowlegs).  It’s definitely birding season at MINWR!

As a side note:  I got an email from a Flickr contact that’s going to be in the area for a couple of days.  They wanted some hints on how to see everything while they’re here, especially Gatorland, Viera Wetlands, and Merritt Island.  I did pass along some hints.  But then I had to tell them that’s a lot to see in 2 days!  The good news is that you’re almost certain to see some good things in those places.  The bad news is that you can’t possibly see everything in that short a time – it’s just too large an area and the weather / wildlife might not cooperate. The key is to relax, enjoy being there and be ready with your camera for whatever comes your way.  I hope I’m not misleading people into thinking that they can photograph all the things they see here on the blog on their first time out.  It takes persistence and even some luck.

Anyway, if you’ve wanted to go to MINWR, now’s the time.  You can see other posts I’ve written about MINWR here and you can see larger versions of the photos above and others from Merritt Island in this set on Flickr.

Thanks for stopping by and reading my blog.  Now, go make some photos!

©2014, Ed Rosack. All rights reserved.

Ponce Inlet, Florida – Lighthouse and night photos

Imagine if you will, a perfect dusk scene with sunset colors drifting up from beyond the horizon. In the distance is a photogenic lighthouse that’s illuminated just enough to make it stand out against the bright sky. Beneath your feet, slow-moving Atlantic Ocean surf rolls up on rocks. You spot a bird in the surf and hope it will be still while your shutter remains open for the seconds necessary to record the image as your mind’s eye sees it – tack sharp from foreground rocks all the way to the distant lighthouse, with silky smooth water reflecting light from the dusk sky. Imagine coming home and seeing the image that you imagined on your computer screen in all it’s glory. This imaginary trip can be made real for you too if you venture over to Ponce Inlet, Florida and have a bit of luck, like we did.

Ponce Inlet lighthouse, sunset, bird

Ponce Inlet lighthouse, sunset, & bird – (Nikon D700, Nikkor 24-70mm lens @ 70mm, 5 second exposure @ f/11, ISO 200)

Once again my friends, the Photography Interest Group braved many hazards to bring you extraordinary photographic insight into another wonderful place for outstanding Central Florida Photo Ops. Three of us wanted to do something a little different from our normal photo excursions. We’ve been talking about night-time / low light photography so we decided to visit Ponce Inlet last Thursday night to try out some techniques. It was also an interesting day from an astronomical perspective, since there was a conjunction of Mars, Venus, Saturn and the Moon in the western sky after sunset, as well as the annual Perseid meteor shower to observe later in the evening. We planned this as a “scouting trip”, since we’d never been there (photographically at least), and our expectations for “wall hanger” images were pretty low. We figured we’d scout the place and come back another time armed with knowledge and hoping for good results.

The weather report wasn’t very good. Earlier in the week, heavy cloud cover and rain were predicted, and it was cloudy and rainy earlier that day. But by the time we arrived at Ponce inlet the clouds had parted and we were left with beautiful (but very hot) conditions.

We stopped first at the jetty and I made several photos including the one above and this one of a fisherman below the conjunction.

Ponce Inlet at dusk, fishing under the Moon & Venus

Ponce Inlet at dusk, fishing under the Moon and Venus – (Nikon D700, Nikkor 24-70mm lens @ 32mm, 13 second exposure @ f/22, ISO 200)

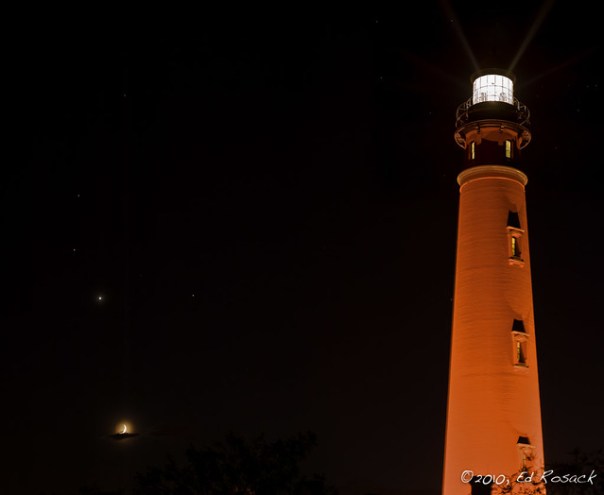
Next, we ventured over to the lighthouse looking to pair it with the conjunction. We had a bit of trouble finding the right place to park. This photo is from the parking lot on the south side of the lighthouse. We didn’t get there in time, but it’s possible that the view would have been better from the lot on the north side – something to try next trip. I made this two shot panorama with a 70 – 200mm lens. You could use a wider angle lens as well.

Ponce Inlet light, Moon, Venus, Mars, SaturnPonce Inlet light, Moon, Venus, Mars, Saturn – (Nikon D700, Nikkor 70 – 200mm lens @ 70mm, 6 second exposure @ f/8, ISO 200, 3 exposure composite panorama)

When we finished at the light house, there was time for a “Slurpee break” to cool off before moving down the beach. We found a good off beach parking area not far from the lighthouse and stopped to look for debris from comet Swift-Tuttle’s tail. Within the first few minutes (before our camera gear was set up), “Grasshopper” saw a large fireball meteor. But that was the only large one that night. Here’s a photo of “Donuts” and “Grasshopper” making star / meteor photos.

Grasshopper and Donuts perform photo-magic on the beach under the stars for an audience of three.Grasshopper and Donuts perform photo-magic on the beach under the stars for an audience of three – (Nikon D700, Nikkor 50mm lens, 4 second exposure @ f/1.8, ISO 1600, manual focus on Donuts’ white shirt with Liveview)

For the set up at this place, I combined my old 50mm f/1.8 lens with the high ISO capabilities of the Nikon D-700. I wanted to make my exposures short so that the stars didn’t trail. I shot in manual exposure mode and checked the results to make sure I was getting what I wanted. There were some high clouds and haze and coupled with the light pollution in the area that made exposure tricky. It was too easy to overexpose the haze / glare, leading to an incandescent glow that hid the stars and meteors. I also used manual focus. I started by using Liveview enlarged around what I wanted to focus on. But with the 50mm lens, it was just as simple to use the infinity mark on the scale. I did manage to catch a couple of meteors, and here is one photo I made.

Long, dim, green Perseid meteorLong, dim, green Perseid meteor – (Nikon D700, Nikkor 50mm lens, 3 second exposure @ f/1.8, ISO 1600, manual focus on infinity mark)

All in all, this was a very fine expedition and we all had a lot of fun. It exceeded expectations and you should try it sometime!

If you do want to try this, make sure you have both wide-angle and telephoto lenses and a sturdy tripod with a cable release. You can also read my post on night time photography for some hints on technique.

Click on any of the photos above to see them larger on Flickr. You can go here to see my Ponce Inlet photo set. “Donuts'” photos are here, and “Grasshopper’s” are here.

©2010, Ed Rosack. All rights reserved.

PIG Tales 1

I belong to a camera club called the Photography Interest Group (the “PIGs). Our members vary in their photographic background and experience (as well as in age, gender and cultural background, by the way).  A couple of us have used SLRs since the film days. Some of the others in our group are beginners with their first Single Lens Reflex camera. But we all love photography.

The “senior PIGs” often get questions about why we do things a certain way, or how to do a specific thing. I think it might be interesting to others if I post the questions and answers. When a junior PIG want to know, others may want to know too. So this post is the first of what may become a series. We’ll see how it goes.

Q. How do you make photos at night?

One member of our club has a trip planned to Yosemite. He (let’s call him “Donuts”) wants to do something a little different and make photos after dark. Do you need special equipment? What settings do you use? How do you focus when you can’t see anything?

Now before we get started, we’re talking about outdoor, landscape and nature photos, not your regular dinner party photos. That would be a completely different post – somewhere else.

A. Slowly and carefully

I’ll write this for people with DSLR cameras. Most of the principles will apply if you have a point and shoot, but your camera may not have the controls or flexibility you’ll need. Still, you should experiment – you may discover some good work arounds with the equipment you have.

1. Night Landscapes

Night landscapes can be different and add some interest to your portfolio.

Moon rise at sunsetMoonrise at sunset, a pasture near Orlando Wetlands Park – Base exposure: f/8, 2 seconds, ISO 200. Second exposure (for moon): f/11, 1/25 sec, ISO 200.

  • Use a tripod to steady your camera. Hand holding a camera at night just won’t work — unless you’re only trying to make sunset silhouettes.
  • Compose carefully. All the normal landscape concepts still count for night photography. Composition (e.g. the rule of thirds), and having something of interest in the foreground as well as the middle and far distance will help your photo. You might want to use a bubble level in your camera’s hot shoe so that you can make sure your shot is level.
  • Focus carefully. The light level might be too low for your camera to focus automatically. If your camera has a live view mode, it can be a great help for manual focus at night, since you can zoom in to see detail. If not, you can estimate distance and set your lens manually. If you’re using a wide-angle lens, depth of field will help you. You can also stop your lens down to give more depth of field (f/11 or f/16) and make the focus less critical. Try focusing 1/3 of the distance into the frame if the main subject is close to the camera, and 2/3 in if the main subject is far away. Again, you may want to set your camera / lens to manual focus after you get it adjusted properly.
  • You’ll need a remote release too so you can avoid shaking the camera when you press the shutter release. For many exposures, the light may call for an exposure longer than your camera’s longest shutter speed (typically 30 seconds). In this case you’ll need to put your camera in Bulb mode and use the remote release to time the exposure by hand (more on this later).
  • Exposure is tricky. Your camera’s auto exposure mode may work, but will probably make the scene too bright. You can adjust this a bit in post processing to make it look more like a night scene. You can also chimp your shots to make sure you’re in the ball park and the result is close to what you want.  If not, use your exposure compensation – usually to dial in a bit less light.
  • Here’s one trick to try for determining proper exposure for very low light situations: Set your camera’s ISO as high as it will go and make a photo. Chimp the shot to see if it’s exposed the way  you want. Then set your ISO back to its base value to get the highest quality photo and slow down the shutter speed by the same ratio as the ISO change. For example, if your exposure looks correct at f/8, 4 sec. @ ISO 3200, then it should also be correct at f/8, 64 sec @ ISO 200 (4*3200/200 = 64).
  • Many DSLRs limit the slowest shutter speed to 30 second. How do you make an exposure of 64 seconds? Use manual mode. Set your aperture, and use Bulb for the shutter speed. Hold the shutter open with your remote release and manually time the exposure.
  • Long exposure noise reduction: With any exposures over a second or two, sensor noise will probably be an issue. I use Nikon’s long exposure noise reduction in these situations. When turned on, the camera will take a second exposure with the shutter closed to measure noise and then subtract the noise out from the first exposure. Try it on your camera – it works well on mine
  • For more advanced projects, stars (and the moon) will leave trails in any exposures longer than a few seconds. One nice effect is to scout a good landscape scene to the north and make a very long exposure. The circular star trails will be centered around the north star. You can also make spectacular photos under a dark sky by placing your camera on an equatorial mount so that the camera follows the earth’s motion. I’ve seen beautiful photos of the Milky Way behind spectacular scenery made this way.

2. Shooting the moon

The moon is interesting and one of the easiest astronomical objects to photograph. But it isn’t easy. You’ll need to set up carefully, expose correctly and have your camera as still as possible. Your photographs will benefit from as much magnification as you can get.

The Earth's satelliteThe Earth’s satellite – f/11, 1/50 sec, ISO 200 (click the photo to go to Flickr, where I’ve uploaded the full res, uncropped version).

  • Use a tripod to steady your camera. Hand holding a camera to make a photo of the moon might work if you have very good image stabilization in your camera or lens. But with a high zoom ratio, hand-held photos will hardly every work out, especially when you zoom in so you can see some detail.
  • Zoom in so you can see some detail. A 300mm lens on a crop sensor camera (~450mm equivalent) should allow you to make a decent photo. Much smaller than that and you’ll need to crop the result a bit – which will lower the quality. I made the photo above with my Sigma 150-500mm zoom at 500mm (750mm equivalent) on a Nikon D90. It’s uncropped and doesn’t fill the frame, but this combination does yield some nice detail.
  • Focus carefully. You might want to set your camera / lens to manual focus after you get it adjusted properly. Don’t bump it later, and don’t forget to put it back in auto focus mode when you’re done.
  • Your camera most likely will not expose the moon correctly. With a lot of dark sky in the frame, the moon will probably come out way over exposed. For your exposure, use your camera’s spot metering function and then set your exposure compensation to about -1 EV. Chimp the result and adjust as necessary. If you don’t have a spot meter, then try using the “sunny 16” rule in manual exposure mode and adjust from there. For those of you that haven’t ever shot with slide film and a manual exposure camera, this rule of thumb says that for bright sunlight, your exposure should be f/16 at a shutter speed of 1/ISO. Since the moon is lit by the sun, this rule of thumb will get you close to a good exposure.
  • You can do even better if you have access to a telescope. It’s relatively easy to use a point and shoot camera to take a photo through the eyepiece of a telescope like I did below. If anyone is interested in this, I can provide more information.
Hand held, autoexposure, Nikon Coolpix P1 through the telescope eyepiece

I’m sure you’ll come up with more ideas as you practice this. Good luck, Donuts. And don’t forget your flashlight and bug spray.

©2010, Ed Rosack. All rights reserved.

Dusk at Lake Eola

Intro / Description

Dusk, Lake Eola, 8:14pm
Dusk, Lake Eola, 8:14pm, 17mm, 6.0 seconds @ f/8

This large lake in downtown Orlando formed from a sinkhole and has been a city park since 1892.  It’s famous for its fountain – which unfortunately isn’t working now although it’s supposed to be repaired in 2010.  There are swan shaped paddle boats that you can rent and live swans you can feed along with occasional other birds that you can watch and photograph.  There’s also a playground, a small outdoor café and an amphitheater for special events.  The night we were there the First Annual Orlando Chillounge Night at Lake Eola was taking place on the east side of the lake, which made for quite a crowd.

We saw a boat leave the dock as we arrived with what looked like fireworks aboard.  We kept an eye on it and tried to be ready when they launched.  After a while, we gave up and of course, they launched right after that.  There was only one quick set.  Lynn really enjoyed watching us  scramble to reset our cameras and by the time we were ready there was nothing left but a few smoke trails.  Oh well, a reason to go back.

If you’re looking for a place in Orlando to take a photo walk, practice some street photography, and / or make some cityscape images at sunset – Lake Eola is a good place to start.

Info for Photographers

Photo hints: Get there well before sunset and stay for a while after.  You never know what the sky colors will do.  You’ll want to set up on the south-east side for sunset.  After sunset, try a few small aperture / long exposure photos to blur the water in the fountains and make the lights into nice star shapes.

Tripod/Monopod: No problem – there’s plenty of room to set up.  You’ll definitely need one for long exposures.  Bring your cable release or remote too.

Lenses: This is a wide-angle photo-op.  My 16 – 35mm lens worked nicely to take in the whole lake and cityscape.  To practice your street photography a 35mm will probably work, although you might want to bring another lens (24 – 70?) too.

Best time to visit: You’ve heard me say before that spring is a wonderful time in Central Florida. The weather is just fantastic.  We had temperatures in the 70s and the humidity wasn’t too high.  There were some insects out, but they weren’t the biting kind.

Other: Parking could be a problem depending on what else is going on when you visit.  We were there on a Saturday evening, and even with an event happening at the east end of the lake, we found a parking spot in a lot about a block south for $5.  The park hours are Mon-Sun 6 a.m. – 12 a.m

Summary

My Lake Eola photo set on Flickr: The set: http://www.flickr.com/photos/edrosack/sets/72157623643136939/Here’s a slide show of the images (click to start, and when running click to go to the photo on Flickr):
Website: http://www.cityoforlando.net/FPR/HTML/Parks/lakeeola.htmhttp://en.wikipedia.org/wiki/Lake_eola
Address / Phone: 195 N Rosalind Avenue, Orlando, Florida(407) 246-2827
Central Florida Photo Ops Rating: Nice evening for a stroll.  Bring your photo gear!

©2010, Ed Rosack. All rights reserved.

Merry Christmas, Happy Holidays!

Nativity

I hope that this season finds all of you healthy and happy and able to spend time with your families.  I wish you well and only the best for now and throughout the coming new year.

The following Christmas greeting translations are provided by wikipedia.  (Please see the original site for more entries and proper characters.)

* Gëzuar Krishtlindjen dhe Vitin e Ri – Albanian, “Merry Christmas and Happy New Year”
* Shenoraavor Nor Dari yev Pari Gaghand Eastern Armenian
* “Shenoraavor Nor Dari yev Soorp Dzuhnoont” Western Armenian
* Zorionak eta Urte Berri On! Basque for Merry Christmas
* Nedeleg laouen na bloavezh mat in Breton
* Tchestito Rojdestvo Hristovo in Bulgarian
* Bon Nadal i un Bon Any Nou! in Catalan
* Bon Nadal – Catalan for Happy Christmas
* Nadelik looan na looan blethen noweth Happy Christmas and Happy New Year in Cornish
* Sretan Boži? – Croatian for Happy Christmas
* Veselé Vánoce a š?astný nový rok – Czech language, “Merry Christmas and Happy New Year”
* Glædelig jul – Danish
* God jul – Danish, Norwegian, Swedish, lit. “Good Yule”
* Gleðilig Jól og gott Nýggjár – Faroese – Merry Christmas and happy New Year
* Vrolijk Kerstfeest or Zalig Kerstfeest with en een Gelukkig Nieuwjaar – Dutch, “Merry Christmas and Happy New Year”
* Gajan Kristnaskon “Merry Christmas” in Esperanto
* Häid jõule – Estonian
* Maligayang Pasko – Filipino word, a Common Christmas Greeting in the Philippines which was Merry Christmas in English Translation.
* Hyvää joulua – Finnish
* Joyeux Noël – French for “Happy Christmas” used in France, French Canada, Belgium, Luxembourg, Louisiana, Switzerland, the Lebanon and Francophone Africa
* Noflike Krystdagen en in protte Lok en Seine yn it Nije Jier! in Frisian
* Frohe Weihnachten/Fröhliche Weihnachten und ein glückliches/gutes Neues Jahr – German for Merry Christmas/Merry Christmas and a Happy/Good New Year
* (Kala Christougenna) – Greek for Merry Christmas, also used in non-Greek many Eastern Orthodox nations, as the first Christian masses were celebrated in Greek.
* Mele Kalikimaka – Hawaiian
* Boldog karácsonyt/Kellemes karácsonyi ünnepeket : Merry Christmas/Pleasant Christmas Holidays in Hungarian
* Selamat Natal: “Christmas best wishes” Indonesian
* Idah Saidan Wa Sanah Jadidah in Iraq
* Nollaig Shona Duit – Ireland, (Irish Language), Gaeilge, lit. “You have a happy Christmas”.
* Buon Natale – Italian for Happy Christmas
* Natale hilare et Annum Faustum! in Latin
* Linksm? Šv. Kal?d? ir Laiming? Nauj?j? Met? – Lithuanian “Merry Christmas and Happy New Year”
* Schèine Chreschtdaag an e gudde Rutsch in Luxembourg dialect
* (Sre?en Boži?) – Macedonian for Happy Christmas
* Il-Milied u s-Sena t-Tajba – Malta – “Happy Christmas and a Happy New Year”
* Nollick ghennal as blein vie noa in Manx Gallic
* Meri Kirihimete in Maori
* Weso?ych ?wi?t Bo?ego Narodzenia in Polish
* Feliz Natal in Portuguese
* Cr?ciun Fericit! Romanian for Merry Christmas
* S’Rozhdestvóm Khristóvym! or, more commonly, simply (S Rozhdestvóm!) for the informal Christmas greeting, while the traditional religious greeting is Khristós rozhdáyetsya!, meaning “Christ is born!” and the traditional response is Slávite!, meaning “Let us glorify him!”;  (S Nóvym gódom!) – Happy New Year! in Russian.
* Heughliche Winachten un ‘n moi Nijaar in Low Saxon
* Nollaig chridheil huibh in Scottish Gaelic
* “Sre?an Boži?” (Serbian) “Merry Christmas” also Hristos se rodi.
* Veselé Vianoce a Š?astný Nový rok – Slovak language, “Merry Christmas and Happy New Year”
* Vesele Boži?ne Pražnike Sre?no Novo Leto or Vesel Boži? in sre?no Novo leto in Slovene
* Feliz Navidad y próspero Año Nuevo – Spanish lit. “Happy Nativity and prosperous New Year”
* God Jul and (Och) Ett Gott Nytt År in Sweden
* Sawadee Pee Mai or Souksan wan Christmas in Thai
* Mutlu Noeller – Turkish – “Happy Christmas”
* (Z Rizdvom Khrystovym) or, when meeting in person, (“Khrystos narodyvsya! – Slavimo yoho!”, lit. “Christ was born! – Praise be with Him!”) in Ukrainian.
* Nadolig Llawen a Blwyddyn Newydd Dda – Wales (by Welsh speakers), “Merry Christmas and a Happy New Year”
* Boldog karácsonyt! in Hungary
* (Shèngdànjié kuàilè) – Merry Christmas!,  (X?nnián kuàilè) – Happy New Year! in Chinese
* (Meri Kurisumasu) – Merry Christmas!,  (Yoi o-toshi-o) (before),  (after) – Happy New Year! in Japanese

All original content ©2002 and 2009, Ed Rosack. All rights reserved.

Around Denver over Thanksgiving

We had a family reunion of sorts in Denver last week for Thanksgiving.  Mary, Mike and Sara met Lynn and I at my mother’s place and we were able to see most of the Aunts, Uncles, Cousins and in-laws.  We had a great time and the Thanksgiving dinner was especially good, with 25 relatives at my sister’s house to consume two turkeys along with various gourmet attractions including sweet potato stuffed oranges.

We also had a chance to visit some Denver area photo attractions:  Buffalo Bill’s grave and museum at Lookout Mountain in Golden, The city of Denver’s bison herd, Garden of the Gods, and Pikes Peak.  We also got in a few minutes of browsing at the antique store along I-70.

Here are some of the photos from our visit – I’ve only posted a few of them here on my blog.  Click on any of them to go to Flickr, where you can look at a higher res version. You can also see the rest of this set on Flickr at this link.

We drove up to Lookout Mountain last Monday to visit the Buffalo Bill Museum and Grave site, which is only about an hour from my Mom’s place.  The museum is nice, with a lot of information about Buffalo Bill and the wild west.  We especially liked the dress up area, where you can don chaps and a cowboy hat, climb up on the legless horse and rope a plastic calf. There’s also some very scenic overlooks from the parking area.
091124__DSC6536_Coors beer factory from the overlook at Buffalo Bill's Grave

A little further up the road (I-70, exit 254), the city and county of Denver has a herd of bison that you can stop and see.
091124__DSC6660_Bison in the city of Denver bison herd along I-70.

On Thanksgiving morning, Lynn and I got up very early and drove down to the Garden of the Gods before sunrise.  You might remember my earlier post about this place.  Let me just say that it’s even more beautiful at sunrise and well worth the early trip.
091126_IMG_1095_Dawn in the Garden of the Gods, Thanksgiving day, 2009

Saturday, we drove down to Pikes Peak and rode the cog railway to the top and back.  The visibility was much better this time than it was the only previous time we did this.  That time we had heavy fog and weren’t able to see much of the landscape.  This time, in spite of clouds – it looked like we could see forever.
091128__DSC7140-7145_photomatix_pano_On top of Pikes Peak, 14110 feet above sea level

It was a wonderful trip, we really enjoyed ourselves, and we’ll cherish the time we spent visiting these places with our family forever.

Our vacation – Ch. 3: Other Alaskan and Seattle photos

This is the third installment of our vacation adventure, where I’ll show you the some of the other things we saw, both in Alaska and Seattle. Chapter One is here and describes the wildlife we encountered on our trip.  Chapter Two is here and is about the glaciers we visited.

I’ve finally gotten through the rest of the photos that I made.  The only ones left to process are the “people pics”.  When I finish these, the final part of my post processing will be to go through everything and then selecting a “best of all set” to try making into a photo book.

Before we get started, please note that the photos in this post are linked to my Flickr account and you can click on them to go to Flickr where you can see a higer res version.

First of all, here’s my favorite photo of me from the trip.  It’s a picture of Lynn and I that Sully made.  We spent a lot of time sightseeing from our balcony, and looking at this really brings back memories.
IMG_3596-44
Ed on vacation with three cameras. Lynn on vacation with two glasses of wine.; Canon PowerShot A700,11.546 mm,1/80 sec at f / 3.5,, Dimensions are 2816 x 2112, Photo by Marin Sullivan

There were quite a few impressive sunrise and sunset opportunities.  I often shot in “panorama mode”.  Most of these I took hand held and they seem to have worked out quite well.  I was careful to line up the horizon or another feature in the terrain with one of the marks in the viewfinder, and this really helps when you stitch.  I’ve also found that running Nikon images through CaptureNX before I stitch them in Photoshop really improves the final image quality.  The key is to use the CaptureNX function that corrects lens distortion.  Here’s a sunrise from our final morning on the ship.  It’s composed of 4 images stitched together vertically.  In the full res version, you can see the planet Mars (if my astronomy software is correct) underneath the moon!
_DSC3576-80_Pano
Seattle sunrise panorama with moon and Mars(?); NIKON D700,48 mm,1/50 sec at f / 2.8,ISO 800, Dimensions are 4312 x 7619

Here’s another one I really like. I took this in Juneau, when Lynn and I went gold panning. I had just my Canon G9 with me (in a pocket most of the time – it was raining), and I used a flat rock in the creek as a tripod.  By the way, Lynn and I both found flakes of gold in this creek!
The gold panning creek in Juneau, Alaska
Juneau, Alaska – gold panning creek; Canon PowerShot G9,7.4 mm,1.0 sec at f / 8.0,ISO 80, Dimensions are 4000 x 3000

And here’s one last photo for the blog of some trees at the Lake Washington Ship Canal.  I’m not sure what this tree was and whether it was turning already for fall, but I really liked the color contrasts.
_DSC5920
Trees; NIKON D90,19 mm,1/50 sec at f / 3.8,ISO 100, Dimensions are 2848 x 4288

As before, I’ve posted the rest of the photos for this blog entry in two ways.  I added a set of “other” photos here to my photo galleries.   You can also look at our Alaska photos together in a single time ordered set of 72 photographs here on Flickr.  Clicking on one of the photos above will also take you to Flickr, where if you click on the “all sizes” button, you can see the photo in a higher res version.

©2009, Ed Rosack. All rights reserved.

Look up!

Well, we had a tripod swap this week, so I went out last night to try my “new” used tripod. I made this photo in my front yard using my D90, Tokina 12 – 24mm zoom, and my new Nikon wired remote release. I set the lens at 12mm, f7.1, and exposed for 25 seconds at ISO 200, using matrix metering. I also set Exposure Delay mode on, Active D-Lighting on Auto, and used Long Exp. NR on. I recorded it in RAW and processed it in Adobe Lightroom. If you click on it, you can look at a larger version.

Moon, pine, palm, Orion

I like the way the palm tree leads your eye to the constellation Orion in the top right part of the photo, and the wide angle distortion causes both trees to lean in and point up. I also think the dynamic range here is pretty impressive. The moon is completely blown out of course, but the detail in the trees (lit by street lights) along with the how the stars are captured by the sensor in this camera is something I’ve never seen in a photo I’ve made before. Especially with such low noise.

Also interesting is that at 25 seconds, star trails are already visible. 25 seconds = 25/(24*60*60) or ~.1 degree. At 12mm, this lens has about a 99 degree field of view, so .1 degree is about 4 pixels.

By the way, I found out recently that the reason the wired release changed from the D80 to the D90 is that the pin out had to be modified to accommodate the GPS unit. Otherwise I could have kept and used my D80 wired release.

©2009, Ed Rosack.  All rights reserved.

Total Eclipse of the Moon

I hope you were able to see the lunar eclipse last Wednesday. It was quite a show in Central Florida.

I used my Nikon D80 with a 70 – 300 VR zoom on a tripod in the driveway to make these photos.

It was quite cloudy at the beginning, but fortunately turned perfectly clear during totality. This first photo was made early as the earth’s shadow started to move across the moon.

Eclipse photo 1

The three photos posted here are all croped versions of larger files. 300mm is not quite enough lens to get full frame magnification. I had thought about trying to make some photos through my telescope, but I don’t have a camera adapter for it and didn’t want to try to hand hold an exposure. I used the spot meter mode in the camera and bracketed +/- one stop. The one stop underexposure was the best choice (as you might guess), since the meter coverage is a bit larger than the moon was in the sensor. I used both ISO 100 and 400. During totality, ISO 400 helped to reduce the exposure time and improved sharpness. I also played with turning the lens Vibration Reduction on and off , but I couldn’t see any difference in the results – which is good. I’ve noticed that the image stabilization in my Canon G9 will actually make a photo worse if left on when the camera is on a tripod.

The next photo was made during totality.

Eclipse photo 2: Totality

Finally, the last photo was made using a wider angle setting to also capture Saturn (lower left) and Regulus (above), which were especially impressive.

Eclipse photo 2: Totality, wider view

I have posted a few more of my eclipse photos
here.

©2008, Ed Rosack. All rights reserved.