Category Archives: Technique

Panos and Otters on Bear Creek

Bear Creek Nature Trail is a small park in Winter Springs, Florida. There’s a path that winds along next to the water and it has some very pleasant scenery for such an urban location. Lynn and I have been visiting for many years – I think I first mentioned it on the blog in 2008. I decided to go by last week and try to improve my panorama techniques.

In the quiet forest 3 In the quiet forest 3: Nine frame panorama, 14011×7881

I’ve written about stitched panoramas many times so you might know that I like to make them. They’re a great way to get a wider field of view and to capture more detail too. See this post for an example of my workflow up to this point.

I knew I’d been taking a few shortcuts and ignoring some things. I’ve had wonderful results, but at times the post processing was more difficult than it needed to be. Two specific problem areas were sloppy leveling and parallax.

If your camera isn’t level you’ll have to level the image in post, which can require cropping in and wasting pixels. It can also introduce stitching errors at the seams between frames. A panoramic head is one solution for this. It’s mounted on top of your ball head and lets you level your camera using its built in level indicator and the ball head controls instead of using the tripod legs. This works well, and it can be left on your main tripod all the time.

Parallax results when close and distant objects in your scene don’t align the same across multiple frames. A nodal slide can remove / reduce parallax errors.

In the quiet forest 2 In the quiet forest 2: Six frame panorama, 12502×6251

I think my first attempt with these worked out well. It’s a bit more effort to set up before your capture, but it can eliminate fixing some problems later in software. I realize this may be more than you wanted to know about panoramas, but if you’ve tried them and have issues stitching, then here are a couple of links that go into more detail. I think they’ll help – they helped me.

In the quiet forest 1 In the quiet forest 1: Six frame panorama, 7743×6104

Oh, about the otters: Lynn and I saw a couple of them at this park way back in 2009. Since then I’ve looked for them every time I go, but haven’t seen them again. I managed to get a photo of one of them swimming away from us as soon as we saw it. I’ll post it now even though it’s not the best image.

Otter in Bear Creek, May 2009

As I was leaving the park this time, I said hi to a Winter Springs Park Ranger. They said they’re there often and I asked if they ever see any river otters. They haven’t but have seen tracks. I guess I’ll have to keep watching for them.

Thanks for stopping by and reading my blog. Take care of yourselves and each other. And when you can – make some panoramas and watch out for otters!

©2021, Ed Rosack. All rights reserved

Wildlife Panoramas

Sometimes you want to get closer / zoom in with your lens to show as much detail as possible but if you do, you can’t fit everything in your frame. When I’m in that situation I try to expand the frame by making a stitched panorama. It’s a common approach for landscape images – but it can also work for wildlife and I don’t see that mentioned very often elsewhere. Here’s a recent example I assembled from two photos:

Pretty in Pink 2
Pretty in Pink

And here’s one more made from three photos:

A Partial Pod of PelicansA Partial Pod of Pelicans. (Click to see larger on Flickr. Click again to zoom in)

I’ve written about this before, so I won’t repeat myself. If you’re interested in my approach, see these two posts:

And there’s much more info on the web waiting for your DuckDuckGo or Google search.

There is an added complication to watch out for when stitching wildlife panoramas: the animals may move between frames. For that reason, I shoot as quickly as possible. I try stitching the frames together automatically and look for any anomalies along seams. If I find some, then I assemble the panorama manually in photoshop and mask out the issues.

I enjoy making these and have many more collected in this folder on Flickr: https://www.flickr.com/photos/edrosack/albums/72157637736002816. Take a look to see some possibilities.

Thanks for stopping by and reading my blog. Take care of yourselves and each other. And if you can – stitch some panoramas!

©2021, Ed Rosack. All rights reserved

Are you ready for the Great Conjunction?

I’m posting early this week to give you a little advanced notice on an upcoming astronomical event.

A Great Conjunction is when the planets Jupiter and Saturn appear closest together in the night sky. The one happening next Monday (21 December) is the closest they’ve been since 1623. Here’s a Wikipedia article with more info: https://en.wikipedia.org/wiki/Great_conjunction

Kevin M ( www.flickr.com/photos/44542650@N08/) motivated me to go out and practice for it this evening. My first attempt is below.

Io, Jupiter, Europa, Ganymede, Callisto, Titan, and Saturn (bottom to top)Io, Jupiter, Europa, Ganymede, Callisto, Titan, and Saturn (bottom to top)

These planets are much brighter than their moons, so to get an image with a little detail in the planets and still show the moons requires stacking multiple frames. This one is a total of 5 frames – 4 for the planets (exposed at ISO 800, f/9, 1/250); and 1 frame for the moons (ISO 800, f/9, 1/40). It’s been heavily cropped and then digitally zoomed with ML Super Res in Pixelmator Pro.

Here’s a diagram from the SkySafari program identifying the objects and their positions for tonight.

 And this is the diagram updated for Monday night:

These are at the same scale, so you can see how much closer they’ll be on the 21st.

I’m hoping the weather will be clear. If so, I plan to at least make another image using tonight’s approach. But I’m also thinking about digging out my telescope. I haven’t used it in a long time. If I can get it running and aligned I should be able to make a little better photo. I guess I’ll see…

Are you going to try and photograph this? If so, I’d really like to see your images.

Thanks for stopping by and reading my blog.Take care of yourselves and each other. And if you can – capture a conjunction!

©2020, Ed Rosack. All rights reserved


12/22/20 edit:

Clouds last night were challenging.  This was the scene at sunset:

And this is how it looked once it was dark enough to see the conjunction:

I went ahead and made some frames and this is the best of the bunch (same approach as above except I didn’t use ML Super Res in Pixelmator Pro this time).  Click on this one to view a larger version on Flickr.

Great Conjuction, 12-21-2020Great Conjuction, 12-21-2020. Left to right: Callisto, Io, Ganymede, Jupiter, Europa, Saturn

I did get the telescope out and tested. It seems to work fine but given the seeing conditions, I didn’t take time to set up and use it. I think I’ll save that for a future project when those two planets are higher in the sky (although not in conjunction!).

Old Photos and New Software

Probably the best wildlife photo outing I ever had was a little over 11 years ago on a dark and dreary day in Juneau, Alaska.

I was using a Nikon D-90 camera and my telephoto lens at the time was the 70-300mm  f/4.0 – 5.6 lens.  To get the shutter speeds I needed, I had to set my ISO between 800 and 1000. The D-90 sensor was good for the time, but at those ISOs, overcast skies,  fast action and small apertures made for challenging exposures. While I like the photos I came back with, I’ve always wished the image quality was a bit better.

Fast forward to this week when DxO Photo Lab Version 4 was announced. It advertises a new RAW conversion approach that uses machine learning to combine demosaicing and denoising into one step. They say:

“The resulting photo quality is nothing short of spectacular, especially for photos taken in low light conditions that require brightening certain areas, photos with small pixels, and photos taken with early-generation cameras.”

That sounds like just what I needed for those old photos, so I decided to reprocess a couple of them. In addition to DxO Photo Lab, I also have new versions of Lightroom (with very nice texture, clarity, and dehaze controls) as well as Topaz Sharpen AI.

Would the new software improve these photos?  Let’s see. Here are the results in image compare frames so you can see the differences (newer versions on the right). You’ve seen the first one in the blog before.

Breaching Humpback 1

I think the reprocessed version has better detail / focus, less noise, and improved contrast / colors.

The next one hasn’t been in the blog before. I’ve always  liked the action / viewpoint / composition and “flight aspect” of the whale, but the noise, color and focus were disappointing.

Breaching Humpback 2

After reprocessing, I think the image quality is more than acceptable.

My workflow for these was:

  • Raw conversion using DxO Optics Pro 4 with “Deep Prime” noise reduction and export back to Lightroom in RAW / DNG format
  • Adjustments in Lightroom: exposure, highlights, shadows, texture, dehaze
  • Sharpening with Topaz Sharpen AI

If you’re interested in more detail about the steps I went through, just ask in a comment and I’ll be more than happy to answer your questions.

Here are some related links to explore:

I’m very glad that I’ve been shooting in and saving RAW format images.  It takes up more storage space and requires  more post processing work than using jpg files.  But having RAW files for my favorite photos lets me take advantage of new technology and algorithms as they become available.

Keeping up with all these new capabilities requires time, effort, and money.  But there’s no doubt in my mind that the software we have today is vastly superior to what was available 11 years ago. What do you think?

Thanks for stopping by and reading my blog. Please stay safe out there and take care of each other. And if you can, make or reprocess some RAW photos!

©2020, Ed Rosack. All rights reserved

A Difference in Scale

The master copy of the image below is made from multiple frames that I stitched together into a panorama. It ended up being ~196 megapixels.  I used a 70mm lens, so the equivalent focal length is about 35mm.  Looking at it another way, the tree line along the horizon is probably a couple of miles in length.

A calm, cloudy mornA calm, cloudy morn

Especially at this time of year, if you can zoom in to almost any image like this you’ll see dragonflies moving around or perched on leaves.  Look closely at this crop from near the center of the first image and you can just make out two of them resting on reeds.

The next photo is a single frame I made a few minutes earlier with another camera / lens at  ~1400mm eq. focal length.

Four-Spotted Pennant (?)Four-Spotted Pennant (?)

So in terms of lens magnification, it’s about a 40x zoom.  In terms of distance shown, it’s a few inches vs. a couple of miles or ~20,000 times smaller.  Either way, quite a change in scale and two unique ways to show the environment and inhabitants.

By the way, the header image at the top of the post is this same one rendered in B&W.  It’s a little more abstract, but I  like that version too.  If  you’d like to see the un-cropped frame, I posted it on flickr at this link: https://www.flickr.com/photos/edrosack/50499722736/in/photostream/.

Exploring an environment at a variety of scales can reveal interesting scenes and details.  Especially if a dragonfly tilts its wings just right in the light.

Thank you for stopping by and reading my blog. Please stay safe and take care of each other. And if you can, make some photos – at different scales.

©2020, Ed Rosack. All rights reserved

Photography Surprises

sur·prise:
noun: an unexpected or astonishing event, fact, or thing
verb: cause (someone) to feel mild astonishment or shock
synonyms: astonishment, amazement, incredulity, wonder

One reason I like photography is because it often pleasantly surprises me. If you do a search on this blog (https://edrosack.com/?s=surprise). you’ll find I’ve used the word many times. Today I have a couple more examples, so lets discuss photo surprises again.

Jumping fish sunriseJumping fish sunrise

The title of this one gives away the surprise. Of course, it’s not unusual for fish to jump out of the water. I was set up for landscape photography, not wildlife or action and I didn’t notice the fish that morning so I hadn’t tried to time my shutter to include it. When I started processing the photo on my computer I was amazed that my camera recorded the fish (a mullet?) mid jump. I think it adds interest to the photo. A small wonder, but a good one. Here’s a closer look.

Mid-jump Mullet

This second image is a different kind of surprise.

First Light on Wetland WildflowersFirst Light on Wetland Wildflowers

I was on Black Point Wildlife Drive and saw that beautiful light on the clouds. When I got out of the car to make a photo, I noticed those nearby wildflowers and wanted to include them – it was a difficult task. The exposure for the flowers would be very different from the sky. And getting everything in focus in one frame would also be hard. I decided to make three vertical frames (adjusting focus and exposure in each one) and then try blending them together into a single panorama image when I got home.

I wasn’t hopeful.  On top of capture issues, I knew the blending would be hard too. The flowers were very close and would change perspective against the open marsh when the camera moved. And any motion from wind would cause ghosting or other issues. I made the frames anyway – it was worth a try. I didn’t think it would turn out this well – an unexpected success!

You can click on the first and last photos to view larger versions on Flickr.

Changing the subject, Tropical Storm Isaias is heading toward Central Florida. Our skies are blue and cloud free right now. Later today it’s expected to be a lot closer and we might get some strong weather beginning this afternoon. Lynn and I have done our hurricane prep and are hoping it stays out to sea and doesn’t get too bad.  We also hope all of you anywhere near the projected path are prepared too.

Thanks for stopping by and reading my blog. Hang in there and take care of each other. And if you can – make some surprising photos!

©2020, Ed Rosack. All rights reserved

Comet Stacking

I’ve seen some awesome images of Comet Neowise C/2020 F3. I’m sure you have too. Did you make any photos of it? Then you might have a better image than you think, just waiting to be processed. Let me explain.

Neowise.Central Winds Park. 7/16/20. Single exposure at 85mm, f/2.8, 8s, ISO 400

Lynn and I went up to Central Winds Park in Winter Springs to see if we could spot Neowise. This park is on the south shore of Lake Jesup and has less light pollution to the north than we do in our neighborhood. Once it was dark enough, we could easily find it in binoculars, but it was very hard to pick up with just our eyes.

I went back a few days later with my long lens to try for a close up.

Comet Neowise C/2020 F3

Neowise. Central Winds Park. 7/19/20. 3 exposure stack, 600mm, f/6.3, 2s, ISO 3200 – 6400

I made a lot of frames of the comet on that trip, trying to find optimal settings for a single exposure. Almost all of the really spectacular images that you’ve seen are probably from a tracking mount, with multiple frames that are aligned, stacked, and processed together to reduce noise and bring out faint detail. I wasn’t trying to do any of that.

But after several attempts to get the best image I could out of what I’d captured, I realized I might have multiple frames I could stack too. So going back through my RAW captures I found three photos to try. They weren’t ideal since they were at different ISOs but I thought it was worth a shot. Here’s a before / after of a single RAW image compared to a stacked composite from three frames.

Comparison of a single RAW frame to the stacked, 3 frame final image

If you’re an astrophotographer, you already know all this. And you probably have some task specific software to align / stack / process images. If you’re not an astronomy buff, then do a web search for “photoshop manual align astro layers” and you’ll find a lot of info on how to do this without any extra programs – which is how I processed mine.

This is only the 3rd or 4th comet I’ve seen and the very first that I’ve tried to photograph. The first one I saw was Halley’s Comet back in 1986. I remember how exciting it was to show it to Lynn and Mike. I had a camera (and a telescope) then, but photos like these with that equipment would have been next to impossible. Photography has come such a long way!

So, if you made any Neowise photos, sort through them for frames you can try to stack. You may be surprised at the improvement you can get.

Thanks for stopping by and reading my blog. Hang in there and take care of each other. And if you can – stack some photos!

©2020, Ed Rosack. All rights reserved

Black and White

Ages ago when I was young and starting out with photography, I used black and white almost exclusively. It was an economic choice, not esthetic. I could buy black and white film cheaply in bulk and do my own processing, which reduced cost substantially.

In today’s digital world I still photograph in black and white, but not exclusively and it’s not an economic choice anymore. Almost every modern digital camera has a black and white mode. And since I shoot in RAW format, I can experiment and choose what my final output will look like long after I press the shutter. There are many reasons to shoot black and white, but here are a couple you may want to think about:

1. Emphasize / reveal different things about a subject
Black (and white) Bird

The Lightroom B&W panel has sliders for 8 different colors. Converting from RAW can provide a lot more control than choosing the default B&W mode in your camera. When processing this photo, I used this to bring out detail and texture in the Osprey’s feathers, brighten its eye, and darken the sky background.

Osprey B&W mix

Here’s a before and after that compares the color and black and white versions. Which do you like?

Osprey before and after
2. Control harsh light and colors

I like both wildlife and landscape photography. Light is best for landscapes during the golden hours around sunrise and sunset and can be very harsh in the middle of the day. Black and white can help you control this and make a good photo even when the light is harsh. I mostly use my infrared converted camera in black and white mode for this, but a regular camera can also work. Here’s an example of some harsh mid-morning light that I think works well in IR/B&W:

A lonely place
A lonely place

You can see more of my B&W photos in this album on Flickr: https://www.flickr.com/photos/edrosack/albums/72157625316775091

If you’re looking for an interesting pandemic project, take a look at your image catalog and try converting some to B&W. You might discover many reasons for black and white photography!

Thank you for stopping by and reading my blog. Hang in there and take care of each other. And if you can – make some (B&W) photos!

©2020, Ed Rosack. All rights reserved

Incredible skies?

in·cred·i·ble, adjective: Very difficult or impossible to believe; extraordinary

There’s been a lot of buzz on the web recently about sky replacement – a genre of compositing. You take the sky from one photo and substitute it into a second photo.  I first tried this way back in April of 2007.  I wanted to make the Great Egret family in this nest at the St. Augustine Alligator farm stand out against the sky. You can compare the before and after in this slider:

Before on the left, after on the right – Use the slider to compare

You can view a higher res version on Flickr here: https://www.flickr.com/photos/edrosack/4101177267/in/album-72157622798164562/. It turned out pretty well, but it was a lot of work (at the time) and I haven’t tried it again – until recently.

The latest version of Skylum’s Luminar photo editor comes with a capability called “AI Sky Replacement. This “automagically” replaces the sky in your photos with a single click and will even adjust the rest of the lighting in the scene to better match the new sky. You can read more about it on their site: https://skylum.com/luminar.

Here’s another before / after slider showing my recent effort with their software. The original photo was made on Black Point Wildlife Drive in Merritt Island National Wildlife Refuge. It was a very pretty morning, but the sky was a bit plain.

Before on the left, after on the right – Use the slider to compare

Here’s the whole completed image (click to see it in much higher resolution on Flickr).

Good Morning
Good Morning

I like how this one turned out too – the sun in the new sky is in the right place and the light direction, intensity, and color match the foreground nicely. It adds interest to the image. And it was easy – Luminar worked well in this case.

But it makes me a little uncomfortable. I guess because in this blog I want to tell you about what, where, and how to photograph. So I think you should expect to see things here that you can also see when you go to these places. This image is a composite, not a photo – you wouldn’t have seen this on that morning. I won’t say that I’ll never do compositing, but I do promise that I’ll disclose it if I do.

Now, am I going to criticize you if you replace skies in your photos? No, you can do whatever you want with your images. They’re your art. But in general, I do see folks on Flickr doing this a little too much. And if you do it you should disclose or tag it. And you should do it right – the results should look natural, not artificial. The light direction and color should match. The lens used in both photos should also match so scene elements are at the proper relative distance from each other. Go for the second definition of incredible (extraordinary), not the first (Very difficult or impossible to believe).

Thank you for stopping by and reading my blog.  And if you can – make some photos!

As for everything that’s going on in the USA and the world right now … I’ll try to keep politics and non-photo opinions out of this blog. But if you’re interested in what I think about things, feel free to take a look at my Twitter feed (link on the right). Peace out.

©2020, Ed Rosack. All rights reserved

Isolation

Anyone can snap a photo.  As photographers, we choose subjects and then compose frames around them so a viewer’s eyes are drawn to what we want them to see.  One thing to think about when we’re out with our cameras is how to isolate the subjects in our images.

Scan the scene when shooting – look for distracting elements and get rid of them.  How?  Sometimes you can’t, but here are some suggestions.

Viewpoint:  Shift a few feet one way or another to hide things.  There’s a much less attractive mailbox just out of the frame below on the left.

A Mailbox on Joe Overstreet RoadA Mailbox on Joe Overstreet Road

Magnification:  We never have enough zoom, do we?  Use what you do have to get close and separate subjects from clutter.  You can also crop later on the computer, but you’ll risk losing some image quality / resolution.

A good morning for a songA good morning for a song – singing Eastern Meadowlark. Joe Overstreet Road

Light:  Sometimes the light is just right to make your subject stand out from the background – take advantage of it!  This can be modified a bit in post processing too.

Shy birdShy bird – A Roseate Spoonbill in the light. Black Point Wildlife Drive

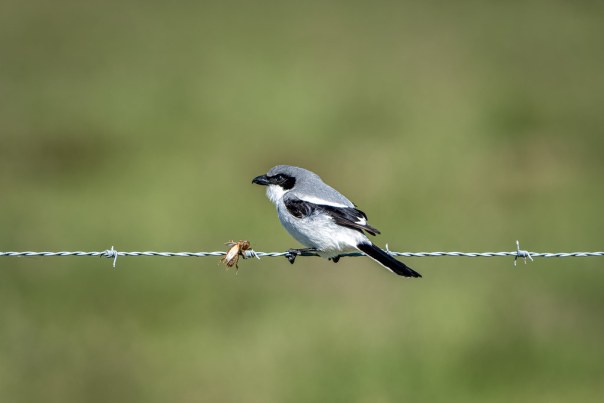
Depth of Field (DOF):  In addition to getting as close as you can and using a long focal length, shooting with a wide open aperture creates a shallower DOF and blurs the background behind your subject.  You may need to shift your position a bit to insure that the entire subject (e.g. both the insect and the bird) are in the plane of focus.

Butcher BirdButcher Bird – Loggerhead Shrikes often kill prey by impaling them on a thorn or barbed wire.  Joe Overstreet Road

Color:  Catching your subject against a contrasting color can help it stand out.  These American White Pelicans with their yellow beaks were very nice to pose for me in the blue water.

American White Pelicans
American White Pelicans. Black Point Wildlife Drive

So that’s a few ideas. If you think about this when you’re out, your photos will improve. Do you have any other suggestions?  Feel free to add them in the comments.

And speaking of isolation, Lynn and I are both generally in good health (thankfully!).  But the CDC says we’re at higher risk from the COVID-19 virus due to our ages.  We’re going to follow their recommendations and stay up to date on developments.

Thanks for stopping by and reading my blog. Now – go out, stay safe – and make some photos!

©2020, Ed Rosack. All rights reserved