Category Archives: Technique

5 Photos in 45 minutes

I’ve been busy with other things and it’s been terribly hot here (and everywhere). So I haven’t been photographing much lately. I know summer isn’t the best time for wildlife but I really needed to scratch my photography itch. So I headed out one morning about a week ago toward Merritt Island National Wildlife Refuge.

I usually try to make a sunrise photo before I start looking for wildlife. This time I wasn’t sure where to set up for a landscape, so I decided to go early and stop at several places. Sunrise was at 6:41am and I got to the my first spot a little before six. This is a two frame vertical panorama cropped to 4×5, at 24mm, f/8, 25 sec @ ISO 800. The scene was a bit dark!

Early morning by the riverEarly morning by the river, Titusville – Marina Park, 5:54:48am.

The sky was so dramatic, I made a second photo from the same spot a few minutes later. On this one I zoomed in to show some of the detail in the distance. Single frame, 66mm, f/8, 29 sec @ ISO 250.

Early morning by marker 6Early morning by marker 6, Titusville – Marina Park, 5:58:22am.

At that point, I decided to move to Scobie Park – just south of Veterans Memorial Park. The folks that live in that condo have a great view every morning! Single frame, 49mm, f/11, 20 sec @ ISO 100.

Rooms with a viewRooms with a view, Titusville – Scobie Park, 6:07:41am

I moved again to Veterans Memorial Park and made this next photo from the gazebo to highlight the virga beyond the bridge. It’s a two frame exposure bracket, 69mm, f/11, 5 sec and 2.5 sec @ISO 100.

I think it's raining beyond the bridgeMight be raining beyond the bridge, Titusville – Veterans Memorial Park, 6:20:27am

I thought the show was about done, so I put things back in the car and started over to MINWR. On the way the sky kept changing. I hurried to a small pond on the left near the entrance to Gator Creek Road. Luckily I still had my 24 – 105 landscape lens on my camera. I quickly jumped out of the car, set up my tripod and made this image. It’s a stitched panorama blend of 7 exposure bracketed frames, 24mm, f/8, 1/125 – 1.6 sec @ISO 100.

Cloud shadows at sunriseCloud shadows at sunrise, MINWR – Gator Creek Road, 6:39:50am

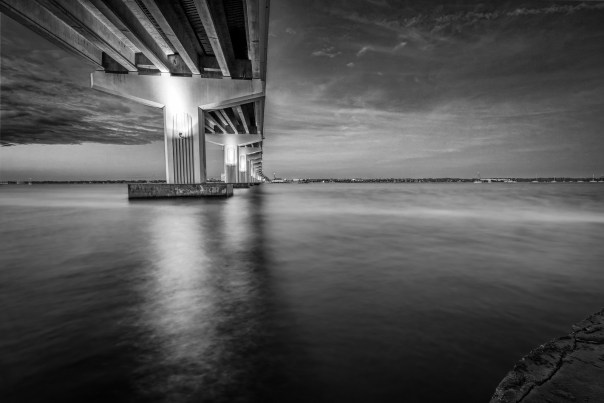
And the header image is actually a 6th photo: a black and white conversion of another image made from the gazebo at Veterans Memorial Park.

After all that, I switched lenses and drove through the refuge looking for wildlife and macro subjects. I didn’t get too many of those, but maybe there’s enough for a future blog post.

I went out that morning with no expectations. My only goal was to exercise my photo muscles. I came home with these 5 images (and more!) that I really like. That’s one reason I enjoy the photography hobby so much – it surprises me almost every time. Sunrise isn’t just a moment. This one took about an hour to unfold. If you want some great sunrise (or sunset) photos, show up early and stay late. And it helps to be familiar with an area so you can get a variety of viewpoints / perspectives in your photos.

Thanks for stopping by and reading my blog. Stay positive, be kind, take care of yourselves and each other. And if you can, spend 45 minutes photographing sunrise!

©2023, Ed Rosack. All rights reserved

A Motionless Marina Morning

The wind’s often calm before dawn (maybe this is why: https://www.chicagotribune.com/weather/ct-wea-1220-asktom-20151218-column.html). When you’re photographing around boats, even calm winds can move the mast tips (or the hulls) enough to blur them in a long exposure. But that wasn’t happening that morning at the Sanford Marina.

Glassy HarborGlassy Harbor (24mm, f/5.6 @ 25s, ISO 100).

My weather app said the wind was 2 mph – about as calm as it gets. Very good for low light photography. Not so good for keeping biting insects away, but artists have to suffer, right?

Paddle wheel and yachtsPaddle wheel and yachts. I Like the juxtaposition of the aft end of the St. Johns Rivership Company’s Barbara Lee with the modern yachts. (34mm, f/11 at 15s, ISO 100)

If the wind’s smearing your subjects, you can try making an extra frame at a higher ISO value to increase your shutter speed. Then you can blend the water and sky from your long exposure frame with the faster shutter speed frame to reduce bluring. But it’s not ideal: the higher ISO may reduce image quality and blending can be tricky with moving subjects. I’m glad I didn’t have to do that for these – things were stock-still!

Peaceful HarborPeaceful Harbor (24mm, f/5.6 @ 25s, ISO 100).

By the way, I was going to call this “Minimal Motion Marina Morning” but that seemed like too much alliteration, even for me.

Thanks for stopping by and reading my blog. Stay positive, be kind, take care of yourselves and each other. And if you can, make a motionless photo!

©2022, Ed Rosack. All rights reserved

A Stroll in the Dark

I wanted to check on the Osprey nest in downtown Winter Park, Florida. I decided to leave (very) early so I could also make some night time / low light photos in the area. I’ve done that before (see: /https://edrosack.com/2015/10/03/winter-park-at-night/). Here are a few of the results from this time.

Colony Theater BuildingColony Theater Building

The Colony Theater on Park Avenue in Winter Park Florida first opened in 1940. Matinees during WW II cost 39 cents. The theater closed in 1975 and was converted to retail space (see winterparkmag.com/history/). It’s still photogenic. This is a single frame (ISO 100, 26mm, f/8 @ 3.2 sec.)

Bright blooms at nightBright blooms at night

When I saw that planter in full bloom in front of an interesting building across the street, I knew I had to make a photo. But I wanted everything in focus and both the flowers and the building / lights well exposed. I made three frames: one focused and exposed for the flowers (ISO 100, 35mm, f/8 @ 20 sec.) and two more focused on the building (ISO 100, 35mm, f/8 @ 10 sec. and 4 sec). I did an HDR blend of the building exposures in Lightroom, and loaded the result along with the flower exposure into separate Photoshop layers. There, I aligned and masked the sharp flowers into the building layer. It took a few minutes, but I like the result.

Almost emptyAlmost empty

This one is a three frame exposure bracket (ISO 100, 24mm, f/8 @ 4, 10, and 20 sec.). I first called it “Empty street”, but then noticed the three ghostly figures and changed the title. The header image in this web post is an enlargement of the center.

Very early trainVery early train

I set up and made a test shot while I waited for a train to come through (ISO 100, 53mm, f/7.1 @ 25 sec.). I wanted a long exposure to show a lengthy train streak. When I looked at the image later on my computer, I didn’t like the way the train headlight changed the lighting on the trees, so I ended up using the test frame as the base image and blending in the train streak from the other frame. I’m glad I had that test shot to use!

Anyway, I like how these turned out and I thought maybe you’d be interested in a brief overview of how I made them. And by the way, Momma Osprey was on the nest but I don’t think any chicks have hatched yet. I’ll try to go back and get some photos of them.

You can review my other posts about Winter Park here: https://edrosack.com/category/photo-ops-in-florida/winter-park/. And you can view other photos from there in this album on Flickr: https://www.flickr.com/photos/edrosack/albums/72157636838442164/with/10424895284/.

Thank you very much for stopping by my blog! Your visits, comments, and likes are always welcome and a big motivator for me. Stay positive, be kind, take care of yourselves and each other. And if you can, make some photos!

©2022, Ed Rosack. All rights reserved

Black and White Light

I’ve written a bit about this before (see #2 in this post: https://edrosack.com/2020/06/28/black-and-white/), but I don’t think I’ve ever explicitly revealed the secret.

Here’s the finished photo:

Under the bridgeUnder the bridge(click to view larger on Flickr)

I like it and the Flickr folks seemed to like it too. It’s a two frame composite blended from these images:

Image 1, exposed for the water: ISO 100, 16mm, f/11, 13s
Image 2 – exposed for the sky: ISO 100, 16mm, f/11, 2.5s

I think the the subject and composition are nice, but the mixed natural light and bridge lighting are too different. I could have tried to use selective white balance (see: https://edrosack.com/2011/10/30/using-selective-white-balance-to-fix-problem-photos/) to fix this, but I think it would have been hard in areas where the colors overlap.

Anyway, today’s secret is that wild lighting can look a lot better in B&W. The Lightroom B&W conversion tool has sliders to adjust the intensity of eight different colors in an image. Wide color differences in the photo combined with all that control gives you a lot of variability and choice when converting to B&W. To me, the B&W lighting in the finished version is much more attractive than the original colors.

Thanks for stopping by and reading my blog. Your visits, comments, and likes are always very welcome and a big motivator for me. Be kind, take care of yourselves and each other. And if the light is wild, make some B&W photos.

©2022, Ed Rosack. All rights reserved

So long IR, and thanks for all the memories

I’ve been interested in infrared photography for a long time. I first attempted it sometime in the 1980s using black and white IR film. The results weren’t very good. Focus and exposure using IR film was a challenge back in ancient times.

One of my first digital cameras was a Minolta DiMage 7Hi and in 2003 I tried again with an IR filter on the lens of the unmodified camera. The dense filter required long exposures on a tripod even in daylight. I hadn’t mastered RAW file processing and was using jpg format which didn’t help. But results were better than 1980s film!

2003: An Oak tree, Oviedo FL – B&W 49 IR filter on an unmodified Minolta DiMage 7H camera, 4 sec @ f/8 ISO 200

In 2011 I started researching IR modified cameras and ended up sending my Olympus E-PL1 off to have its IR blocking filter replaced with one that passed IR light and blocked normal visible light. That was a big step forward. Focusing just worked and exposures were similar to those on an unmodified camera. I made the image below from a small boat and it would’ve been very difficult with a dense filter and 4 second exposure!

Blue Cypress Lake2012: Blue Cypress Lake, Fellsmere FL – IR modified Olympus E-PL1, 1/250 sec @ f/5.6 ISO 100

In 2013, I traded up to an IR modified Olympus E-PL5 to take advantage of the lower noise and additional resolution.

A calm day on Jordan Pond2014: A calm day on Jordan Pond, Acadia National Park, Maine – IR modified Olympus E-PL5, 1/200 sec @ f/5.6 ISO 200

Then in 2017 I bought a second hand IR modified Olympus E-M5 MII and sold the E-PL5. The E-M5 MII was a bit better and had a hi-res mode which I used frequently.

Wetlands view2019: Wetlands view, Merritt Island National Wildlife Refuge – IR modified Olympus E-M5 MII, 1/1600 sec @ f/3.5 ISO 200

In late 2021, I decided to sell the E-M5 MII. I hadn’t been using it much. Packing the extra camera, lenses, batteries, chargers, etc. was a hassle. And remembering how to use another camera system isn’t easy when you don’t use it very often. Now, if I want to do any B&W photography I have to use one of my non-IR cameras.

Along the shore2022: Along the shore, Merritt Island National Wildlife Refuge – unmodified Fuji X100V, 1/140 sec @ f/8 ISO 160

For all except the first, I started with the original RAW file and processed them with my 2022 current work flow and software. You can click on the last four to see higher res versions on Flickr. And I’ve collected many IR photos in this album: https://www.flickr.com/photos/edrosack/albums/72157628062119778

It has been a long journey with infrared. Am I done with it? It seems so, but who knows? Not me!

Thanks for stopping by and reading my blog. Your visits, comments, and likes are always very welcome and a big motivator for me. Be kind, take care of yourselves and each other. And if you can, make some photos – you’ll cherish the memories!

©2022, Ed Rosack. All rights reserved

Good light

Classic / traditional landscape photography is often about pre-planning, travel to iconic grand vistas, waiting for gorgeous light, and making a carefully exposed image with a wide angle lens on a high end camera mounted on a tripod.

And that’s all great – I enjoy doing that. But that’s not something we can do all the time (especially during the last couple of years!). As photographers, we learn to see and understand light. When we notice attractive or different light, we should photograph it. No matter how mundane or common the subject is, it can be lovely if the light is lovely.

Just a clump of grassJust a clump of grass

When I noticed the sun shining on this area, I’d already put away my tripod and taken off my wide angle landscape lens. I made it at ISO 100, 70mm @ f/2.8 for 1/640s, hand held. I like the way it came out.

Always watch for interesting conditions: golden hour, blue hour, or in bad, cloudy or severe weather too. The subject is of course important – but there’s no photography without illumination, and no good photography without good light.

There’s beauty everywhere at all times of day. You just have to look a little harder sometimes and capture the light where you find it.

Thanks for stopping by and reading my blog. Your visits, comments, and likes are always very welcome and a big motivator for me. Be kind, take care of yourselves and each other. And if you can, make some photos – wherever you find them!

©2022, Ed Rosack. All rights reserved

Lightroom Masking Changes

Back in October, Adobe changed the way masking works in Lightroom and Camera RAW. I was a little irritated at first. The new interface was unfamiliar and I didn’t know how to do things I was used to doing with the old version (the radial and gradient tools). How dare they “move my cheese“?

Anyway – I’ve been using it since, have figured it out, and now like it much better than the older approach. The AI based capabilities (select sky and subject) are awesome and work pretty well. And the re-organized interface combines all of the masking capability into one place with very helpful ways to combine selections.

I won’t try to explain how to use the new tools. There’s a lot of info on the web about it. Here’s one tutorial that’ll get you started: https://digital-photography-school.com/lightroom-masking-tool/.

Instead, I’ll show you an example of how I processed an image using the tools. This one is from Merritt Island and it’s been sitting un-processed in my archives since 2016. Once I started working on it, I wondered why I’d left it sitting there for so long! This is the finished version:

Another morning in the marshAnother morning in the marsh

And now, here are the four different masks I used in the final stage of processing:

Mask 1: Some areas in the clouds were too bright. I reduced highlights and bumped up texture and clarity.
Mask 2: I also lowered highlights in the corresponding reflection so they better match the sky.
Mask 3: The trees on the right were very dark, so I increased shadows there to bring out more detail.
Mask 4: And finally, the clouds on the left were a bit dark. I increased the exposure there by about 1/3 stop. This one is a radial filter intersected with a dark luminous range.

Here’s a before / after slider that shows the effects of the mask adjustments.

Comparison slider: Before (left) and after (right) masking. The changes aren’t all that dramatic, but I think they help.

So that’s my example. If (like me) you were a little put off by these changes, I’d encourage you to have another look. It’s worth the effort to master them. The control we have with digital capture and processing is just amazing when you think about how hard this would be to dodge and burn using film in an actual darkroom.

You can see a higher resolution version of this photo on Flickr at this link: https://www.flickr.com/photos/edrosack/51720541937/in/dateposted-public/lightbox/

And you can see many more of my black and white photos in this album: https://www.flickr.com/photos/edrosack/albums/72157625316775091

Thanks for stopping by and reading my blog. Please be kind, take care of yourselves and each other – and if you can, get out and make (and mask) some photos!

©2021, Ed Rosack. All rights reserved

Lighthouse Before and After

Lynn and I wanted another print for our walls and we both liked a photo of the Bass Harbor Head Light Station that I made on a trip to Acadia National Park back in August of 2014. Looking at the file in Lightroom, I wasn’t happy with the colors, and the resolution wasn’t quite enough for the size print that we wanted. I dug out the original RAW image file and reprocessed it with my current software and techniques. Here’s a comparison slider showing the full image (before is on the left):

Bass Harbor Head Light Station, Acadia National Park, August 2014

In Lightroom, I used their recently added “enhance” capability to improve RAW details and upsize. I also did basic adjustments including a slightly larger crop, white balance, and exposure. Then I opened it in Photoshop for final edits – which included texture / clarity tweaks and a pass through the Topaz Sharpen AI filter.

Here’s a small crop showing detail down by the water:

Software has improved a lot since 2014. I’m glad I saved the RAW file in my archives. We’ve already made the print and it looks good up on the wall.

A higher resolution version of the finished photo is here: https://www.flickr.com/photos/edrosack/51514669988/in/dateposted-public/.

If you’re interested, this link will take you to other blog posts I’ve written about reprocessing: https://edrosack.com/?s=reprocessing.

And I’ve collected some reprocessed examples in this album on Flickr: https://www.flickr.com/photos/edrosack/albums/72157622798164562

Thanks for stopping by and reading my blog. Please take care of yourselves and each other. And if you need to – reprocess some photos!

©2021, Ed Rosack. All rights reserved

Planning or Luck?

Ansel Adams is known for his pre-visualization approach to photography.

“The term [pre]visualization refers to the entire emotional-mental process of creating a photograph”

“It’s not what you see, it’s what you want me to see”

Ansel Adams

Having deliberate control of all parts of the photo capture and printing processes allowed him to create wonderful images. We can’t be Ansel Adams, but we can continue learning so that we gain as much control as possible in our own photography.

Embrace your craft.  Study it.  Understand it.  Practice it.  Select a subject. Compose and expose. Process and print. Use all your skills to control the light you capture. It’s a life long activity that you’ll never completely master.

But sometimes the subject and light find you. When this happens, be ready. If you are, you can use all of your acquired skills to make a photo showing what you want people to see. Ansel also said:

“Sometimes I arrive just when God’s ready to have someone click the shutter”

Ansel Adams

A while back over in Merritt Island National Wildlife Refuge, I saw this scene developing and really liked the way the sun was shining through the backlit clouds. I quickly searched for some foreground and found a pool of water reflecting the sky. I made a set of four frames that I could stitch into a vertical panorama.

Wetland Weather Wetland Weather

Later on the computer, I had to solve issues with stitching, exposure, and focus but luckily I knew what to try and had the tools to do so. Of course, it’s not Ansel Adams level photography – but I’m very pleased with the result.

What kind of photographer are you? Do you pre-plan / visualize all of your photos? Or do you wander around and photograph what nature presents? Which approach gives you the best results? Which gives you the most pleasure:  A carefully controlled composition that comes out exactly like your vision?  Or a serendipitous image that came out well when you tried something new?

Luck is good.  Preparation is good.  Being prepared when you get lucky is better.

“Chance favors the prepared mind.”

Louis Pasteur

Thanks for stopping by and reading my blog. Please take care of yourselves and each other. And if you can, be ready – and make some photos!

©2021, Ed Rosack. All rights reserved

SpaceX Crew Dragon Launch – 22 April 2021

Launches from the Kennedy Space Center have ramped up in the last few years, and here in the Central Florida area, we’re blessed with a good view of them. Lynn and I often go out and watch from our driveway. At times, we’ll be disappointed when clouds block our view, or if a low trajectory keeps the the vehicle down behind our neighbor’s trees. But last Friday’s launch didn’t disappoint!

SpaceX Crew Dragon Launch SpaceX Crew Dragon Launch, from Winter Springs, Florida. About 2 1/2 minutes after lift off.

Photographing one like this is an interesting challenge. There are several approaches to try. I usually concentrate on the rocket itself. In the daytime, you might be able to use aperture priority and automatic focus. In the dark, shooting in full manual mode will likely give you better results. I preset my aperture to wide open and my shutter speed as slow as I think I can hand hold with image stabilization turned on. If your camera doesn’t have IS, use a tripod to stabilize it. I also pre-focus to infinity, since the small size of the rocket in the frame might make auto focus unreliable. While shooting, I adjust my ISO setting to get a good exposure. With mirrorless cameras I can see the effect of ISO changes in the viewfinder. If you’re using a DSLR, you’ll have to chimp to make sure your ISO is correct.

The photos above were made with a focal length equivalent of 525mm and exposure of f/6.3, 1/80 sec, ISO 2000. The one below was at 164mm eq., f/6.3, 1/80 sec, ISO 6400.

Crew Dragon and launch plume. About 3 minutes after lift off

I won’t talk about other techniques to try, but here are a couple of impressive examples from Friday’s launch: Chuck P. has a long exposure image at this link: https://www.flickr.com/photos/chuckpalmer/51133507223/in/pool-lm-pigs/. And Matthew P. has a composite from all the way over in Tampa at this link: https://www.flickr.com/photos/matthewpaulson/51132476677/in/dateposted/

I have my rocket launch blog posts collected here: https://edrosack.com/category/photo-ops-in-florida/rocket-launch/, and launch images are in this album on Flickr: https://www.flickr.com/photos/edrosack/albums/72157719054007165

I enjoy this type of photography, especially at night with such a pretty launch. Have you tried it?

Thanks for stopping by and reading my blog. Take care of yourselves and each other. And when you can – photograph a launch!

©2021, Ed Rosack. All rights reserved