Tag Archives: reviews

Topaz ReStyle Mini Review

Topaz released a new plug-in recently, called ReStyle.  You can download any of their products for a free thirty-day trial, so I thought I’d give it a go.  This isn’t a full review or tutorial (I haven’t used it long enough for either of those).  But I have used it a bit so I’ll try to introduce you to some possibilities with three examples I’ve played with.  If you want to see the “before” versions, I’ve included them towards the end of the post.

I had trouble with the white balance in this photo of Marineland beach at dawn.  I could have separately adjusted the color balance on the sky and ground using layer masks in Photoshop or gradients in Lightroom.  Instead, it was easy to pick out this version from the grid displayed inside ReStyle.  It’s interesting how   remapping changed the color in the beach and rocks differently from the sky.

Down on the beach at dawn

Down on the beach at dawn (after Topaz ReStyle).

ReStyle maps color and tone statistics from a selected style to a target image.  It seems like Photoshop’s “Image/Adjustments/Match Color” command.  When you do this in Photoshop, you have to supply an image with the colors you’re trying to match.  ReSyle comes with over 1000 presets and provides control / adjustment of the results that aren’t easily available in Photoshop.   There are so many presets that they’re overwhelming, but ReStyle breaks them down into collections (e.g. “Landscape”), and you can mark your favorites.   You can show a collection or your favorites as a grid applied to your photo, which makes choosing one very simple.  You can also search for  similar styles by color or by name.  Within each style, you can further adjust the hue, saturation, and luminance of the five colors in each style, as well as the opacity, original image “Texture” strength, and others variables.  It also includes mask / selections controls to apply the effects selectively.  There’s a lot more info available in the manual at this link.

In this photo of some struggling trees on a small rocky island near Haulover Canal, I wanted a more dramatic color palette.  Once again, it was easy to pick out this version from a grid of possibilities.

Survivors
Survivors (after Topaz ReStyle)

For this infra-red photo of sea oats on the beach that I made in Fred Howard Park near Tampa , I wanted a different look from a typical IR false color image.  I like this color mapping I found in ReStyle .
Sea oats

Sea oats – False color infra-red (After Topaz ReStyle)

There are so many presets, options and adjustments that ReStyle can be a little overwhelming.  It’s not hard to use, but it is hard to grasp all the possibilities and decide what to do.  It’ll take a bit more time for me to get comfortable with it, so I’ll have to play with it some more.

For comparison purposes, here are versions of the photos before I applied Topaz ReStyle:

__D8C4109_HDR_Ed-Rosack
Before:  Down on the beach at dawn.

_P8110813_Ed-Rosack

Before: Survivors

Sea oats

Before:  Sea oats – False color infra-red processing.

Summary:  Do you have to use plug-ins?  Of course not, but they’re useful and save time.  And ReStyle seems to offer something I haven’t seen elsewhere.  It’ll definitely make your images look different.  Are they better?  I think ReStyle improved these three images, but only you can decide for your photos.  Will this fix all of your problems and should you use it on every photo?    Definitely not  – I’m new to the tool, but on several photos I tried, I couldn’t get anything that I thought looked good.  But it does look like something that’ll be good to have in your bag of tricks.

Off topic public service announcement:  I’m always telling you to get out and enjoy nature.  I also need to remind you to protect yourself from the sun.  I had two skin cancers removed last week.  I’m fine – but it’s not the most pleasant thing to go through.  And it can be much, much worse than mine were.  So when you’re out in the sun enjoying nature, please protect yourself.  Use sunscreen, wear a hat and long sleeves, stay in the shade as much as possible, etc.  The sun is brutal, especially in Florida.  And no one wants to suffer the consequences of too much exposure ten or twenty years down the road.

Thanks for stopping by and reading my blog. Now – go make some photos!  And use sunscreen!

©2013, Ed Rosack. All rights reserved

Space Shuttle Atlantis Exhibit – Kennedy Space Center

At the end of the space shuttle program, four different locations received an orbiter from NASA:  Kennedy Space Center, the California Science Center, the Smithsonian Air and Space Museum in DC, and the Intrepid Sea, Air, and Space Museum in New York. KSC got the Atlantis, which was the last shuttle ever launched.  The Atlantis Shuttle Experience grand opening ceremony was on Saturday, June 29, 2013.  It’s been a while since I’ve been to the Visitor’s Center, so I decided to go over and see what it’s like.

Space Shuttle Atlantis panorama
Space Shuttle Atlantis side view panorama – It’s displayed as if in orbit, with the cargo doors open, a satellite in the bay and the robot arm deployed.

In short, this new exhibit is outstanding.  At the entrance to the building, there’s a full size model of the solid rocket boosters and fuel tank assembly.  You enter and walk up a ramp to a room with a movie about the history of the shuttle program.  Then you move into a second room with another movie about the launches before you finally enter the exhibit hall itself.  The Atlantis is suspended as though it’s in orbit and you’re free to walk all around it and explore on several levels.  In places you’re almost within arms reach – close enough to see a lot of detail including re-entry marks on the tiles.  The hall also has many other exhibits including satellites, a transport van, space suit, a space station mock-up your kids can run through, and a group of simulators you can try including several where you attempt to land (OK if you must know, I crashed my simulated shuttle – but not too hard).

Space Shuttle Atlantis - front view
Space Shuttle Atlantis – front view

To put this into perspective, I went back through my photo archives to see if I had any previous photos of Atlantis and found several.  Here are two – you can see they’re not as close up as the new ones are:

Space Shuttle Atlantis on the pad in October 2009 prior to the STS 129 mission
Atlantis on the pad in October 2009 before the STS 129 mission – This is as close as I got to a shuttle while they were operational.

Space Shuttle Atlantis launch on STS 117 in June of 2007
Atlantis launch on STS 117 in June of 2007, just after SRB separation (made from Orlando, ~50 miles away)

And finally, here’s one last photo from my trip this week.  It shows the Astronaut’s Memorial.  In the background on the left you can see the Solid Rocket Booster assembly that stands in front of the building housing the Atlantis.

Astronaut Memorial

Astronaut’s Memorial – also known as the Space Mirror Memorial.  The Atlantis Experience entrance is behind and on the left.

Photo hints:  The light inside the exhibit hall is mixed so be careful with your white balance or shoot in RAW so you can adjust it in post processing.  The lighting is also a bit dim.  I shot at ISOs between  800 and 1600 with an aperture of f/4 and a shutter speed between 1/15 and 1/60 sec.  I didn’t use a tripod, but I did have vibration reduction / optical stabilization.  Atlantis is large – a wide-angle lens will help you fit all of it in the frame.  I used a 24 – 120mm zoom lens and it worked well for most photos.  I did have to make a multi shot panorama for the horizontal view above.

Here’s a link to my previous post on Kennedy Space Center.  Here’s a link to the entry for the Atlantis on Wikipedia.  Boing Boing has a really good review of the exhibit at this link.  And here are some other links to news about the Atlantis Exhibit opening:

Florida Today (sorry, no longer available)

USA Today

Space.com

I’ve posted other Kennedy Space Center photos in this set on Flickr.  Also, I’ve licensed the first photo above as Creative Commons.  It’s free for non-commercial, no derivative use as long as you provide attribution.  If you’d like to see / download a high-resolution version (~80MP), click it to go to Flickr.  Then click on the “…” symbol at the bottom right of the photo and select “View all sizes”.

Living in Central Florida for so long, I feel a personal connection to the space program and I was extremely impressed with the Atlantis Exhibit.  This vehicle flew 33 separate missions between October 1985 and July 2011 covering hundreds of orbits and over 126 million miles.  It’s awesome to see something like this up close and I’m very grateful it’s nearby.  But at the same time, it makes me a little sad.  The shuttle program was wonderful, but it’s over now.   With all the other competing priorities, will we ever have an ambitious space program again?  I hope so.

Thanks for stopping by and reading my blog. Now – go make some photos!

©2013, Ed Rosack. All rights reserved

Daytona International Speedway

Intro / Description

The Photography Interest Group was well represented at the Daytona International Speedway last Saturday.  Kevin M., Kevin K., Lutfi E., and I went for the day and covered most of the events from practice to racing and activities in between.

The Speedway in Daytona is the home of the Daytona 500 and opened in 1959.  In addition to NASCAR events, the track also hosts ARCA and other races. It’s a 2.5 mile high-speed tri-oval, and has sports car, motorcycle, and karting courses.

Saturday was part of Speedweeks which culminate next weekend with the Daytona 500.  There were two practice sessions, the Lucas Oil 200 race, the Sprint Unlimited Exhibition race, and other things to see and do.

Pit Road and the grandstands
Pit Road and the grandstands from the Fanzone

Kevin K’s son, Evan scored a package deal for us that included general admission, infield parking, and Sprint Fanzone entry for a very low price.  Sometimes being part of a prestigious organization like the Photography Interest Group can really pay off.  😉

Info for Photographers

Photo hints:

This was the first time I’ve actually photographed an automobile race and it took a while to settle on a shutter speed.  Luckily, Kevin M. was along – he’s a big race fan and advised us on settings.  He suggested using 1/1250th sec. and at this shutter speed the car body was relatively sharp while the wheels were a bit blurry – which is what I wanted to help imply motion.

These cars run over 190 mph and if you can get to the stands in the infield, they pass by very close.  So it’s a great situation to practice your panning technique.  I got the best results when I picked up the car in the viewfinder well before I pressed the shutter, concentrated on smoothly following as it approached, and continued to follow through after the shot.  I also had better luck when I used a focus point on the side the car was coming from and selected  continuous focus.  Previous experience with bird photography and keeping the focus point on target will pay off here too.

You may want to try turning off your camera / lens image stabilization to see if it works better without it at high-speed.  With fast shutters, you probably don’t need it, and depending on your equipment it might actually degrade the image.

I normally shoot in aperture priority but for this, the most critical part of the exposure triangle is the shutter speed – so I switched to shutter priority.  I set 1/1250th, and then controlled ISO manually to move the aperture to 1/f8.  It was cloudy most of the day, so my ISO ranged between 400 to 1000.

I also found myself using some positive exposure compensation at times to bring out detail inside the cars.

It’s fun to try to catch each driver at practice, but photographing single cars can quickly get monotonous.  We were fortunate to have access to several locations which helped us vary positions / light direction, and avoid back lighting most of the day.  Be on the lookout for unusual / different compositions.  There was a checkered flag in the foreground near turn two and it was fun to try to catch cars as they passed underneath.

Juan Pablo Montoya - car #42
Juan Pablo Montoya – car #42; Passing underneath a Daytona International Speedway checkered flag during practice

You should also watch for interesting people.  Be quick, since they don’t seem to stick around very long.

Richard Petty during the Dollar General Car (Matt Kenseth, #20) inspection

Tripod/Monopod:

Allowed, but not recommended.  With all the panning you’ll be doing, a tripod would get in the way.  And when crowds get dense, you’ll have trouble finding space to set yours up.

Lenses:

This depends on where you are at the track.  We were using various camera systems with a number of zoom lenses (70-200, 70-300, 150-500, 200-600 mm – full frame equivalent).  From the infield grandstands, the 600mm was a bit too long.  From the main grandstands, something that long might be useful.

It’d be helpful to have a shorter zoom available too for non-racing situations in the garage and Fanzone areas.  And a wide-angle or even a fisheye lens are useful for car close-ups.

Best time to visit:

Consult the speedway website for race schedules.  I found that last Saturday was a wonderful day there.  We got to see all the big name stars, but the crowds were very reasonable.  The traffic and number of people at the track can get crazy for big events like the Daytona 500.  Of course, if you’re a race fan, you probably don’t mind putting up with crowds to see that one.

Here are a couple more photos from the races:

Julian Jousse in car #94
Julian Jousse in car #94 has trouble in the Lucas Oil 200 race

The Big One
The Big One (photo by tkmckinn) –  A crash after dark in the season opening Sprint Unlimited exhibition race later on  Saturday night

Other:

Check the weather before you go.  It can be a bit warm or even a bit cold in Daytona in February.  Dress appropriately, and bring sun block.

Food and drinks are a little expensive.  Consider  bringing in some of your own in a small cooler.  Check the Speedway website for their rules on what you can bring in.

The Speedway has a phone app that might come in handy.  It’ll show you the day’s schedule, maps, and other info.  It also has a mode that allows you to find friends  (although it didn’t work all that well for us – everyone needs to have it open and on the GPS map screen).

Entry to the Fanzone is worth doing.  There are a lot of photo ops there that you won’t be able to get close to from the grandstands.  The infield parking was also nice, since it allowed us to move around for better vantage points.  Separate fees for admission, parking, Fanzone, etc. add up though.  Do a little research, and you might be able to find a special deal like we did.

Summary

Even though I’m not a huge race fan, I had a good time.  I wish I hadn’t waited this long to visit the speedway.

My Gallery /  Flickr photo set:  http://www.flickr.com/photos/edrosack/sets/72157632780891033/
 more photos Kevin M’s / Flickr photo set
 more photos Kevin K’s /  Flickr photo set
 more photos Lutfi E’s /  Flickr photo set
Website:  http://www.daytonainternationalspeedway.com
Address / Phone: 1801 W International Speedway Blvd  Daytona Beach, FL 32114
(386) 254-2700
Central Florida Photo Ops Rating:  A Central Florida Photo Ops “should do”

You can click the photos above to see larger versions on Flickr.  And you can see many more photos from yesterday at the links in the table above.

Thanks for stopping by and reading my blog. Now – race out and make some photos!

©2013, Ed Rosack. All rights reserved.

Fort De Soto

Season’s Greetings!  The holidays are here once again and many of you are traveling to visit family and friends.  Please have a safe journey and enjoy the time with your loved ones.

Well, I think I now have another favorite photo-op!  I’d heard many things about Fort De Soto and a couple of my friends had great experiences there, but it’s a ~2.5 hour drive from Winter Springs – so I’d never gone until last week.

Lynn, Mike, Sara, and Mary got me a wonderful birthday present this year – a 1 on 1 photo workshop with Jason Hahn of Outdoor Photo Workshops.  I’d been waiting to use it until the weather cooled off a bit and I finally scheduled it for last week.  Jason lives in the Tampa area and he’s an expert on Fort De Soto, so it seemed like a great opportunity for me to visit with a local guide and learn more about the place.

Since we were meeting at 6:45am for sunrise, I went over the night before to make sure I knew the way and to try to get a sunset shot.  Before I left, I used the Photographer’s Ephemeris app on my phone to do a little virtual scouting and noticed that the setting sun would be in nearly perfect alignment with a section of beach near the Bay pier at De Soto.  If you don’t have this app or another like it, get it.  It’s extremely useful when planning photo-ops.  This setting looked like it would be different from the sunrise and sunset geometry I usually get, so that’s where I ended up on Thursday evening.  I was blessed with some very nice clouds and light, and the geometry led to this composition.  What do you think?

The end of the day at Fort Desoto
The end of the day at Fort Desoto – Looking southwest toward Egmont Key from the base of the bay pier.  The ferry that travels back and forth to the Key is on the left.

Fort De Soto park is south of St. Petersburg, Florida and is run by Pinellas county.  It’s made up of a number of islands (keys) and the location and geography make it very unique, especially from a birding perspective.  It lies along the migration routes and is a landing-place for birds flying across the Gulf of Mexico.  If the conditions are favorable, a knowledgable birder can see over a hundred different species here in a single spring-time day.  I’m definitely going to keep an eye on the birding lists and plan to go back next April.

It’s also quite diverse from a landscape photography perspective.  The Sunshine Skyway bridge can add to a scene, and the tides cover and uncover shoreline features that can vary the foreground interest in your photos.  Storms also come through occasionally and these can cut new channels or shift sand to change the layout of the smaller islands.  So it’s possible to see changes on both a daily and seasonal basis.  When I arrived there Friday morning, the light wasn’t good for a typical sunrise shot, but I set up anyway and made this photo.  I think the reflections from the bridge on the low clouds and water add a lot to the image.

The Sunshine Skyway Bridge over Tampa Bay Florida, before dawn
The Sunshine Skyway Bridge over Tampa Bay Florida, before dawn. From the East Beach turnaround at Fort De Soto

Jason showed me around, and was quite knowledgable about the site, the wildlife, and how to photograph all of it.  He was also patient and easily dealt with my many questions.  It was interesting to hear him talk about the behavior of the animals and how they interact with the terrain and tides and then explain how to use the knowledge to make better photos.  It was a greatly enhanced scouting expedition and  I only hope I can remember half the things he told me!

The wind was blowing at 10 miles an hour or more, so many of the normal birds were hunkered down out of sight, but we did see Laughing, and Herring Gulls (including one with its breakfast), an American Oystercatcher, a family of Raccoons, Common Loons, Red-breasted Mergansers, Ospreys, Tri-colored and Great Blue Herons and maybe a few other species.

American Oystercatcher
American Oystercatcher – a very cooperative bird. He strolled right by us, leaving a wake.

There was a pretty interesting scenario with the Herring Gull below.  They catch crabs and then fly them up to 40 or 50 feet above rocks or hard sand before they drop them to crack the shells open. This particular gull was going to crack his crab, but another gull came close, so it flew off somewhere else to dine in private.

Herring Gull flies off with crab

On this trip, I met a fellow photographer for the first time, scouted a new place (which definitely made the “must do” list), learned lot in the process, and had a great time.  A pretty fine photo-op, in spite of the clouds and wind.

As usual, you can see larger versions of these images on Flickr by clicking on them. And I have a couple more photos from Fort De Soto in this set.

Thanks for stopping by and reading my blog. Now – go make some photos!

©2012, Ed Rosack. All rights reserved.

Bok Tower Gardens – Lake Wales, Florida

Intro / Description

Kevin M. saw some internet chatter about a Rufous Hummingbird sighting at Bok Tower.  The bird had been hanging out in some flowering bushes near the “Window by the pond”.  Although the Rufous does sometimes migrate through Florida, Ruby Throated Hummingbirds are normally the only kind we see, so this is a bit unusual.

Kevin  organized a Photography Interest Group expedition and he, Lutfi, and I headed over on Saturday morning to try to find this bird.  It was right where it was reported and in fact there were several of them.  We saw multiple Ruby Throated Hummingbirds too.  The Rufous seem more aggressive – they chased the Rubies away from the plants where they were feeding.

Rufous Hummingbird

Rufous Hummingbird resting on a twig, Bok Tower Gardens.  Tiny birds:  this one was about 3 inches long.

Info for Photographers

Bok Tower is open every day from 8 a.m. to 6 p.m and admission is $12 for adults and $3 for children, although if you arrive on Saturday mornings between 8 and 9 like we did, you can get in for half price.

Personal photography is permitted in all areas.  Commercial photographers should contact management to receive authorization before visiting.

This is a 250-acre botanical garden and bird sanctuary, located near Lake Wales and is one of the highest places in the state at an elevation of almost 300′.  It’s named for the 205′ pink marble and coquina tower which includes a carillon that you’ll hear every half-hour and at twice daily concerts (1 & 3 p.m).  Bok Tower is listed on the National Register of Historic Places.

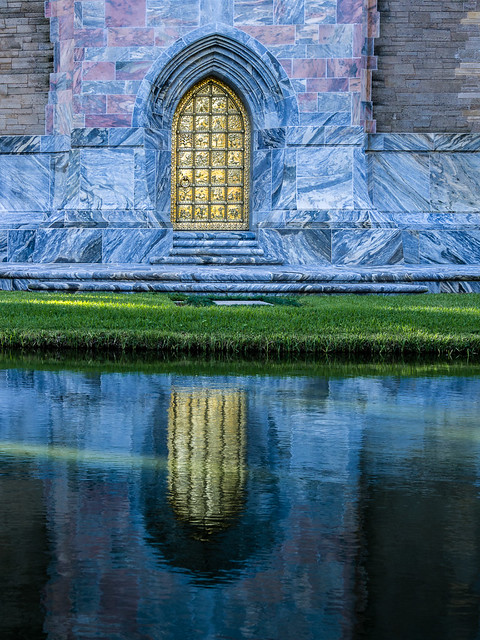
Door and reflection
Bok Tower door and reflection – the base of the tower from the reflecting pool side.

Photo hints:

There’s quite a variety of subjects to photograph here.  You can shoot landscapes, architecture, many kinds of flowers, and several varieties of butterflies.

Path and trees
Path and trees – a false color IRFE (infra-red, fish-eye) photo.  I made this photo right before they started to set up for a wedding.

Bok Tower Gardens is also a bird refuge where you can find a number of species.  The day we visited, we saw the Rufous and Ruby Throated Humming birds, Blue Jays, Mockingbirds, Doves, a Gray Catbird, a Brown Thrasher, a Tufted Titmouse, Cardinals, Red Wing Blackbirds, a few wading birds, and others.  We heard that wild turkeys and Sand Hill Cranes are often on the grounds too.

Tripod/Monopod:  Allowed and very useful for the normal reasons.

Lenses:  To cover all the subjects here, you should bring a variety of lenses from wide (for landscapes), macros (for butterflies and flowers), and telephoto (for birds).

Best time to visit:  Fall is good for migrating birds and springtime is great for flowers.

Other:

The gardens are about a 90 minute drive from the Winter Springs and are close to Legoland.  It’s also close to the can’t miss Spook Hill.

Summary

Bok Tower is one of the best botanical gardens in Florida, plus it has the tower, scenic landscapes, and at times an interesting  bird population.  Well worth your time.

My Gallery /  Flickr photo set:  http://www.flickr.com/photos/edrosack/sets/72157631763032197/
Website:  http://boktowergardens.org
Address: 1151 Tower Blvd., Lake Wales, FL 33853
Phone: 863.676.1408
Map: View in Google Maps
Central Florida Photo Ops Rating:  Autumn hummer haven; Spring flower fun – well worth a visit.

Thanks for stopping by and reading my blog. Now – go make some photos!

©2012, Ed Rosack. All rights reserved.

Cocoa and Viera Wetlands – August 4, 2012

I realized I hadn’t been to Viera Wetlands since last year, so I went over yesterday morning with Kevin K.

We spent a few minutes with The Photographer’s Ephemeris and found a promising sunrise stop along the way.  It’s just north of the first bridge into Cocoa on SR 520.  If you don’t have a copy of this software, you should get it.  It’s available (for free!) for the Mac, PC, and Linux as well as (paid versions) for Android and iOS.  The iPad version is especially helpful.  If you have a cell phone signal, you can use it wherever you are to visualize the natural lighting.  It shows the sun and moon overlaid on a Google Map for the place and time you enter.  Highly recommended.

The sunrise was pretty and there was even a nice bird posing at the end of an old dock for us.

Old pier at sunrise
Old pier at sunrise: North of the Hubert Humphrey Causeway in Cocoa, Florida.

When we got to Viera Wetlands, there was more going on  than I thought there would be.  We saw Great Blue Herons, Great Egrets, both White and Glossy Ibis, Moorhens, Coots, Limpkins, and Black Bellied Whistling Ducks, among others.  There were even some Roseate Spoonbills there – the first time I’ve ever seen them at Viera Wetlands.  A few Moorhen chicks, surprised me too – I didn’t realize they hatched this time of year.

Moorhen and chick near Ibis
Moorhen and chick near Ibis: “Kid – I told you not to hang out with those Ibis birds. They’re nothing but trouble”.

You can click on the images above to get to larger versions on Flickr. You can also see more of my Viera Wetlands photos here on Flickr.  For a slightly different perspective, you can also look at Kevin’s photos in his set on Flickr.

Thanks for stopping by and reading my blog. Now – go make some photos!
©2012, Ed Rosack. All rights reserved

Wide, wide weekend

I was in Colonial Photo and Hobby and saw a Rokinon micro four thirds  7.5mm f/3.5 manual focus fish-eye lens on the shelf.  I’ve never had a fish-eye lens before although I’ve always liked wide-angle.  I couldn’t resist and ended up taking it home.

Fish-eye lenses are not rectilinear – meaning they sacrifice keeping perspective lines straight to make the field of view big.  This one has a full 180° field of view and covers the sensor without any vignetting.  180° is really, really wide – keep your fingers and toes out of the composition!   They also tend to have a huge depth of field, which is even greater on a micro four thirds camera than on a full frame 35mm equivalent.

I tried it first on my infrared modified camera – I call these IRFE (infrared, fish eye) photos.  In this one, I wanted to take advantage of the distortion introduced by the lens to make the support structure for the bridge look more interesting. So I put the beams as close to the edges of the frame as I could get them.

Suspension bridge
Suspension bridge: Carl Langford Park, Orlando

In this next one, I saw the tree branch above and wanted to try to capture the complexity against the sky.  I’ve found it hard to make photos like this with a regular  wide-angle lens.  I end up not having a wide enough view and then taking multiple photos and trying to stitch them together as a panorama.  Stitching software just doesn’t hold up too well when the angle of view is too large.

Tree branches
Tree branches: Dickson Azalea Park, Orlando

Of course, you can use a fish-eye lens in a more normal way.  If you keep things that you want to appear straight toward the center of the frame, the image will look a lot more like a regular wide-angle photo.

Curve ahead
Curve ahead: Behind Lake Lily Park, Maitland.

I’m really happy with the lens.  It seems sharp, doesn’t vignette and the manual focus aspects aren’t a big bother because of depth of field.  It seems to handle flare pretty well and I’m not noticing any pronounced chromatic aberrations or other problems.  On my camera, it exposes correctly in aperture priority mode, even though there’s no electronic coupling.  And… it’s fun!  Isn’t photography supposed to be fun?

You can click on the images above to get to larger versions on Flickr. You can also see some of my other infrared photos here on Flickr.

Thanks for stopping by and reading my blog. Now – go make some photos!
©2012, Ed Rosack. All rights reserved

Queen Extravaganza at the Plaza

Queen Extravaganza performed at Orlando’s Plaza Theater on Fathers Day to a sold out, enthusiastic crowd.

Yvan Pedneault, Francois-Olivier Doyon, Tyler Warren, Brian Gresh, Tristan Avakian
Queen Extravaganza at the Plaza: Yvan Pedneault, Francois-Olivier Doyon, Tyler Warren, Brian Gresh, Tristan Avakian

QE as we’ll call them, is a tribute band backed by Queen guitarist Brian May and drummer Roger Taylor.  The show ‘celebrates the music and live experience of Queen’.  They’re on their summer tour and stopped for one night in Orlando.

Brian Gresh solo
Brian Gresh solo

This very talented group of musicians put on a wonderful show and performed many of Queen’s greatest hits.  I’m not a proper Queen super fan, but to my uninitiated ears, QE were really good.  The very loud sound mix and very annoying lighting (which occasionally flashed strobes directly into the eyes of the audience) bothered me a bit.  I suspect that the sound level and lights are purposeful and similar to a live Queen show, but I have to admit I never saw them live, so I don’t know.

Brandon Ethridge, Brian Gresh, Tristan Avakian, Francois-Olivier Doyon and Yvan Pedneault

The Plaza has been one of my favorite venues for concert photography.  I think their policy used to be “no professional cameras”, but at this show their sign said “no interchangeable lens cameras” and “no flash or video”.  They didn’t give me any hassle at all, but they were stopping people making videos with their phones.  I’m not sure if this is a permanent change or was specific to this event.  It would be a shame if it’s permanent.  I really enjoy the acts at the Plaza, but one of the key draws for me is the opportunity to make some photos.  If it becomes too hard to carry my camera in, I’ll probably go there less.

You can read my earlier blog entries about the Plaza here Keb’ Mo’ at the Plaza and here Hot Tuna at the Plaza.  You can view more Queen Extravaganza photos in this set on Flickr, and other photos from the Plaza in this collection on Flickr.

Thanks for stopping by and reading my blog. Now – go make some photos!
©2012, Ed Rosack. All rights reserved

Large photo processing

Mullet Lake, Geneva Florida
Dawn at Mullet Lake – Geneva, Florida

With all the large photo files I process (sometimes with multiple layers in Photoshop) my late 2009 iMac has felt a bit slow and crowded.

To solve the disk space problem, I added an OWC Guardian Maximus firewire 2 TB RAID-1 (Mirrored) external disk.  It’s running great, has more space than I need (for now), and since it’s mirrored it should be pretty safe storage.  I also do a periodic complete backup.

To address the speed issue, I doubled the memory in my iMac to 16 GB (also ordered from OWC).  To test it, I put together this panorama. The full size image is 85 mega pixels and the iMac handled it just fine.

I’m happy with the changes and I think I’m set for a while on computer upgrades.  And it wasn’t too painful.

Thanks for stopping by and reading my blog. Now, go make some photos!

©2012, Ed Rosack. All rights reserved.

Blue Cypress Lake

Intro / Description

What a beautiful place.

One cypress treeBlue Cypress Lake

I’d seen a few mentions online of Blue Cypress Lake near Vero Beach, Florida. It’s a long drive from Winter Springs – which is why I hadn’t made it down there. But that’s also why I was up at “0 dark thirty” last Saturday. Fortunately, I packed the night before so I was able to sleep in just a bit.  I also didn’t want to arrive in the dark on my first time there. So Kevin M. and I met at 5:30 near his house and were off.  There was a lot of fog and drizzle on our drive down, although it eventually cleared up and the clouds added some drama to the skies.  We turned in to Blue Cypress Lake Road just after 7am, but were delayed by stops for photos of Wild Turkeys in the fields on the west side and three Otters playing in the road up near the lake.

At Middleton’s Fish camp, we first parked near the camp sites, but couldn’t really see much from the shore – although with the right lens a sunrise shot from the bridge over the canal might be very pretty. We decided to rent a small boat to explore out in the water and wow, I’m glad we did!  We went north and scouted the trees, shoreline, and birds for about two hours.

The calm water and weathered cypress trees make for some outstanding scenery. We also saw literally hundreds of Ospreys and a good portion of them were carrying or eating fish. There were also plenty of alligators, a few quite large.  Black-bellied Whistling Ducks were also numerous and they serenaded us the whole morning.  We heard an eagle but didn’t see it and although there are supposed to be hawks and barred owls, we didn’t see any of them.

Osprey Family
Osprey Family – One of the many nests on Blue Cypress Lake. Many are just a few feet from the water. (Photo courtesy of Kevin McKinney)

Info for Photographers

Photo hints:

According to the locals, the best cypress trees are on the west side of the lake (where Middleton’s is) both north and south of the canal. For sunrise shots, you’d probably want to get between the shore and some of the farther out trees. This might be tough, especially in the dark if you don’t know the lake.  Be careful of hidden snags / submerged fallen trees that could hang you up! If you’re on the lake later in the day, a safer photo might be an evening sunset from a little farther out with a telephoto lens.

Many cypress trees
Many cypress trees: The north-west shore of Blue Cypress Lake, Black & White, Infrared

If you have an IR camera or filter, YOU MUST BRING IT to Blue Cypress Lake! I just love the way Cypress trees show up in infrared.

Depending on how much time you have available, there are a couple of other places you could check out in the area.  On the way home, we went by Joe Overstreet Road.  On the way we saw (and I finally got a photo of) a Swallow-tailed Kite.  When we arrived, we saw Eastern Meadowlarks, Sandhill Cranes, Red-bellied Woodpeckers, a Bobwhite, egrets, herons, and other birds.  We hoped to see a Whooping Crane, but no such luck.

Swallow-tailed Kite with snake

Tripod/Monopod:

I brought mine, but didn’t use it out on the lake.  It’s not much use inside the boat.  Although many people get out into the water to use theirs, I was a bit leery of doing this.  If you do, just be very careful of the depth and your footing and be sure to watch for alligators!

Lenses:

I had a 16 – 35mm on one camera and a 28 – 82 equivalent on the other.  I felt the 16 – 35 was a bit too wide for the conditions.  Next time I go, I think a 24 – 70 would be ideal for Cypress trees /  landscapes.  For birds of course, you’ll want a stabilized telephoto lens that you can handhold in a moving boat.  Kevin used his 70 – 300VR  on his DX crop body for some great shots.

Best time to visit:

If you go in February – April, you’ll be able to see Osprey’s nesting, breeding and raising their young. Some of the nests are quite close to the water so you can get an excellent look. Just be sure you don’t stress the birds.

There will still be many Ospreys around to photograph the rest of the year. Many of them are fishing and carrying their catch back to a convenient tree, so opportunities for flight shots of these magnificent birds with their prey abound.

Of course, the cypress trees are here year round.

Other:

Middleton’s Fish Camp offers tours and rents boats, and cabins.  If you also fish, they rent fishing tackle and sell bait.  If you do want to rent or take a tour, call ahead for availability.

Summary

My Gallery / Flickr photo set: My Blue Cypress Lake photos on Flickr

Kevin M’s Blue Cypress Lake photos on Flickr

Website: http://www.middletonsfishcamp.com/
Address / Phone:

21704 73rd Manor
Vero Beach, Florida 32966

1-800-258-5002

View in Google Maps

Central Florida Photo Ops Rating: Central Florida Photo-Op must do!

A wonderful, wonderful trip.

Thanks for stopping by and reading my blog. Now, go make some photos!

©2012, Ed Rosack. All rights reserved.