Tag Archives: Olympus

Atlanta at night

Focus on Atlanta

I enjoy listening to the Mirrorless Minutes podcast (audio on iTunes, video on YouTube).  It’s an interesting show on photography and since  Mike Boening and Jamie MacDonald  (the hosts) are both Olympus Visionaries, they often have good information and tips on Olympus camera gear.

So when I heard their announcement about a photo workshop in Atlanta I was eager to go – and It wasn’t too hard to talk Lynn into getting this for my birthday!  They coordinate using the Mirrorless Adventures page on Meetup.com so sign up was an easy process. If my post gets you interested, you can find out about their future workshops there.

Atlanta Marriott Marquis Interior 2Atlanta Marriott Marquis Interior 2

Our HQ was the Marriott Marquis in downtown Atlanta and it’s an awesome photo-op itself – lots of interesting architecture, angles, and patterns to fill your memory card.  And if you get tired of the photo ops there, you can take a break at one of their restaurants or bars!

We met on Friday evening and then left for the Jackson Street bridge for some sunset and light trail photography.  It’s a popular spot.  There were lots of folks making photos and it’s easy to see why – the skyline view is awesome!  Here’s one of mine:

A little laterA little after sunset.

I made this image with the Olympus “Live Composite” mode.  I’ve used this once before, but it was great to get in some guided practice and I’ll be using it more in the future.

Other stops on the workshop were at Old Car City (http://oldcarcityusa.com/), Amicalola Falls (http://www.amicalolafallslodge.com), and Oakland Cemetery (https://www.oaklandcemetery.com).  The workshop was last weekend and I came home with hundreds of photos.  I’ve been going through them every day since then – but I’m not finished processing yet.  So today I’ll just include a few from Atlanta and maybe do another post later about the other locations.

Watching sunriseWatching sunrise.  We stopped near this park while we waited for the cemetery gates to open

Oakland cemetery was founded in 1850 and many of Atlanta’s prominent citizens are buried there.  It has a great deal of sculpture, architecture, and gardens to draw your eye.  And an interesting sign across the street!

Six Feet Under BarSix Feet Under BarAtlanta Skyline from Oakland CemeteryAtlanta Skyline from Oakland Cemetery

I’ve always liked Atlanta.  My mother’s family lived in the area (in Cedartown) so we visited often when I was growing up.  I also went to college there (Go Tech!) and that’s where I met Lynn.  It was great to visit for a long weekend, and the drive from Central Florida isn’t too bad.

A photo workshop can be a big boost to your image making.  You might;

  • Learn or improve your skills:  I refreshed and practiced “Live Composite” mode and will likely use it more often now.
  • Go places you wouldn’t normally see.  I’ve been to Atlanta many times, but the only place from this workshop that I’d seen before was Amicalola Falls (mentioned in this post).  Trying new things is good for your soul!
  • Meet new people.  Hanging around with other folks passionate about photography is fun!  They don’t even get bored when you talk about lenses, cameras, technique, processing, etc.!
  • See different approaches / techniques.  On the last day, we spent a few hours processing images and each of us picked out several images to show the group and talk about.  I was floored by the variety and ideas that everyone shared.  It’s amazing how people can go to the same place and come back with such different photographs.

I really enjoyed this workshop – it was a pleasure to meet so many new photo friends! I thought the locations we went to were terrific and Mike and Jamie were extremely knowledgable, friendly, and always willing to help anyone with questions. They created a wonderful atmosphere for us to learn and make beautiful photographs.  And I liked the van they used for transport – it was a real pleasure to just climb in and have someone else drive us around to all these spots.  Well done Mike and Jamie!!!

I’ll be adding my photos from the workshop to this album on Flickr as I finish them.  Check back later for even more.  And if you want to see some of the photos the other attendees made, watch episode 95 of the Mirrorless Minutes podcast on YouTube.

And to all my new (and old) photo friends, If you’re in the Central Florida area, look me up.  Maybe we can meet at one of my favorite spots.

Thanks for stopping by and reading my blog. Now – go make some photos!  On a workshop!

©2018, Ed Rosack. All rights reserved

Looking for Landscapes at Loughman Lake

The sky wasn’t very promising on our way over to Merritt Island National Wildlife Refuge last week.  There were no clouds and we didn’t think the morning color would be any good.  Since it didn’t seem like we had a lot to lose, we decided to try a new sunrise spot:  Loughman Lake, on the south side of SR 46 just west of Mims.

Misty PalmsMisty Palms.  Olympus High Res mode, converted to B&W. ISO 200, 3.2 sec. @ f/6.3, 200 mm eq. (cropped to ~250mm eq.).  6:16 am.

We were right – at first.  There was hardly any color and I ended up converting this first image to black and white.  But there was some photogenic fog and around 15 minutes later, the color arrived along with a few clouds on the horizon.

Misty DawnMisty Dawn.  Olympus High Res mode, two frame stitched panorama.  ISO 200, 1/6 sec. @ f/6.3, 150 mm eq. 6:28 am

The images in this post are in time order and I’ve added exposure, focal length, and timing  info for you.  It turns out that I made all of these with a relatively long lens – unusual for my landscape photography.  I’m sure that there are some great wide-angle compositions there, but the shorter focal length photos I made that day aren’t as interesting to me as these.   I’m glad I brought the very versatile Olympus 12-100 f/4 zoom.

Morning Glory.  Olympus High Res mode, two frame stitched panorama. ISO 200, 1/80 sec. @ f/8, 200mm eq. 6:37 am

Here’s one more image.  I like the Great Blue Heron “statue” out in the water.

Misty morning marshMisty morning marsh. Olympus High Res mode.  ISO 200, 3.2 sec. @ f/6.3, 200mm eq. 6:45 am

 Loughman Lake turns out to be a good place to stop on the way over to MINWR.  But make sure you bring a longer lens!

As always, you can click on these photos to see larger versions.  And I have many sunrise and sunset landscape photos collected in this album on Flickr:  https://www.flickr.com/photos/edrosack/albums/72157624939669770.

Thanks for stopping by and reading my blog. Now – go make some photos!

©2018, Ed Rosack. All rights reserved

Circle B Bar Reserve – March 10, 2018

When I began writing this post, I looked at the Circle B Bar Reserve category on my blog (https://edrosack.com/category/circle-b-bar-reserve/).  To my surprise, once again it’s been about 2 years since my last visit!  Every time I’m there I think I should go more often.  This time I mean it – it’s a wonderful place!

It’s also a popular place – there’s a lot to see and a lot of people looking.  Kevin M. and I went over last Saturday and here are some highlights from our visit.

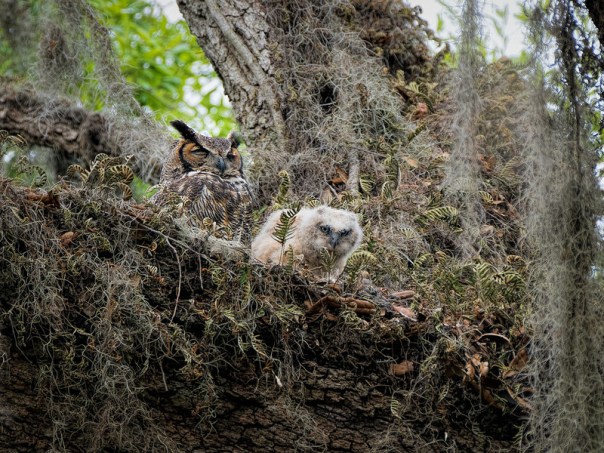
Great Horned Owl parent and chickGreat Horned Owl parent and chick

There’s been a Great Horned Owl nest along the entrance road for several years.  It’s marked off with tape and signs and there’s usually a crowd observing so you can’t miss it. The image above is a composite. They didn’t both look toward me at the same time, so I combined two exposures in Photoshop.  The chick seems pretty large.  I’m guessing it must be several weeks old.  They grow fast – go over soon if you want to see it before it fledges.

Cooper's HawkCooper’s Hawk

This hawk startled several birds (and me) when it launched towards a coot on the surface of the canal by Marsh Rabbit Run.  It missed and then stayed in this tree for a bit before moving on. I almost didn’t make the photo, since at first glance, it looked like a Red-shoulder Hawk to me.  But luckily someone nearby said “That’s a nice Cooper’s”, which is a new life bird for me.  It’s young so the colors aren’t typical for an adult, but the eyes give it away.

I also tried one of the features in the new firmware for the Olympus E-M1 MII camera:  Pro Capture (hi) mode with the PL 100 – 400 lens.  I wanted to catch the bird as it launched off the branch.  It didn’t quite work because hi speed Pro Capture freezes focus after the first shot.  It took off at an angle toward the camera and the bird isn’t sharp in the frame.  Oh well, another thing to add to my ‘try again’ list.

Pig and PeoplePig and People

This wild pig was foraging along the Heron Hideout path. It’s pretty small, seemed very calm and used to all the curious people, and minded its own business.  But I’d still be cautious around it.

Gray CatbirdGray Catbird – infrared, monochrome

I forgot the spare battery for my main camera back in the car and of course it died on our hike just after the hawk photo.  But I also had my IR camera with me with plenty of battery left. So I switched my long lens over to it and kept shooting.  We spotted this Gray Catbird in the bushes, and I like the way the bird stands out from the vegetation in IR converted to B&W.

Cedar Waxwing @ Circle BCedar Waxwing @ Circle B (Photo by Kevin McKinney, used with permission)

We found a flock of Cedar Waxwings in the branches above the path – but my photos of them are in infrared too.  Unlike me, Kevin was prepared and he was kind enough to let me use one of his from the day for this post.

Since it’s a long drive, we got lazy and slept in – so no sunrise images.  I did make some infrared landscapes there and I’m planning to use them in a future post, so check back for that.  Maybe I’ll include the IR Waxwings too.

We usually walk down Alligator Alley but it’s closed.  The gators are apparently active in that area although we didn’t spot any.  We did spot Painted Buntings, Indigo Buntings, a Barred Owl, Blue Wing Teals, Double Crested Cormorants, Anhingas, American Coots and chicks, a Purple Gallinule, the usual Herons and Egrets, Roseate Spoonbills, Warblers, Bald Eagles, Ospreys, turtles, and more.  Like I said – a lot to see!

You can view more Circle B Bar Reserve photos in my album on Flickr  (https://www.flickr.com/photos/edrosack/albums/72157625343566505) and in Kevin’s  (https://www.flickr.com/photos/44542650@N08/albums/72157666796492018).

Thanks for stopping by and reading the blog. Now – go make some photos!

©2018, Ed Rosack and Kevin McKinney. All rights reserved

Some Recent Photos

I haven’t been on a photo expedition recently, so this week I’ll cheat a bit and show some images that haven’t been on the blog before.

Orlando WetlandsOrlando Wetlands Park, October 2017. Olympus hi-res, two frame panorama converted to B&W.  I don’t convert sunrise photos to B&W very often, but the light in this one is pretty.

Space View ParkSpace View Park, February 2018. An alternate view to the one posted back then.  Looking east at dawn. You can see the hurricane damage to the dock that hasn’t been repaired. Olympus hi-res, two frame panorama.

Red-winged BlackbirdRed-winged Blackbird, Merritt Island National Wildlife Refuge, December 2017.  Common around here, but those epaulettes are attractive!

A gull and the ocean, 1A gull and the ocean, Cocoa Beach, January 2018. This is also an alternate view to the one posted back then.  I bracketed exposure due to extreme contrast and to get some detail on the bird.  Blended in Photoshop

Please click on any of these to see a larger version on Flickr.  And thanks for stopping by and reading my blog. Now – go make some photos!  I will too!

©2018, Ed Rosack. All rights reserved

When the Experience Exceeds the Photo-op

Lynn and I met Howard and Nancy T. at the Cape last Tuesday to watch the first launch of the SpaceX Falcon Heavy rocket.

SpaceX Falcon Heavy first launchFalcon Heavy first launch – This is an Olympus Live Composite, multiple exposure image showing the ascent.  From ~12 miles away (the “Close” viewing area off of Vectorspace Blvd near Kennedy Space Center). 40mm eq. Field of View.

Elon Musk founded SpaceX in 2002 and it’s amazing to think about how far they’ve come in so short a time – all as a privately funded company.  Their first launch to orbit was in 2008 and last week they launched an object into solar orbit with the Falcon Heavy, which is now  the world’s most powerful launch system.

SpaceX 1st Falcon Heavy LaunchSpaceX 1st Falcon Heavy Launch – sending a red Tesla sports car past Mars!  ~600mm eq. Field of View.

To me as an engineer, the capability to land and reuse boosters is even more impressive.  Especially when you watch two boosters simultaneously landing back near the launch site!

SpaceX: !st Falcon Heavy Launch - two simultaneous booster braking burnsSpaceX: !st Falcon Heavy Launch – two simultaneous booster braking burns.  These two successfully landed back at the Cape.  Unfortunately, the third booster crashed at sea.  ~600mm eq. Field of View.

If you’re a space fan like I am, you’ve been following this story.  But if not, here are a few pages around the web that you might find interesting:

It was truly a wonderful experience to watch this happen.  It seems to me that Elon is well on the way to earning his place as another Edison.

As far as the photo-op went, it’s a tough assignment.  We were about 12 miles away in the area NASA calls “Close”.  This is much closer than our usual viewing area (our driveway – about 35 miles away), but still a bit distant.  They also have “Closer” and “Closest” areas about 7.5 miles from the pad.  VIPs and press were only 3 miles away.  If you want truly great photographs, you’ll have to figure out how to get closer than we did.

Hey Elon – Central Florida Photo Ops needs a press pass!!!

It turns out this wasn’t really about the photo-op.  It was about the experience of witnessing history with thousands of other space fans.  And these photos will help me remember the thrill.

SpaceX Falcon Heavy first launch - vapor trail

Post launch vapor trail

Thanks for stopping by and reading my blog. Now – go witness some history!  And make some photos!

©2018, Ed Rosack. All rights reserved

Any Micro 4/3 Camera Regrets?

The short answer is “Nope, not really”.  For the longer answer, read on…

Sometimes I’ll take a camera by Bear Creek Nature Trail in our neighborhood (the middle of Tuscawilla, along the north side of Winter Springs Boulevard).  On this particular day back in January of 2017, sunlight was filtering down through the trees and hitting the water at a bend in the creek.  The light refracting  through ripples in the surface created interesting patterns and colors I thought were worth a shutter click.

Bear Creek ripples 1aBear Creek Ripples 1a  (28mm eq. focal length, f/8, 0.5 seconds, ISO 64)

This was a month or so after I started using the Olympus E-M1 Mark II camera.  I’d sold my Nikon D-800 and lenses so I could afford to upgrade my Olympus kit and I was still getting used to the new gear.  I’d had the D-800 for over four years and it’d worked extremely well for me.  It was the very best camera I’d ever used so getting rid of it was a big step and I was still second guessing my decision.

Why did I sell the Nikon gear and move exclusively to Olympus?  And how is it working out?  Glad you asked!

It seems that discovering micro four thirds cameras is a big thing on the web, lately.  Here are a few links with a lot of information you can investigate:

I won’t repeat these discussions.  Everyone will have their own opinion and reasoning for the camera equipment they use. I’ll just summarize by saying that for me, no regrets.  The smaller and more modern design has many advantages with few real issues.  For what I shoot, I haven’t seen much downside.

I can carry much more camera capability with far less weight.  And the new gear does things the older Nikon equipment doesn’t.  Really, the only thing that concerns me even a bit is star / astro photography with the smaller sensor.  I haven’t had much of a chance to test this yet and hopefully ease my concerns, but even if the Olympus isn’t as good at this type of photography, I’m not very worried.  I don’t do it all that often and if I need to, I can always rent / borrow a different camera with a larger sensor or use something like the iOptron SkyTrackerTM  to make really long exposures. Your mileage may vary of course, and you should investigate thoroughly before you make such a significant change.

If you have questions, feel free to ask in the comments.  I’ll be more than glad to try to answer.  And you can click on the image below to go to Flickr and browse through an album of the images I’ve  made with the new camera:

Great Egret head shotGreat Egret head shot

Thanks for stopping by and reading my blog. Now – no matter the camera you have, go make some photos!

©2017, Ed Rosack. All rights reserved

Three Photography Observations

When I left to meet Kevin K. and Tom M. for some photography before dawn last Monday, the sky was clear, the stars were shining and I didn’t think the sunrise would be very good.  If I hadn’t been meeting friends, I might have gone back to bed!  Looking at the photos in this post, it’s easy to see I was wrong – the sunrise was beautiful.

Observation 1:  Go.  You can’t always anticipate what you’ll see when you’re out photographing.  But if you stay home, you know you won’t see anything.

Calm Blue HourCalm Blue Hour.  14mm (equivalent), ISO 64, f/5.6, 10 sec., Hi-res mode.

We ended up at Cocoa Riverfront Park.  The clouds were moving in and the light and colors changed as we watched.  There were several interesting directions to point the camera.

Observation 2:  Arrive early and stay for a while when photographing sunrise.  Watch all directions.  Bring several lenses to vary your exposure, composition, and perspective.  Work the scene!

Fire in the skyFire in the sky.  70mm (equivalent), ISO 200, f/5.6, 1/50 sec., multi-frame stitched panorama

Photos 1 and 3 are from the Olympus E-M1 Mark II camera in hi-res mode.  You may remember this post (https://edrosack.com/2015/08/09/thoughts-on-processing-olympus-om-d-e-m5-mark-ii-high-resolution-photos/) where I wrote about motion anomalies with E-M5 Mark II hi-res and how to manually fix them.

Observation 3:  My conclusions from the earlier post are all still true – except for one.  I’m happy to report that with the E-M1 Mark II camera, Olympus has made a great deal of progress with hi-res mode.  I didn’t have to fix any motion anomalies in either of these photos.  Well done Olympus.

Dew on the BoardwalkDew on the Boardwalk. 14mm (equivalent), ISO 64, f/5.6, 8 sec., Hi-res mode.

Thank you for stopping by and reading my blog. Now, go make some photos!

©2017, Ed Rosack. All rights reserved
Olympus and focus bracketing

I’ve written before about computational photography and focus bracketing / stacking.    And if you’re curious, you can find much more info on the web.

Today’s post is inspired by a gift the Olympus Camera Company has just given to owners of their OM-D E-M5 Mark II and E-M1 cameras.  They’ve issued free firmware updates that add new capabilities, one of which is focus bracketing.  Here’s an example image I made while learning about the new features.  I wanted all the orchids sharp and the background to stay blurry.

OrchidsOrchid – a focus stacked image processed in Photoshop from 14 frames made with the new focus bracketing feature in the E-M5 Mark II.  Individual frames are at ISO 200, f/4, 1/25 second, 60mm (120mm eq.).

You can read about the firmware updates at this link on the Olympus website (sorry – no longer available).

There are several camera companies providing new features in firmware updates to existing cameras.  The Olympus engineering team is exceedingly clever and seem to really enjoy exploiting their hardware to come up with novel features, many of which are computational in nature.    Focus bracketing is the latest example.  Here are my first thoughts about this mode:

  • Of course, you can focus bracket manually, but having the camera do it for you is a big help.
  • When you frame your composition, leave room to crop.  The stacking process can introduce anomalies at the edges.
  • Your starting focus point should be on the closest area.  The bracketing function will step the focus away from the camera.
  • You control the number of exposures and relative step size.  The step size you use depends on the situation and you’ll have to use trial and error to set it until you gain some experience.  If your step size is too great, it’ll leave blurred areas in the processed image.
  • Set the number of exposures greater than you think you’ll need.  Once you look at them on the computer you can discard any unnecessary ones.  You can get very good control of depth of field and background blur by selecting which frames to use when post processing.
  • Focus bracketing uses the camera’s electronic shutter, so there are some limitations from that (e.g. flickering / banding due to fluorescent lights;  An 8 sec. longest shutter speed limit; others?)
  • As with many kinds of multi-frame computational images, subject or camera motion will introduce artifacts.  Focus bracketing works best for stationary subjects with your camera on a tripod

Here’s another example.  And yes, including this may give you some idea of how old I am – I’m old enough not to care about that.

My engineering school calculator
My engineering school calculator – a focus stacked image processed in Photoshop from 21 frames.  Individual frames are at ISO 200, f/4, 1/40 second, 60mm (120mm eq.).

For comparison purposes, here is a single frame from the series.  You can see the tremendous difference in depth of field.

Testing the new focus bracketing feature in the OMD EM5 MII. It works well - big thumbs up to Olympus for putting out this free firmware update. This is a single frame. It works well - big thumbs up to Olympus for putting out this free firmware update.
My engineering school calculator – single image

I have more focus stacked images in this album on Flickr.

I’m very pleased with how well this works.  Olympus deserves a big thumbs up for putting out this update for free.  Doing things like this can earn a lot of customer loyalty.

Now if we could only combine it in camera with other computational photography tricks:  focus stacking, plus high res mode, plus HDR, plus … maybe next time.

Thanks for stopping by and reading my blog.  Now – go compute some photos!

©2015, Ed Rosack. All rights reserved.

Thoughts on Processing Olympus OM-D E-M5 Mark II High Resolution Photos

Introduction

I’ve been using an Olympus E-M5 Mark II for several months and I’ve mentioned it once before (in this post about algorithmic and computational photography).  I very much like the camera and the photos I’ve made with it.  You can see many more images I’ve made with this and other micro 4/3 cameras  this set on Flickr.

Today I’d like to talk more about its high res mode and some things I’ve learned so far while working with it.  I’ll use this recent image from the north bank of Haulover Canal in Merritt Island NWR for my example.  By the way, please click on the photo, you’ll be able to see a higher resolution version on Flickr.

Daybreak at Haulover CanalDaybreak at Haulover Canal

For those of you who aren’t interested in this particular camera or capability, here’s the tl;dr summary:  Your capture and processing tools, technique, and skill make a difference in the resulting photo.  But that’s true of every camera.  And you already knew that, didn’t you?

Okay, for those of you that are interested, here’s some hints on how to get the best out of this mode.

RAW Import

I’ve found that the software I use makes a big difference in the detail that shows up in the file.  I normally use Lightroom for all my photos, although I also have DxO Optics pro and I think it does a good job with higher ISO images.  But I noticed issues when using either of them with the Olympus high-resolution files.  Here are three 1:1 crops, processed in the three different software packages.  These are just after importing from the RAW file, with (mostly) default processing, although I did adjust sharpening on the first two to try to improve detail.

Lightroom Processed

Processed in Lightroom  CC Version 2015.1.1

DxO Processed

Processed in DxO Optics Pro 10 Version 10.4.2 

Olympus Processed

Processed in Olympus High Res Shot Raw File Photoshop Plug-In 

To my eye there’s no question:  the Olympus software does a better job processing the High Res Raw file.  The result is sharper, with more detail – so I’ve switched to using it instead of either Lightroom or DxO Optics Pro for initial input of the high res files.  There are limited adjustments available with it, so after importing the file I usually add an Adobe Camera Raw adjustment layer in Photoshop to help fine tune the highlights, shadows, etc.

Motion Artifacts

You can see artifacts on the water surface in the crops above.  These are from the way the high res files are created.  Each file is composed of 8 separate captures that the camera combines into the high res RAW output file.  So any motion during capture will result in strange-looking distractions.  If your camera is moving, the image will be unusable.  So I use a sturdy tripod, a cable release and / or a shutter delay.  If part of the scene is moving (like water, or wind-blown branches) you’ll see the distracting artifacts in that part of the frame.  For some subjects (e.g. still life) this isn’t a problem – nothing moves.  For landscapes, you’ll need a very calm day or you may want to remove the artifacts in post processing.

If they bother you, there are (at least) a couple of things you can try.  Olympus also saves the first of the 8 frames that it uses to create the RAW file.  You can open this, up-res it, and mask it into the high res version wherever there are artifacts you want to remove.  (Note that you’ll have to rename the normal res file – your software probably won’t recognize the .ORI extension).  And you’ll have carefully process the normal and high res files exactly the same up until the point where you do this so that any color or brightness difference doesn’t show.  And finally, you’ll have to recognize that wherever you do this, the resolution will suffer.

For water surfaces, you can also try applying a motion blur in Photoshop and masking it in to hide the artifacts.  That was easy to do in this photo, since it was a relatively long exposure (1/2 sec.) and the water surface was calm.  Here’s a before and after 1:1 comparison:

Motion Artifacts

Motion Artifacts – prior to removal

Motion Artifact removal

Motion Artifacts – masked out using a motion blur layer in Photoshop 

Other Artifacts?

Olympus outputs 64 Mega Pixel RAW files.  Olympus themselves say there’s not 64MP of information in the file.  It’s more like 40MP, so they downsize their JPG files to 40MP.  When using this mode keep that in mind.

There’s not too much else to worry about, although I have seen some things that look like “hot pixels” in the high res images (2 or less per file).  I’m not sure if that’s what they are and I also don’t see them in normal res files from the camera.  But they are pretty easy to remove with the Healing Brush in Lightroom.  By the way, If anyone else has seen these, I’d be interested in hearing from you.

Red Dot Artifact

High Res “Hot Pixel”

Conclusions

So, the E-M5 Mark II High Res mode:

  • Is most suitable for still life types of images when the camera is mounted on a tripod and nothing is moving.
  • Is best processed from RAW by the Olympus High Res Shot Raw File Photoshop Plug-In – at least with current (August 2015) versions of software.
  • Offers better resolution and improved color and noise characteristics than the normal mode images.
  • Can be used in other situations (e.g. landscapes), but unless the subject is still, you’ll need to deal with motion artifacts.
  • Provides the greatest benefit with better lenses.  Lower quality glass could compromise the output resolution of the system.

If you capture images in high res mode and the artifacts are too difficult to deal with, you can always drop back and use the normal resolution file.  The results will be almost as good for anything except large prints (or pixel peeping).

Have you used a capability like this?  What have you discovered?

Thanks for stopping by and reading my blog. Now – go make some photos!

©2015, Ed Rosack. All rights reserved.