Category Archives: INSIDE FLORIDA

Adding location information (GPS) to your photos

Here comes the sun
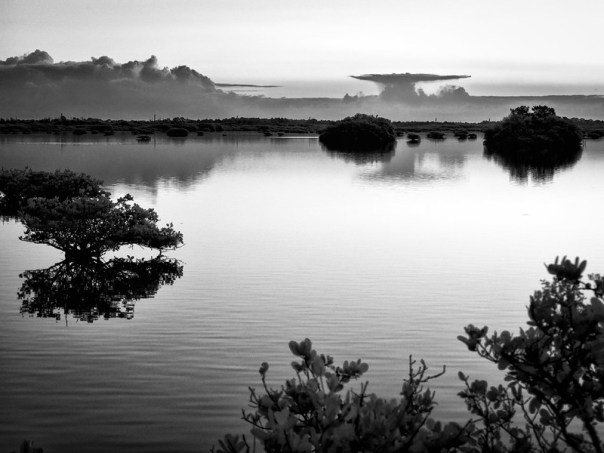
Here comes the sun – Sunrays shining through offshore clouds mirrored on calm inshore water.  Merritt Island National Wildlife Refuge. GPS:  28°38’8″ N 80°46’33” W

I’ve been adding Lat/Lon location info to my photos for several years.  It’s helpful to others to see where I made each one.  And I like to look back and see the info too.  If you click on a photo in the blog that I’ve geo-tagged, it’ll display on Flickr with a map showing the location below the photo.

I use Lightroom’s Map module for this.  If I know where I was I can easily drag the photos to that place on the map.  For unfamiliar places, I try to remember to make at least one iPhone photo so I can copy its GPS info to the other photos I make there.   That’s what I did on my recent trip to Acadia National Park and it worked well.  But I want something a bit less manual.

It would be nice if all cameras did this automagically like the iPhone does.  The only other one I have with GPS capability is an Olympus TG-2 underwater camera that I use when kayaking.  Nikon makes an add-on GPS, but it only works with Nikon, you’d have to remember it, not lose it, and it plugs into the remote release socket – so it’s a pain when you’re shooting from a tripod.

I’ve experimented before with using my phone to record GPS tracks.  On our trip to Alaska in 2009, I used an app and later synced the tracks to photos back on my computer.  That was a pain too (the app and software weren’t very reliable).  But it seems I wasn’t paying attention to Lightroom updates since then.  I completely missed that it now has the capability to sync a captured GPX format track to photos in your library.

Screen-Shot-2014-08-29-at-12.01.05-PM

Lightroom Map Module:  The track interface is hidden in a pull down menu at the bottom of the screen. 

Using the interface at the bottom of the Map Module (shown above), you can load a track and use it to auto-tag the location of photos in a folder.  And it works very well!

So how exactly do you do this?  There are three steps:

  1. Before you leave, make sure you set the time in your cameras correctly.  The time stamp is used to sync the position from the GPS track to each photo.
  2. Use your GPS unit or an app on your phone to record a track of your movements.  There are several iPhone apps that will capture the track info.  I tried GeoTagr ($4.99 in the app store) and it worked well.  Motion-X GPS (no longer in the app store?) also works.  When I got back home, I emailed myself the .gpx file with the track information.  One warning:  sometimes these location recording apps can be power hungry.  You might want to check to make sure you don’t run down your battery doing this.
  3. Move the .gpx track file to the folder on your computer with your photos.   Then load it into Lightroom and apply it to the photos.  Easy-peasy!  It all just works!

Two more geo-tagged photos from a quick trip to Merritt Island early last Thursday:

Nearby Mangroves and distant storms
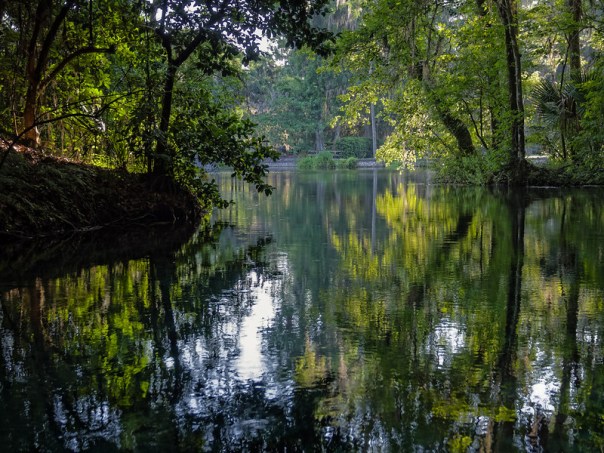
Nearby Mangroves and distant storm.   Merritt Island National Wildlife Refuge. GPS:  28°38’8″ N 80°46’33” W

Morning by the causeway
Morning by the causeway.  Parrish Park. GPS:  28°37’21” N 80°47’45” W

I like this method and I’ll probably use it in the future.  It’s much less fussy than what I tried several years ago.  Now all I have to do is remember to start the app at the beginning of a photo-op.  I wish I’d worked this out before my trip to Maine.  It was an effort to figure out where each of those photos were made.

By the way, MINWR was still quiet last week – not much wildlife or birds about.  I did see a group of White Pelicans there.  Usually, they don’t show up until November.  I’m not sure what that means, but they were fun to watch.

Thanks for stopping by and reading my blog. Now, go make some photos! And geo-tag them!

©2014, Ed Rosack. All rights reserved.

Orlando Wetlands Park, 16 August 2014

After the trip to Maine, I was looking forward to getting back out and photographing here in Florida.  So it was up early (not as early as Cadillac Mountain!) and out the door to meet Tom M. at Orlando Wetlands before dawn last Saturday.

Nature foiled our sunrise plans and instead served up some semisolid, soupy fog for our photo enjoyment.

Foggy morning 1
Misty morning 1

And we did enjoy it.  It was interesting looking for compositions in the mist and trying to find foreground objects to add some definition to the photos.  I like the one above but after looking at it on the computer, I wish I’d moved a bit to separate the near and far grass on the left.  I didn’t see the overlap when I made the photo.

It took a while for the sun to burn through the fog.  That gave us time to try several different places.  I thought the south shore of Lake Searcy and the southwest corner of cell 16A were very photogenic.  I especially liked the light on the close leaves in this scene.

Foggy morning 2
Misty morning 2

Discovering beauty in unexpected places or situations is one of the addictive things about photography.  Sunrises shouldn’t all be super saturated.

New subject:  The Lake Jesup flowers will begin blooming at the end of September.  Here’s a link to my post about last year’s flowers, with much more info on them.  Make your plans now!

Thanks for stopping by and reading my blog. Now, go make some photos!

©2014, Ed Rosack. All rights reserved.

Let's go fishing – how I made the image

Here’s another photo from my last trip to Viera Wetlands.

Let's go fishing!
Let’s go fishing! Two fishermen head out before dawn.

I’ve made this kind of photo before – you can see some examples in this set on Flickr.  I think this one turned out better than my earlier tries.  I used a different approach and because it’s been a while since I’ve written a “behind the scenes / how-to post”, I thought I’d fill you in on how I made this.

The boat ramp at this little park where SR 520 crosses the St. Johns River is pretty busy around dawn.  It seems to be a popular place for fishermen to put in.  I  waited several times while they cleared my frame and the water calmed down before I could make my next exposure.  So I decided to make an image that included a boat.

It’s a challenging shot.  I wanted to capture the intense sunrise colors so I had to be careful not to over expose and blow out the sky.  I also wanted some detail in the boat, so I needed to over expose there a bit, but still minimize motion blur.  At sunrise, I normally use a low ISO for the best quality image, and a small aperture for good depth of field.  This results in a long shutter speed, which is bad for photographing moving boats.  And if I want to bracket and use multiple frame HDR to capture the huge contrast range in the scene – that’s even worse for moving boat photography.  So how did I make this image?  Glad you asked!

The secret is to carefully capture two frames and blend them together by hand.  The first frame is exposed for the boat:  I used a high ISO and a wide open  aperture to get my shutter speed as fast as possible, and I overexposed slightly to capture a little shadow detail in the boat and in the vegetation on the shore.  With my camera set and on a tripod, I composed and waited for the next boat to get to the right point in the frame.  Here’s that RAW file:

1-the boat Screen Shot 2014-07-22 at 12.49.58 PM
First frame, exposed for the boat, ISO 1000, f/4, 1/20 second

The second frame was my main exposure and I wanted it to be the best quality possible.  I also wanted to slightly under expose to capture color and detail in the sky.  I waited until the boat was gone and the water was calm again and then made this exposure:

2- the sky Screen Shot 2014-07-22 at 12.49.51 PM
Second frame, exposed for the sky, ISO 100, f/11, 0.8 sec

When I got home, I preprocessed the two raw files using identical color balance and paying careful attention to noise reduction (especially on the higher ISO frame with the boat).  I’ve used DxO Optics Pro lately when I want the best RAW conversion.  It does a wonderful job on both lens corrections and noise reduction for supported equipment.  After a few tweaks to exposure in each file, I brought them into Photoshop on separate layers.

The next thing to deal with was the boat.  Even though I’d pushed my shutter speed as high as I thought I could, 1/20 second still left a little  motion blur visible.  The “Filters / Sharpen / Smart Sharpen” command in Photoshop has a “Remove Motion Blur” option and I’ve found that it works well in situations like this where the direction of motion is known.  I used it selectively on a duplicate layer to enhance detail in the boat.   Here are before and after crops at 200%.  I think it’s a nice improvement:

3-motion blur boat Screen Shot 2014-07-22 at 12.45.59 PM
Motion blur (before using the filter)
4-sharper boat Screen Shot 2014-07-22 at 12.45.43 PM
After the motion blur processing

Next I used layer masks to blend the multiple frames together.  I worked carefully around the boat and painted it into the main / second frame.  I like a little detail in my shadows instead of a straight silhouette.  Since I’d slightly overexposed the first frame (and was careful with noise reduction) I painted some of that into the vegetation.  Here’s the first merged result:

6-Initial merge Screen Shot 2014-07-22 at 12.48.18 PM
Initial merged frames

The only filter I used on this was Topaz Clarity – I like the way it increases mid-tone contrast without adding halos.

7-Adding clarity Screen Shot 2014-07-22 at 12.48.29 PM
After Topaz Clarity

After selective sharpening on a separate layer, I returned to Lightroom for final adjustments (black and white points, vignette, etc) to get the first image in this post.

I struggled some with the cropping. I tried a 16×9 aspect ratio, but because I wanted to keep all the sky, I thought the horizon ended up too close to the center. I decided to keep the original composition since the dark water at the bottom holds my eye in the frame. I might play with it some more.

I like how it turned out and I hope you do too.  I also hope the info helps with your photography.  If you have any questions on details or other photography related things, let me know in the comments.

Thanks for stopping by and reading my blog. Now, go make some photos!

©2014, Ed Rosack. All rights reserved.

Viera Wetlands on 7-19-2014

I went over to Viera Wetlands last Saturday.  It’s best not to expect too much in the middle of summer in Florida, so my expectations were a little low.

First on the agenda was a stop where SR 520 crosses the St. Johns River, near Cocoa, Florida.  There’s a park on the north side of the road with a busy boat ramp and a boardwalk reaching a short distance out into the river.  The sunrise was pretty – here’s one of the images I made:

Ultra-wide daybreak
Ultra-wide daybreak – Five frame panorama – The resulting horizontal field of view is about 130 degrees.

After sunrise I went on to Viera Wetlands to meet up with several Photography Interest Group members.  Kevin M. organized it and we had one of the largest turnouts in a long time.  Frank B., Kevin K. and his son Evan, and Tom M all showed up too.

With the heavy rains we’ve had lately they closed the berms to cars, so we took off on a stroll around the cells closest to the entrance.  There were more birds out and about than anticipated.

Red bellied Woodpecker
A very colorful Red bellied Woodpecker

In addition to woodpeckers, we saw and heard a lot of whistling ducks.

Perched Black Bellied Whistling Duck

We also saw many of the regular Florida avians (Tri-colored Herons, Great Blue Herons, Snowy Egrets, Ibis, Anhingas, Moorhens, Coots, Black Vultures, etc.). Dragonflies and Alligators were also abundant.

I started with low photographic expectations and ended up coming home with several images I really like.  I also got to spend a little time with friends.  Once again I was pleasantly surprised by another wonderful Central Florida Photo Op!

You can see more of the photos from trip by clicking the links I included above to each person’s photo stream.  You can also click here to view the Photography Interest Group photo pool.  My Viera Wetlands album on Flickr is at this link, My St. Johns River album is at this link, and my Cocoa album  is at this link.

Thanks for stopping by and reading my blog. Now, go make some photos!

©2014, Ed Rosack. All rights reserved.

Silver Springs State Park

Intro / Description

I spent some time at Silver Springs State Park in late May.  This is Florida’s newest park, created in October of last year when the former Silver Springs and Wild Waters commercial attractions were merged with Silver River State Park.  Lynn and I used to visit when our kids were younger and the commercial attractions were going strong.  But that was a while ago and it’s a different place now.

Silver Springs headwaters, view 2
Silver Springs headwaters – A glass bottom boat returns to the dock before a storm

Florida’s renovating Wild Waters and has already re-opened some of the water rides.  The Glass Bottom Boats still run in the Silver Springs area, although the jungle river boat tour and antique car museum that I remember from past years are gone.  It’s a little soon to say what the park will look like after the state is finished merging the areas together, but it always was and still is a fine place to visit.

Info for Photographers

Photo hints:

There are hiking and biking trails throughout the park, but I think the real attraction is the water.  You can rent canoes and kayaks or bring your own, and there are several places to put in.  I used the launch close to the headwaters.  It’s a short paddle to the main spring.  It’s also very close to the Fort King paddle trail (where the Jungle Cruise used to go) which is open to paddlers now for the first time since the 1800s!

In addition to the put in I used (off the Silver Springs parking lot) there’s also one inside the main park, but it’s about a 1/2 mile carry to the water – too far for me!  One other place you can put in is at Ray Wayside Park where you can paddle upstream to the spring.   Silver Springs also offers guided kayak tours and a shuttle service to / from Ray Wayside.

A view from my kayak
A view from my kayak – Along the Fort King paddle trail near the Silver Springs headwaters

Here are a couple of articles from other sites about paddling at Silver Springs.  Take a look – they like it as much as I do!

If you can’t go on a paddle, at least ride the glass bottom boat or take an air boat excursion.  You’ll get to see more of the scenery and wildlife than you can from the land.

Airboat ride on the Silver river

Airboat ride on the Silver river

Tripod/Monopod:  I did have mine, but didn’t use it as much as I thought I would.  It’s a very wooded area and landscape opportunities aren’t as numerous as they are in some other places.

Lenses:  Bring what you can carry.  I got the most use out of a normal range zoom (~24-70), but longer and wider would be nice to have in your bag if you need them.  If you have any waterproof equipment, bring it for paddling expeditions.

Best time to visit:  It’s starts getting very warm in May and doesn’t cool off until September or October, so plan accordingly.  If you’re going on the rides at the water park or kayaking, the heat is a bit more tolerable.  I went during the week.  Weekends will be crowded.

Other:

There’s a variety of wildlife, but not as much as some other locations in Central Florida.  For instance eBird lists 112 species at Silver Springs vs 293 in Merritt Island National Wildlife Refuge.   I spotted Ospreys, Cardinals, Black Vultures, Red-bellied Woodpeckers, a few wading birds, Alligators, Deer, Turtles, Cormorants (on the water and in nests, and one swimming underwater), Barred Owls (calls and one in flight), Hawks and a few other species.  There are recent reports of Manatees in the springs.  And although I didn’t find any, there’s a troop of feral rhesus macaque monkeys  descended from ones let loose in the 1930s.

Typical Turtle
Typical Turtle – Along the the Fort King paddle trail near the Silver Springs headwaters

The River side of the park is home to the Silver River Museum and Environmental Education Center (open to the public on weekends and holidays).  Tours through the pioneer cracker village are offered once a month, except in the summer.  You’ll have to call the park for details.

Cracker cabin
Cracker cabin

Finally, 60 campsites are available along with 10 very nice, two bedroom cabins.  I’d recommend staying for one or two nights so you have some time to explore.  There are also several other great areas nearby including the Ocala National Forest, Rainbow Springs State Park, Juniper Springs Recreation Area, and Salt Springs Recreation Area.

Summary

Click on any of these photos to go to Flickr where you can see larger versions.  My Silver Springs album on Flickr includes these and a few other  photos.

Silver Springs State Park is a wonderful place to visit and an especially wonderful place to paddle!

My Gallery /  Flickr photo set:  https://www.flickr.com/photos/edrosack/sets/72157644924434114
Website: https://www.floridastateparks.org/silversprings
Address / Phone: 1425 N.E. 58th Avenue, Ocala, Florida 34470(352) 236-7148
Central Florida Photo Ops Rating:  A Central Florida Photo Op must do!

P.S. – In the good news department, it looks like those of you that subscribe to the blog via email are getting the updates.  If you’re having any issues, please let me know.

Thanks for stopping by and reading my blog.  Now, go make some photos!

©2014, Ed Rosack. All rights reserved.

Photographic Friction

Friction synonyms: Hostility, frustration, conflict, discord, strife, opposition, contention, dispute, fighting, antipathy, resentment, …

Friction antonyms: Harmony.

For the past week or so, my photographic pursuits seem to be in slow motion.  Creating  photos is difficult.  Friction and frustration are up and harmony and flow are down.

What’s going on?  Glad you asked.  1.  I’m having problems finding things to photograph.  2. I’m also having problems with the software I use to process photos.  3. And I’m having problems with my blog.  Hmm.

1. The Images

I was a little busy this week (with #2 and #3) so it left me less time to photograph.  But I did go out on Saturday with Kevin M.  He needed  a park pass and suggested we drive over to the Merritt Island National Wildlife Refuge to pick one up at the Visitor’s Center.  Of course, I talked him into leaving early for sunrise and we went by Gator Creek just before dawn.  This is a nice enough image, but leaves me wanting better.  The sky’s a little bland and I couldn’t find a nicer foreground.  And the no-see-ums were fierce!

Another Gator Creek morning
Another Gator Creek morning – a 4 frame panorama, ISO 100, f/11 at 2 seconds

We also drove around Black Point Wildlife Drive, but honestly, there aren’t many birds or animals there now.  We saw very few of the regular birds and a wild pig, but most of the wildlife seems to be somewhere else.  Summer slow down indeed.  When we swung by the Visitors center there wasn’t much bird activity there either.  I carried my infrared camera and experimented with IR insects.  I like this one – but it also leaves me wanting.

An infrared butterfly

I guess the moral of this part of the story is that making good photos isn’t easy and some photo ops aren’t as good as others.  Don’t let all the good ones you see on the web convince you otherwise.  Keep looking and shooting.  And don’t go just looking for photos –  you should also go for the experience.  Enjoy being out and don’t make it all about the image.  And in Florida, in the summer, before dawn – bring insect repellent to cut your hostile friction with the bugs.

2. The Software

I’ve had issues for some time using the “Edit in Photoshop” command in Lightroom.  Photoshop would open, but sometimes the file itself would never show up.  If I tried to open the file directly from inside Photoshop, it worked every time.  With the latest updates to both programs the problem got much worse.  Every time I tried to open a RAW file in Photoshop from Lightroom, it wouldn’t work.

After several searches on Google, I found others are having this problem too.  But there wasn’t any clear-cut solution, so I  called Adobe.   They told me to uninstall both programs and reinstall, but make sure to reinstall Photoshop first.  This is a pain since I have to also reinstall all the plug-ins and presets I use too.  I did get through it and it’s now working better, although it’s still happened a few times since.  Frustrating friction.

3. The Blog

If you follow this blog via email or Twitter, you probably didn’t see last week’s post – a shame – I thought it was pretty good!

For some reason, the server isn’t sending email or Twitter notifications when a new post goes up.  I’ve tweaked some settings and hope it’s corrected now.  If not, I’ll have to keep troubleshooting.  Curious, conflicting friction.

By the way, if you didn’t see last week’s post, here’s a link:  https://edrosack.com/2014/06/18/wild-orchids-and-more-at-fort-christmas/


Photography is a great hobby that’s sometimes frustrating.  But I’ve done it long enough to know that harmony will eventually return.  When it does, the frictionless flow will be truly enjoyable.

If it doesn’t I’ll have to get a giant can of WD-40 to spray all over everything.  That should lower the friction.

Thanks for stopping by and reading my blog. Now, go make some photos!

©2014, Ed Rosack. All rights reserved.

Wild Orchids and more at Fort Christmas

I follow Florida Hikes and they tweeted about wild orchids blooming at Fort Christmas,

Fort Christmas Historical Park is east of Orlando close to Orlando Wetlands Park.  I’ve written about it before:

I hadn’t ever seen Orchids in the wild and I hadn’t been out there since 2012, so this was a big enough motivation to make me want to visit again.  I ended up exploring with Tom M. on a morning last week.

Once we knew what to look for, the orchids weren’t hard to find.  There were a lot of them higher up in the large live oak trees.  The strong back light, wind, and distance made them hard to photograph well, but with a longer lens, a flash, and some careful camera positioning I managed to isolate these blooms against a dark background.  I like the colors and background, which remind me of an oriental flower painting.

Wild Orchids
Wild Orchids – Up in the live oak trees. Two frames, with flash, different focus points, hand merged in Photoshop.  I believe these are Florida Butterfly Orchids (Encyclia tampensis).

Sunflowers were also blooming in one of the small gardens on the site.

Sunflower bloom
Sunflower bloom – In the garden. Single frame, ambient light.

We also spent some time looking around inside the buildings.  You’re free to enter most of them as long as you’re careful.  And since we were there on a mid-week morning, there weren’t many other folks around.  Until two busses of summer camp kids showed up around 10:30.

In the bedroom
In the bedroom – Single 1/2 second exposure at f/8 for depth of field. I didn’t have a tripod, so I rested the camera on the window sill

Antique fixtures and appliances fill the rooms.  These and the wood and fabric textures make for some very photogenic settings – perfect material for a bit of nostalgic, B&W processing.

In the kitchen 1
In the kitchen – I was able to hand hold this one when I opened the aperture to f/2.8. The depth of field is acceptable since there’s nothing too close to the viewpoint.

Here are some photo hints for you:

  • For the orchids, you’ll probably want a longer zoom lens, a flash, a tripod and remote release.
  • Some of the flowers and other items would make good macro subjects.
  • For photos of the building and room interiors, I found a wide-angle lens very useful.  A tripod might be handy for this too, but I was able to brace my camera and / or use the pop up flash to eliminate camera shake / blur.

I’ve posted other photos from Fort Christmas in this set on Flickr.  It’s a wonderful year round photo-op.  And the blooming orchids in the summertime are a nice bonus.

Thanks for stopping by and reading my blog. Now, go make some photos!

©2014, Ed Rosack. All rights reserved.

Gatorland, 7 June 2014

If you’ve meant to go to Gatorland in Orlando, Florida to see the wild birds that nest in the rookery there, you’ve just about missed your chance for this year.

I went by last Saturday with Mahesh S. and Greg N. to see what was going on (and to renew my annual photographer’s pass). There were still one or two Great Egret nests with chicks, but the other young birds have hatched, grown, fledged, and moved out. Nesting activity will start-up again in mid to late February next year.  After this weekend, you’ll also have to visit during regular hours since the early entry program ends on June 15th.  In the mean time, Gatorland’s still a great place to get close access to a number of Florida bird species.

Great Egret ABOAS*
Great Egret ABOAS*

And of course, it’s always a great place to see Alligators.

Like an iceberg
Like an iceberg – There’s more under the surface than you can normally see from above.

And there are occasionally some nice avian visitors too.

Soaring Swallow-tailed Kite

I’ve posted a great many photos from Gatorland in this set on Flickr and you can read Central Florida Photo Ops posts about Gatorland at this link.  The St. Augustine Alligator Farm posted a very handy bird nesting season reference guide here and you can read Central Florida Photo Ops posts about the St. Augustine Alligator Farm at this link 

I’ve also uploaded a short bonus video of bellowing alligators at the park.  They were feeling feisty and declaring their gator dominance.

Turn up the volume and make sure you have your sub-woofer on too!

Thanks for stopping by and reading my blog. Now, go make some photos!

©2014, Ed Rosack. All rights reserved.

*ABOAS = Another bird on a stick 🙂

Merritt Island – May 31, 2014

I made a quick trip to Merritt Island National Wildlife Refuge last weekend with Kevin M. and Lutfi S.   We stopped first at the Titusville marina for a sunrise photo.  The sky was so-so, but the calm wind gave us very nice reflections in the water

Morning at the marina

Next, along Gator Creek Road we found a group of preening Roseate Spoonbills.  I liked the contrast between their pink and the blue sky reflected in the water.

Preening Spoonbills
Preening Spoonbills

Later at the Visitor Center, we found a great many butterflies.  They seem to like these Buttonbrush plants.

Gulf Fritillary
Gulf Fritillary

And Green Herons were common too, especially at the rest area on Black Point Wildlife Drive where we saw several nests and juveniles.  This one (also at the Visitors Center) drew my eye as it posed against the silver-like water while it waited to strike an unwary fish.

Green Heron in a silver pond

With the hot weather starting to arrive, there’s not as much activity at Merritt Island as there sometimes is. But there’s still a lot to see and photograph.

Thanks for stopping by and reading my blog. Now, go make some photos!

©2014, Ed Rosack. All rights reserved.

Lake Louisa Follow up – 5 Mile Road

When I wrote about Lake Louisa State Park a couple of weeks ago, I didn’t know about 5 Mile Road.  It’s just  across US 27 from the Park. When I did hear about it, I drove back over to take a look.

It’s a dirt road, and although a bit narrow it’s well maintained.  I didn’t have any problems with my car.  There are some interesting landscape views:

Views from 5 Mile Road #2

And some interesting wildlife views too:

Guarding the burrow
Guarding the burrow

I made these photos on May 21st.  One of my Flickr friends told me he visited the Burrowing Owl nest on the 26th and it looked abandoned.  That’s sad.  I’m not sure what happened.  Maybe the chicks fledged and flew off.  That’s what I want to believe anyway.

If you visit Lake Louisa, 5 Mile Road is worth checking out too.  You can find more photos from there in in this set on Flickr.

Thanks for stopping by and reading my blog. Now, go make some photos!

©2014, Ed Rosack. All rights reserved.