Tag Archives: travel

Sky City, New Mexico

MK and I went out to New Mexico for a short visit over the July 4th holiday.  I’d been there several times on business travel but never got to see much of the state.  This trip fixed that!

One place we very much enjoyed was the Acoma Pueblo (also known as Sky City).  It’s a lovely spiritual site, and provides a glimpse into what Native American life was like as long ago as the 13th century.  The Pueblo is about 60 miles west of Albuquerque – it’s a lovely drive.
Mesa Encantada
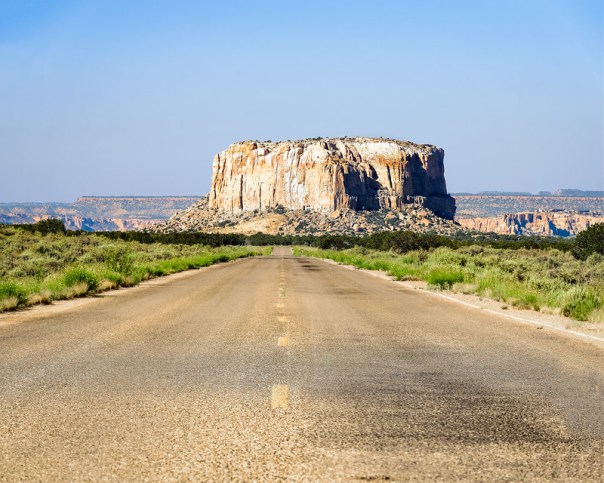
Mesa Encantada – Along Route 23 just east of Acoma Pueblo (visible in the distance on the right). According to Acoma Pueblo oral history, it was their first home before they moved to the current location.

If you enter “Acoma Village” in your GPS, it will try to lead you up on the mesa, which you can’t get to unless you’re on a tour.  Search for the visitor center instead!

Looking up at Sky CityyLooking up – This B&W IR view of Acoma Pueblo is from about 360 feet below, just across the highway from their visitors center

At the visitors center you can learn about the culture and history of the area.  Their tour includes a bus ride to the top of the mesa and a guided walk around the pueblo. Also included in the tour price is a “photo permit” for one camera.  You’ll have to buy more permits if you want to use multiple cameras.  I decided to just bring my Olympus Pen F with the 24-200 mm equivalent lens and it worked for most situations on the mesa.  I used the extra space in my camera bags for two bottles of water.  Nice to have while walking around in the hot sun!

The horno is a traditional outdoor, wood fired oven.  People were selling bread made in these ovens in the pueblo.

Homes, horno oven and wood fuelHomes, horno and wood fuel

Even though there’s no electricity or running water up there, many of the homes on the mesa are still lived in.    I liked how occasional colorful paint accents contrasted with the tan walls.

Door and windowsDoor and windows – One of the homes on the mesa

Our guide told us that the Acoma adopted Catholicism from missionaries in the 1500s but they still practice their own spiritual traditions too.  Although they’re very private about this, outsiders can attend celebrations during the Feast of St. Stephen(September) and at Christmas.

Acoma Pueblo Kiva (religious chamber)Kiva – The Acoma concealed their traditional worship places inside homes and entered via a ladder through the smoke-hole in the roof.

As you’d expect, the views from the mesa are spectacular and the visibility is awesome.

View north toward Mount Taylor (on the horizon, about 40 miles away)View north toward Mount Taylor (on the horizon, about 40 miles away).  Ponderosa Pine used to build the mission was hand carried from Mount Taylor and up to the mesa.

Photography isn’t allowed in the cemetery (to the left of the mission) or inside the church itself.  This spot is about the best vantage point I could find.

San Estevan del Rey Mission ChurchSan Estevan del Rey Mission Church – Built between 1629 and 1641.  According to Acoma oral tradition, their people were forced by Friar Juan Ramirez to build the mission.

Many have photographed in Acoma and some of the images are in the public domain.  It’s interesting to compare the older photos with contemporary views.  Both Edward S. Curtis (in 1904-5: http://www.loc.gov/pictures/search/?q=acoma%20indians&co=ecur&sg=true) and Ansel Adams (in the 1930s and 40s: https://www.archives.gov/research/ansel-adams) photographed here.  They both stood very close to the spot where I made this mission photo.

You can find more information about Acoma at these links:

And I’m collecting my New Mexico images here:  https://www.flickr.com/photos/edrosack/albums/72157685850604925

For those of you that are wondering why I haven’t posted any bird or wildlife photos in a while, please be patient.  We did some birding while we were in New Mexico and I’m planning to blog about that next.

Thanks for stopping by and reading my blog. Now – go make some photos!

©2017, Ed Rosack. All rights reserved

A few more DC photos

Last week’s post went over my usual three photo budget.  So here are even more images that I didn’t include (and again I’m over budget!).

The Air Force MemorialThe Air Force Memorial.  (ISO 200, f/5.6, 14mm equivalent FL, 1/640 sec.).  I was glad I had an ultra-wide lens.  It all fits into the 14mm field of view from a close distance.

The Potomac River at Great FallsThe Potomac River at Great Falls.  (4 frame panorama, ISO 200, f/4.5, 28mm equivalent FL, 1/1600 sec., color image converted to B&W in Lightroom).   Although I grew up near Washington DC, I don’t remember ever hearing about the park until Lynn mentioned it on this trip.

Ceiling in the Library of CongressCeiling in the Library of Congress.  (4 frame panorama, ISO 200, f/4, 30mm equivalent FL).  Our tour of the US Capitol included a stop inside the Library of Congress.  I had to shoot from an awkward angle and stitch multiple frames together for this view. 

The Burghers of CalaisThe Burghers of Calais – Sculpture by Auguste Rodin, one of twelve original Bronze casts, Hirshhorn Museum and Sculpture Garden, National Mall. (Infrared, B&W, ISO 200, 34mm equivalent FL, f/4.5, 1/320 sec.).   I really like the way the IR  camera rendered this, especially  the bronze contrasting with the foliage.  There are some very impressive sculptures in the National Mall in DC.  You can read the fascinating background on this one at: https://en.wikipedia.org/wiki/The_Burghers_of_Calais.

Washington Monument at duskWashington Monument at dusk. (Olympus High Res mode, ISO 200, 62mm equivalent FL, f/5.6, 1/8 sec).  There were hundreds (thousands?) of people just behind me at the Lincoln Memorial.  I moved to the water’s edge to avoid most of the tourists and frame this view.  I like the way this square composition shows off the symmetry.  I also like the light and reflections – the last time I was in DC (2008?) the pool was a mess!  After we left this time, we heard reports  that the pool had been drained due to duckling deaths (www.washingtonpost.com/local/malls-reflecting-pool-to-be-…). 

More DC photos in this album on Flickr, – check ’em out!

Thanks for stopping by and reading my blog. Now – go make some photos!


PS:

Happy Father’s Day!

My dad’s been gone for many years. It would be so wonderful to visit with him again, give him a big hug, wish him a happy day and enjoy his company.  And make a photo of us too.


©2017, Ed Rosack. All rights reserved

Washington DC photo hints

I grew up near Washington DC, and I’ve made many trips (both business and pleasure) to the area since then.  So I feel somewhat qualified to offer ideas on photo opportunities in our nation’s capital.

US CapitolUS Capitol

My most recent visit was last week.  Lynn and I went to Williamsburg, VA to see Caroline (our niece & god-daughter) graduate from high school.  We decided to go early so we could spend a few days as tourists in downtown DC.

"Uncommon Valor was a common Virtue"“Uncommon Valor was a common Virtue” – I was very happy when I saw how the light was falling as we arrived at the Marine Corps War Memorial in Arlington.  I couldn’t wait to get off the bus!

I probably don’t have to tell you that DC is a rich photo environment.  Monuments, memorials, museums, history, art, architecture, gardens, government, and more are everywhere.  But how do you get interesting photos, ones different from everyone else’s?  Here are some suggestions.

Try using an Infra-Red modified camera.  I really like the way mine renders buildings against foliage and the sky.

Smithsonian CastleSmithsonian Castle – Infrared, Black and White

Take an evening guided tour:  Lynn signed us up with the Bi-Partisan Tour Company for their “Epic Evening Tour” (thanks Lynn!), and we both really enjoyed it.  They took us around to great locations and allowed us to see them in a different light (dusk, blue hour, and night).  I think it added interest to my photos.

If you do take a tour, stay alert in the bus and watch for good vantage points as you ride.  I spotted the Washington Monument behind the Jefferson Memorial and rushed back to make this shot when we parked while everyone else went into the building itself.

Thomas Jefferson Memorial at duskThomas Jefferson Memorial at dusk – with the Washington Monument in the background

It’s almost always crowded.  You can try going in early on a Sunday morning, but if you’re there with everyone else you’ll have to use the people in your photos or find vantage points / ways to minimize them in your photos.  I don’t know how many were at the Wall when we were there – it was elbow to elbow and had to be thousands.

Crowds at the Vietnam Veterans MemorialCrowds at the Vietnam Veterans Memorial

"Out of the mountain of despair, a stone of hope." Martin Luther King, August 28, 1963“Out of the mountain of despair, a stone of hope.” Martin Luther King, August 28, 1963.  Ghostly figures move around the base of this long exposure photograph of the Martin Luther King Memorial at blue hour, with the Washington Monument in the background.

If you go at night, be sure to take your tripod.  It can be a pain, but my night tour images wouldn’t be nearly as good if I hadn’t taken mine.

Some other hints:

  • Contact your senators or congress person to arrange a tour of the capital (you’ll need to start months in advance).  If that doesn’t work out, there are commercial ones available that will still get you a guided tour inside.
  • Take wide or ultra-wide angle lenses.  Building interiors don’t fit in the frame with a standard zoom.
  • Before you go, practice making stitched panoramas.  You can use this technique in place of an ultra wide lens.
  • Stay in a hotel as close to the National Mall as you can.  Parking is scarce and expensive.  You’ll be walking or catching rides to get where you want to go.  Wear comfortable shoes and clothes, and use your light weight photo gear.
  • If you’re from Florida, you’ll appreciate the price of admission.  All of the museums and monuments are free.  Museum hours are usually 10am – 5:30pm.  Lines were typically short, but some will require reservations (check first). You can visit monuments 24/7, but rangers are only available 9:30am to 10pm.
  • You might have cooler weather in May or early June.  It’s not as pleasant to walk around later in the summer with the temperature at 95 degrees Fahrenheit.

You can spend many days (or weeks!) exploring DC.  But if you run out of things there, Photo ops abound in the surrounding area.  Two that I’d highly recommend are the Steven F. Udvar-Hazy Center just south of Dulles, and Great Falls Park about 30 minutes NW of DC.

I’m collecting Washington DC photos in this album on Flickr, and I’ll add to it as I finish processing images from this trip.  Please check it out!

Thanks for stopping by and reading my blog. Now – go to Washington DC and make some photos!

©2017, Ed Rosack. All rights reserved

Wildlife Tails: Seward, Alaska

Editors note:  Today we have another post from our roving correspondent MaryKate.  Her report includes some excellent wildlife watching tips and photographs. Enjoy!

In April, I escaped the Florida heat and visited my friends Monette and Jesse in their new home of Seward, Alaska.  This was my third Alaskan adventure with Monette, and while we stayed in one place for the duration of the trip (a rarity for our travels!), I enjoyed the beautiful vast views and wildlife that Seward, Alaska has to offer.

Alaska MoonriseAlaska Moonrise

While in Seward, Monette, Jesse and I went whale watching.  This was my second trip with Kenai Fjords and I’d highly recommend them.  Their boats are comfortable, there’s plenty of room for running around to view wildlife, the crew is very knowledgeable, they serve great snacks and refreshments (wine!), and they had awesome limited-edition Grey Whale Tour 2017 T-Shirts.

Humpback WhaleHumpback Whale

We were lucky enough to see Dall’s Porpoise, Sea Lions, Sea Otters, a Humpback Whale, and the first Gray Whales of the season returning to Seward!  Pacific Gray Whales migrate all the way up from Baja to Alaska every Spring, the longest migration of any mammal – quite remarkable!  You can tell Gray Whales and Humpback Whales apart based on their blow.  While Humpback Whales have a tall blow, Gray Whales have a shorter, thicker heart-shaped blow due to their double blow hole.

Gray Whale

Gray Whale Blow (short and puffy/heart-shaped)

Keep your eyes open when whale watching – constantly scan the horizon back and forth to look for blows.  You don’t want to miss any of these amazing creatures, and it’s really exciting being the first to spot them (as Jesse often does!).

Gray Whale

First Gray Whales of the season!

Once back on shore, we saw some other wildlife friends too, like this Sea Otter – who was anything but shy and really hammed it up for the “otterazzi” of cameras!
Sea Otter

Synchronized Swimmer

And there’s plenty of wildlife on the side of the road.  Like this Bald Eagle couple…Bald Eagle Couple

Bald Eagle Couple

Or this grazing moose…Moose

AlMOOSEt done with this blog post

Finally, I recommend swinging by the Alaska Wildlife Conservation Center in nearby Girdwood, Alaska – this group is “dedicated to preserving Alaska’s wildlife through conservation, education, and quality animal care” and you can see many residents up close.  The Center takes in orphans and lost babies – this resident Black Bear is Kuma (or Uli?), and is unable to return to the wild:Bear Necessities

Bear Necessities

Thanks for stopping by and reading my blog. Now – go be amazed by wildlife and make some photos!

©2017, MK Rosack and Ed Rosack. All rights reserved

Whale of a Trip!

I was lucky to have some downtime in Seattle before a recent business trip to Vancouver, so one of my best friends – Jessica – popped up from San Francisco to join me for some National Park adventures and whale watching!  I love exploring our National Park system and its jewels – and we packed a lot of them into one weekend.

Our first stop was Mt. Rainier National Park – America’s fifth oldest national park.  Blessed with amazingly perfect sunny weather, we spent Saturday driving through the park and stopping along the way to appreciate its beauty.  The Nisqually Entrance is open year round, and with an SUV its an easy drive through the park with lots of scenic overlooks.  But winter at Mt. Rainier means renting chains to carry in your car – even if you’re not required to put them on – or you’ll have to turn around and drive to the nearest rental place (like we did!).  Plan time to stop at the Longmire and Paradise Visitors Centers to learn more about the park’s history, ask a ranger questions, or get a souvenir!

Mt. RainierMt. Rainier

On Sunday, we took a 4-5 hour whale watching trip with Island Adventures out of downtown Seattle – I’d highly recommend this company, and Tyson our naturalist was very knowledgeable!  While January isn’t peak whale watching season, they still run a trip everyday and have luck spotting resident orcas or a humpback here and there.  While the first few hours of our trip were pretty quiet and peaceful, we were excited to find Speckles the Humpback Whale – a juvenile humpback that has been spending a lot of time in the area.  Named Speckles for his distinguishing marks on his back and tail, this little guy gave us a show for about an hour fishing, surfacing, and even blowing his whale stench in our direction (quite a smell if you’ve never experienced it!).

"Speckles" the Humpback WhaleSpeckles and his Speckles

Speckles really gave the two guys on this boat a close encounter!

Humpback Whale and BoatSpeckles the Humpback Whale 

We finished the weekend with a scenic drive through the Western part of North Cascades National Park.  While there were many breathtaking views, it was mostly closed for the season (or for Martin Luther King Day) – so we’ll have to come another time when its warmer.  It was still worth taking the longer loop back to the airport (vs. the interstate) for views like this:

North CascadesNorth Cascades National Park

More photos from my trip can be found in my album here, or check out Ed’s previous post with additional whale photos.

Thanks for reading about my whale of a trip.  Now go make some photos!

©2017, MK Rosack. All rights reserved

Cruising Wildlife

Lynn and I were fortunate to be able to cruise the Caribbean once again earlier this month. I love watching birds and wildlife and trying to make photographs of their behavior.  On this trip we both saw something for the first time.

On more than one occasion, birds followed our ship and dove for fish right along side.

Brown Boobies were following the ship and diving for fish right along side.Brown Booby

There were mostly Brown Boobies with a few Masked Boobies mixed in.

There were a few Masked Boobies fishing tooMasked Booby

Flying Fish were also plentiful along our route and the ship’s wake seemed to scare them up as we passed.

Flying Fish were plentiful along our route and the ship seemed to scare them up as we passed.Flying Fish

A closer look at the Flying FishA closer look at the Flying Fish

Photographing the birds catching fish wasn’t easy. You have to track a bird (at high magnification) as it moves just above the water and focus / shoot continuously – then hope you catch the right moment before your camera buffer runs out. I managed to get a few frames although the quality is not high. This is probably the best one.

Just before the catchJust before the catch

I was using a new camera (Olympus E-M1 II) for the bird / fish photos.  The frame rate and continuous focus capabilities really helped.  There’s a new “Pro Capture” mode on this that I couldn’t use (didn’t have the right lens).  It captures frames with the shutter button pressed half way and saves them with a final frame when fully pressed.  It would have made this use case easier.  I’m looking forward to seeing how the camera works in other situations.

We also saw Magnificent Frigatebirds. They seem pretty common in the Caribbean – mostly in the harbors. I’ve only seen a few here in Florida, along both coasts

Magnificent FrigatebirdFemale Magnificent Frigatebird

Cruise directors plan interesting things for passengers to do while at sea but these may not appeal to everyone.   It’s good to have an alternative activity available like wildlife observation and photography when you’re looking for something fun to do.

I’m collecting other photos from the trip in this album on Flickr.  And I have several other blog posts that feature photography from cruise ships.  If you’re interested, see this link:  https://edrosack.com/category/photo-ops-categorized-by-place/cruise-ships/

By the way (no.1): I realize that some spam filters may reject the email for this post due to the names of the birds.  If it happens to you, sorry.  You can always read the latest content on the web at https://edrosack.com

By the way (no. 2):  I think the search problem on the blog is resolved.  If anyone still has issues, please let me know.

By the way (no. 3):  Happy new year!  I hope all of you have a great holiday and prosperous and delightful 2017!

Thank you for stopping by and reading my blog. Now – go make some photos!

©2016, Ed Rosack. All rights reserved

Reprocessing reminder

Do you have a favorite photo that you made a while ago?  Perhaps with an older camera?  If so, you may want to see what new versions of software and your revised tastes and improved skills can do differently.

I had a request for a print of this image.  It’s from way back in 2007, made with my first DSLR – a Nikon D80:

Littleton, Colo. cabinLittleton, Colo. cabin

I like this photo.  A lot, and not just because of the subject.  It reminds me of driving along the road between where my Mom used to live and my Sister’s house, and visiting them both.  It’s been on the blog before:  here and here.  If you’re interested, please take a look at these two posts to see earlier versions.

Fortunately, I was saving my digital files in RAW format even back then, so I can take full advantage of any improvements in photo software.  I decided to run this through my current imaging workflow before printing.  Using DxO Optics Pro, Photoshop, and Lightroom, I was able to reduce noise, improve shadow and highlight detail, and tweak color, contrast, and brightness.  I feel the new version is better.

Using current software on an image made with 10-year-old technology can be amazing.  I even see a spider web hanging from the near door that I never noticed before.

What do you think?  Do you ever reprocess your older images?

Thanks for stopping by and reading my blog. Now – go make and / or reprocess some photos!

©2016, Ed Rosack. All rights reserved

The Great Wall of Photography

If there’s one person who loves travel as much as me (or more), it’s my cousin Phil. That’s why I was so excited for our whirlwind adventure to China! Our journey was just five days, so I had to pack lightly, but I wish I could have brought my Dad and more camera equipment with me: the photography conditions were tricky! Since he couldn’t be there with me, he processed my photos after, and has joined me in this post with photo hints.  So here it is: Central Florida Photo Ops official furthest-away post ever!

Great Wall - MutianyuMK and Phil on the Great Wall – Mutianyu

First, we visited Shanghai – If you have the chance to go, I highly recommend the Shanghai Museum, and then a meal at the Living Room restaurant on the 87th floor of the Park Hyatt Shanghai. From there, you’ll find sweeping views of the Bund and the Huangpu River, and on a clear day like we were lucky to have, you’ll gain an amazing appreciation for just how large the city is.

My Dad lent me his polarizing filter, but I enjoyed the meal so much I didn’t think to use it on this shot while we were indoors.

Shanghai SkylineView from the 87th: Shanghai

Editor:  A polarizer can be useful to darken skies, reduce the fog / haze in a photo, and eliminate reflections when shooting through glass.  It doesn't always work - success depends on the conditions (amount and direction of the light).  I always try to carry one with me and use it if I remember.   I processed this image through DxO Optics Pro for sharpening / noise reduction.  Then in Lightroom, I adjusted the exposure, and contrast, straitened buildings, and used clarity and dehaze adjustments along the horizon with a radial filter to lessen the haze.  Here is a "before version":

The highlight of Beijing was, of course, the Great Wall of China. There are several places along the wall you can easily visit from Beijing.  We chose Mutianyu for its sweeping views (and it’s reputation of being less crowded than nearby spots). While we had perfect weather in Shanghai, fog almost completely enveloped us at Mutianyu. But every once in a while the fog would shift and we’d get a quick but miraculous glimpse of just how Great the Great Wall is.

Mutianyu is about an hour from Beijing.  I recommend hiring a private driver – we used John Yellowcar – for about $150 USD, we had our own private driver/translator/tour guide for the entire day.  We thought this was a great value for a 10-hour day trip.  While there are restaurants and souvenirs at the wall, bring water/snacks and wear comfortable hiking shoes!  Also remember that haggling with vendors is accepted and expected at the Wall.

Great Wall - MutianyuMisty Mutianyu Watchtower

The fog was too thick for the polarizing lens, so I tried to take as many photos as I could and hoped my Dad could help when I got home! Here are some pointers from him on how he was able to save these photos, and in hindsight, things I could have done differently to make the photos even better.

Great Wall - MutianyuWinding Wall and Watchtowers – Mutianyu

Editor:  MK faced some tough photo conditions.  Fog greatly reduces contrast and the amount of light.  It also diffuses the light so that the polarizing filter won't be much help  (sorry MK!) and the filter itself also reduces the amount of light getting to the sensor by 1 or 2 stops.  About the only thing I could recommend is to be careful with exposure (sometimes fog can cause underexposure). I processed this photo like the previous one.  DxO Optics Pro and Lightroom.  In these conditions, clarity and dehaze adjustments are again very helpful.  I used quite a bit of dehaze in this image.  It's easy to go too far - be careful.  Here's the "before version" of this one:

More photos from my trip (with my Dad’s amazing edits) can be found here: https://www.flickr.com/photos/marykate/sets/72157676855966605/

Thanks to our roving correspondent MK for our first ever opposite side of the globe post! And thanks to all for stopping by and reading the blog.  Now, go make some photos!

©2016, MK and Ed Rosack. All rights reserved

Regarding image selection

Editors note:  Although I’m feeling much better, I’m still going to take a sick day.  I’ll repeat this post from September 2014.  If you haven’t read it before, I think it’s still very relevant and worth a look.  If you have – then I apologize for the repeat.


If you use raw format in your photography, they look different from jpg photos.  Raw format is just the data read directly off of the sensor with no processing by the camera.  Depending on how you configure your camera and software, raw image contrast and sharpening can be very low, white balance may not be optimized, and exposure is often set for capture / low noise instead of display / print.. This can make it tough to judge raw photos and decide which ones merit further processing.

When I returned from Maine and reviewed my photos, I bypassed some.  When I finished working on the ones I’d identified as “selects”, I went back and re-looked at those I’d set aside.  Some of them deserved attention.

A calm morning on Bubble Pond

It’s not just raw images that can be difficult to evaluate.  Infrared photos usually need processing to optimize too.

Bass Harbor Light
Bass Harbor Light

And multi image panoramas make seeing composition and field of view a challenge before the individual frames are stitched together.

Behind Sand Beach
Behind Sand Beach

I can’t tell you how to rate your images and select your best.  But what I can tell you is to be very careful not to discard something before you’re very sure that it’s not worth pursuing.  Give your photos a second chance.  Learn your software so you know how far you can go with adjustments.  And as with any thing worth pursuing, practice will make you better.

Thanks for stopping by and reading my blog. Now – go make some photos!
©2014, Ed Rosack. All rights reserved.

Close Call

It’s been a while since we’ve had such a strong hurricane pass so close to us here in Central Florida.  Matthew was a category 4 storm last Wednesday as it approached our east coast and had just roared through Haiti with devastating effects.  Luckily, it veered a little further away and winds were lower than forecast when it hit here.  We had strong rain and winds, power flickers, trees down, and some damage in our area on the North East side of Orlando.  But we were spared most of the dire effects that we worried about.  Friends from New Smyrna Beach stayed with us and they too reported very few problems from the storm, although they lost power for a day.

Anyway, I wasn’t able or even motivated to do any photography last week.  So instead I’ll show you an image that has nothing to do with storms, from our recent trip Shenandoah.

Bearfence Mountain PanoramaBear Fence Mountain Panorama – This is part of the vista from the top of Bearfence Mountain in Shenandoah National Park. It’s one of the few places there where you get a true 360 degree view. This image is a mutli-frame panorama stitched together in Lightroom.

Scrambling up this rock pile on the top of the mountain, I had to acknowledge  that my 64-year-old knees aren’t as good as I thought.  But I did make to the top and the view was awesome.

I hope all of you also came through hurricane Matthew ok.  If not, our thoughts and prayers are with you.  And thank you for stopping by and reading my blog.  If possible – go make some photos!

©2016, Ed Rosack. All rights reserved.