Tag Archives: cloud

Georgia vacation report

Lynn and I spent a week in Georgia this month.  She had a school reunion and we wanted to visit the north Georgia mountains for a few days beforehand.  We have fond memories of weekend hikes along the Appalachian Trail when we were in college.  I can report that the area is just as pretty as I remember, but the trails seem a lot steeper now.

We stayed in a cabin at the Enota Mountain Retreat, between Helen and Hiawassee.  This was only a few miles from Brasstown Bald, the highest point in Georgia.  The Cherokee people called this mountain Enotah.

Brasstown Bald is in the Chattahoochee-Oconee National Forest and there’s a small entrance fee at the parking area, but if you have a National Park Service Senior Pass, you can use that.  The 0.6 mile paved trail from the parking area to the top is very steep, although a bus runs between 10am and 5pm.  We arrived after 5 on our first day – it was well worth the hike to the top.  The spectacular 360 degree view was the best one we saw.

The view from Brasstown Bald
The view from Brasstown Bald – This is the highest point in the state of Georgia (4,784 feet). 5 frame infrared panorama, B&W.

Compare that to a very similar view from an un-modified camera to see how the infrared sensor helps cuts through the haze.

The view from Brasstown Bald
Color view from Brasstown Bald – Looking a bit to the right of the IR version. Also a 5 frame panorama, 

Good vistas don’t seem as common here as they are for instance in the Rockies.  The small roads have places to pull over, but the view is often blocked by trees.  Which makes the outlook from Brasstown Bald exceptional.

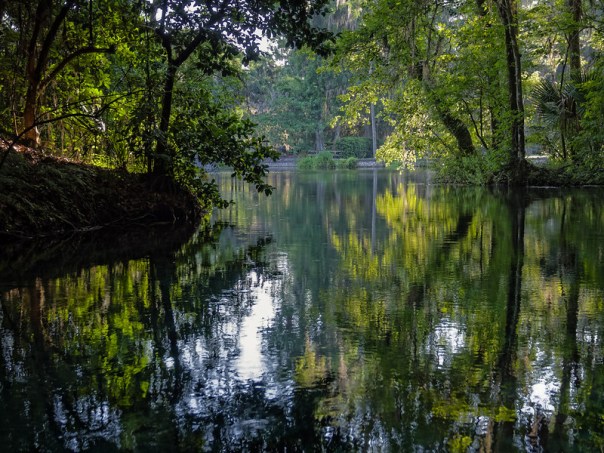
North Georgia also has a huge number of waterfalls – but some are more difficult to find, get to, and see clearly than others.  There are four on the Enota Resort grounds.  The trail to this one was steep and muddy in spots and led up along the side of a ravine to this spot  across from the falls.  We couldn’t find a viewpoint with a clear view through the trees, although there were other paths that we didn’t have time (or energy) to try.

Hidden falls
Hidden falls – Along a trail inside the Enota campground.  ISO 200, f/8, 0.6 sec.

We did visit other waterfalls that are easier to get to and see.  There’s even a pull off just outside Vogel State Park where we could view a large waterfall from the road (no hike!).  Anna Ruby Falls is on federal land inside Unicoi State park near Helen.  The paved path to the falls is about 1/2 mile long and not too difficult with resting places along the way.  We also visited Amicolola Falls near Dahlonaga after our wonderful lunch at the Smith House Restaurant.  This falls also has a relatively short and easier paved path to a wonderful open view.  But the hike might be even easier when your stomach isn’t so full!

Amicolola Falls
Amicalola Falls – Near Dahlonega, Georgia.  ISO 100, f/16, 0.1 second.

I used a variety of shutter speeds on the waterfalls and I think 1/10 to 1/2 is the range to play in to make the water look best. Unless you find a pool of swirling water – where a longer exposure might be better.  Try different shutter speeds while you’re there so you can pick the best result when you get home.  Most of the time I could get my shutter speed in range by adjusting ISO and aperture.  I did have a variable neutral density filter with me that I used a couple of times – it was handy when the sun was out.  Most of the time it was cloudy enough so that I didn’t have to worry about using the filter or fight the extreme contrast of sun shining on white water.

As far as wildlife goes, we didn’t spend a lot of effort looking and we didn’t see many animals.  I was able to photograph one new life bird:  a Louisiana Waterthrush.  Lynn found it foraging on the ground outside (while we did the laundry!).

After our time in North Georgia, we headed to Atlanta for the reunion.  For various reasons, my photo ops there were limited, but we did have a nice vantage point from our hotel room.

Incoming storm
Incoming Storm – Atlanta.  During a long exposure needed to capture this ominous cloud rolling in, I also caught a flash of lightning.

One place I’ve heard great things about but didn’t get to visit is the Georgia aquarium.  I’ll have to save it for next time.

All in all, an exceptional, relaxing, and photogenic trip which we both thoroughly enjoyed.  These and other Georgia photos are in this  album  on Flickr, where you can view larger versions. Also, if you haven’t seen last week’s post about the Narcosee Indian Mound, please take a look at that.

Thanks for stopping by and reading my blog. Now, go make some photos!

©2014, Ed Rosack. All rights reserved.

Ceremonial Cherokee Indian mound

The Nacoochee Indian mound is just outside Helen, Georgia.  Lynn and I were up there on vacation last week and happened to find it on our way out-of-town.  Of course, I had to pull over for a photo.

I like the setting, the look of the mound, and the hills and clouds beyond it.  It seems very spiritual to me.

Nacoochee Cherokee Indian ceremonial mound, just outside Helen, Georgia
Nacoochee Cherokee Indian ceremonial mound, just outside Helen, Georgia – This was the center of the Cherokee town of Gauxule, visited by DeSoto in 1540 while searching for gold. The mound is 190 feet long by 150 foot wide by 20 feet high. Research beginning in 1915 showed that the Cherokee people buried their ancestors on this spot and lived on the land around it.

My grandparents on my mother’s side both lived in North Carolina and Georgia and had some Cherokee blood in their background.  I wonder if any of my distant relatives lived and died near here?

I haven’t had time to organize / process photos from this trip. Hopefully I’ll get to that this week and have a better report ready for next time.

Thanks for stopping by and reading my blog. Now, go make some photos!

©2014, Ed Rosack. All rights reserved.

Silver Springs State Park

Intro / Description

I spent some time at Silver Springs State Park in late May.  This is Florida’s newest park, created in October of last year when the former Silver Springs and Wild Waters commercial attractions were merged with Silver River State Park.  Lynn and I used to visit when our kids were younger and the commercial attractions were going strong.  But that was a while ago and it’s a different place now.

Silver Springs headwaters, view 2
Silver Springs headwaters – A glass bottom boat returns to the dock before a storm

Florida’s renovating Wild Waters and has already re-opened some of the water rides.  The Glass Bottom Boats still run in the Silver Springs area, although the jungle river boat tour and antique car museum that I remember from past years are gone.  It’s a little soon to say what the park will look like after the state is finished merging the areas together, but it always was and still is a fine place to visit.

Info for Photographers

Photo hints:

There are hiking and biking trails throughout the park, but I think the real attraction is the water.  You can rent canoes and kayaks or bring your own, and there are several places to put in.  I used the launch close to the headwaters.  It’s a short paddle to the main spring.  It’s also very close to the Fort King paddle trail (where the Jungle Cruise used to go) which is open to paddlers now for the first time since the 1800s!

In addition to the put in I used (off the Silver Springs parking lot) there’s also one inside the main park, but it’s about a 1/2 mile carry to the water – too far for me!  One other place you can put in is at Ray Wayside Park where you can paddle upstream to the spring.   Silver Springs also offers guided kayak tours and a shuttle service to / from Ray Wayside.

A view from my kayak
A view from my kayak – Along the Fort King paddle trail near the Silver Springs headwaters

Here are a couple of articles from other sites about paddling at Silver Springs.  Take a look – they like it as much as I do!

If you can’t go on a paddle, at least ride the glass bottom boat or take an air boat excursion.  You’ll get to see more of the scenery and wildlife than you can from the land.

Airboat ride on the Silver river

Airboat ride on the Silver river

Tripod/Monopod:  I did have mine, but didn’t use it as much as I thought I would.  It’s a very wooded area and landscape opportunities aren’t as numerous as they are in some other places.

Lenses:  Bring what you can carry.  I got the most use out of a normal range zoom (~24-70), but longer and wider would be nice to have in your bag if you need them.  If you have any waterproof equipment, bring it for paddling expeditions.

Best time to visit:  It’s starts getting very warm in May and doesn’t cool off until September or October, so plan accordingly.  If you’re going on the rides at the water park or kayaking, the heat is a bit more tolerable.  I went during the week.  Weekends will be crowded.

Other:

There’s a variety of wildlife, but not as much as some other locations in Central Florida.  For instance eBird lists 112 species at Silver Springs vs 293 in Merritt Island National Wildlife Refuge.   I spotted Ospreys, Cardinals, Black Vultures, Red-bellied Woodpeckers, a few wading birds, Alligators, Deer, Turtles, Cormorants (on the water and in nests, and one swimming underwater), Barred Owls (calls and one in flight), Hawks and a few other species.  There are recent reports of Manatees in the springs.  And although I didn’t find any, there’s a troop of feral rhesus macaque monkeys  descended from ones let loose in the 1930s.

Typical Turtle
Typical Turtle – Along the the Fort King paddle trail near the Silver Springs headwaters

The River side of the park is home to the Silver River Museum and Environmental Education Center (open to the public on weekends and holidays).  Tours through the pioneer cracker village are offered once a month, except in the summer.  You’ll have to call the park for details.

Cracker cabin
Cracker cabin

Finally, 60 campsites are available along with 10 very nice, two bedroom cabins.  I’d recommend staying for one or two nights so you have some time to explore.  There are also several other great areas nearby including the Ocala National Forest, Rainbow Springs State Park, Juniper Springs Recreation Area, and Salt Springs Recreation Area.

Summary

Click on any of these photos to go to Flickr where you can see larger versions.  My Silver Springs album on Flickr includes these and a few other  photos.

Silver Springs State Park is a wonderful place to visit and an especially wonderful place to paddle!

My Gallery /  Flickr photo set:  https://www.flickr.com/photos/edrosack/sets/72157644924434114
Website: https://www.floridastateparks.org/silversprings
Address / Phone: 1425 N.E. 58th Avenue, Ocala, Florida 34470(352) 236-7148
Central Florida Photo Ops Rating:  A Central Florida Photo Op must do!

P.S. – In the good news department, it looks like those of you that subscribe to the blog via email are getting the updates.  If you’re having any issues, please let me know.

Thanks for stopping by and reading my blog.  Now, go make some photos!

©2014, Ed Rosack. All rights reserved.

Look Again

I drive past this place all the time.

The road less taken
The road less taken (black and white, infrared; two image vertical panorama blended manually)

I’ve made some photographs there, but haven’t actually stopped for several years.  It’s changed tremendously, and I like how the overgrown road looks now in infrared.  A little spooky.

Places change.  Even if you think you know a site, go back once in a while.  It might look different.  Or you might have an infrared camera with you next time.

Thanks for stopping by and reading my blog. Now – go make some photos!

Lessons from a photogenic place

There were a few lights in the parking lot way back behind the sand dunes and the clouds were thick and low, making it so very dark on Marineland Beach south of St. Augustine, Florida that my first few exposures didn’t even register on the sensor. I kept raising exposure times and ISO until I was able to capture this:

99 seconds in the dark
99 seconds in the dark – ISO 400, 99 seconds @ f/8; Marineland Beach, about 45 minutes before sunrise.

It sure didn’t look this way to my eyes.  I couldn’t see much at all and had to use my head lamp to compose and focus.

When I got home and processed the photos, they reminded me of some things that might be useful to others.

Pre-visualize before, during, and after you press the shutter

You should always try to pre-visualize the photo you’re making before you compose and shoot – and it’s a delightful feeling when the image turns out just like you imagined.  But this is often harder than it sounds.  Especially if you can’t see what you’re photographing.  There’s nothing wrong with adjusting your vision as you go.  This is a wonderful advantage of digital cameras that we’d be foolish to ignore.  Check your results on the LCD during the shoot and adapt as necessary.  In this case, I knew exactly what I needed to change when I first looked at my (black) LCD.  I needed more exposure!

Pre visualization is great, but there’s also nothing wrong with post visualization.  What I mean is to try as many things as you can think of while you’re there and sort it out later when you get home.  Try HDR, panoramas, high tripod, low tripod, and focus stacking.  Use different  focal lengths, shutter / aperture combinations, and positions / directions.  Exploit changing weather / light as time goes on.  Capture them all and give yourself a better chance to come out with something you like.

Shutter speed

Shutter speed is a critical variable when photographing moving water.  The 99 second exposure above gave me very smooth and milky looking water, nicely outlining the rocks.  A 1/1000th second (or faster) exposure can freeze drops of water.  In between, you can find other speeds that look very different from the extremes.  Capture the scene with different shutter speeds when possible.  In this 1 second exposure, I like the added interest from the flow patterns in the water.

Marineland Beach and cochina rocks
Marineland Beach and coquina rocks – ISO 100, 1 second @ f/4 with 8 2/3 stop neutral density filter, ~30 minutes after sunrise.

High Dynamic Range (HDR) processing and ghost removal

There are so many controls and sliders in HDR software that it’s hard to know which ones to change.  Most HDR software has an option for removing “ghosts” (differences between multiple frames for anything moving in the image) and I think it’s a critical setting.  HDR Efex allows me to select the baseline frame I want to use as well as the amount of ghost removal to apply.  I like to experiment with these and select the combination that looks best.  In the image below, there was only one  setting that showed the breaking wave. And I think the wave definitely adds to the image.

Golden rocks and sand
Golden rocks and sand – 5 image bracket (-4 to +4 stops), almost an hour after sunrise.

Don’t leave too soon

I made these three images (and more!) over a period of 90 minutes.  The changing light provided different looks and opportunities to photograph this place.  It’s worth getting there early and staying for a while.

Don’t get overwhelmed

When you visit a beautiful place, especially for the first time – it’s easy to be overwhelmed and forget about everything except pressing the shutter button.  It helps to visit multiple times. The first time, it’s hard to see all the possible compositions until you get over the novelty and excitement. When you can relax and enjoy the experience you can open your mind and get in the zone.  Then you’ll make images you’ll be happy to share with others.

You can see more of my photos from Marineland in this set on Flickr.

Thanks for stopping by and reading my blog.  Now – go make some photos!

©2014, Ed Rosack. All rights reserved.

Merritt Island National Wildlife Refuge, 1-12-14

Kevin M, Robert W, Tom M, Lutfi E, and I met at Parish Park in Titusville last weekend for a photo excursion.  We got there well before sunrise and had time for a few night photos.

Stars above the causeway at Parrish Park
Stars above the causeway at Parrish Park – Looking SW, before dawn.

When we’d all arrived, we carpooled over to East Gator Creek Road for sunrise.  Since it was so clear before dawn, I didn’t think it would be very good.  But once again, Mother Nature surprised me, and a set of clouds moved in to add interest and color to the sky.

Passing storm
Passing storm

After daybreak, we drove on around East Gator Creek Road and then Black Point Wildlife Drive looking for birds.  We didn’t have to look too hard – they’re out force!

We saw many species and huge numbers of some of them.  White Pelicans were especially plentiful, both foraging in the water and soaring above us.  There were other huge formations of ducks flying over, but they were too high for me to ID.  One smaller flock flew very low right down the road.  I didn’t see them coming and the noise when they passed startled me.

We also saw Ring billed Gulls, a Bonaparte’s Gull, a some Forster’s Terns, Least Terns, a Black Skimmer, Northern Shovelers, Northern Pintails, Blue winged Teals, Lesser Scaups, Red Breasted Mergansers, Hooded Mergansers, Pied billed Greebes, Greater Yellowlegs, Sandpipers, Killdeer, Roseate Spoonbills, a Bald Eagle, Ospreys, Loggerhead Shrikes, Savanah Sparrows, Red winged Blackbirds, White Ibis, Glossy Ibis, Wood Storks, Reddish Egrets, a White Morph Redish Egret, Great Egrets, Snowy Egrets, Great Blue Herons, Tri-colored Herons, Belted Kingfishers, and maybe a few others.

Cooperative Loggerhead Shrike

Highlights also included a very cooperative Shrike that sat still while we all made way too many photos of it, a bald eagle that flew right overhead, and two life birds for me (the Bonaparte’s Gull and Greater Yellowlegs).  It’s definitely birding season at MINWR!

As a side note:  I got an email from a Flickr contact that’s going to be in the area for a couple of days.  They wanted some hints on how to see everything while they’re here, especially Gatorland, Viera Wetlands, and Merritt Island.  I did pass along some hints.  But then I had to tell them that’s a lot to see in 2 days!  The good news is that you’re almost certain to see some good things in those places.  The bad news is that you can’t possibly see everything in that short a time – it’s just too large an area and the weather / wildlife might not cooperate. The key is to relax, enjoy being there and be ready with your camera for whatever comes your way.  I hope I’m not misleading people into thinking that they can photograph all the things they see here on the blog on their first time out.  It takes persistence and even some luck.

Anyway, if you’ve wanted to go to MINWR, now’s the time.  You can see other posts I’ve written about MINWR here and you can see larger versions of the photos above and others from Merritt Island in this set on Flickr.

Thanks for stopping by and reading my blog.  Now, go make some photos!

©2014, Ed Rosack. All rights reserved.

Marineland Beach

Intro / Description

Historically, coquina’s been used as a building material.  The Castillo de San Marco in St. Augustine and Bulow Plantation in Flagler Beach are made of it.  But today I think the best use of coquina is for photography – it makes a great foreground in landscape photos!

Marineland Beach morning 3
Marineland Beach morning – A colorful, brisk daybreak on the rocks (48mm, ISO 50, f/16, 3 seconds)

Several locations on the Atlantic coast of Florida have deposits of coquina rocks exposed on the beach.   Three that I know of are:

  • Washington Oaks Gardens State Park (Palm Coast, Fl)
  • Blowing Rocks Preserve (Jupiter Island, north of West Palm Beach, Fl)
  • Marineland Beach (south of St. Augustine, Fl)

I’ve mentioned Blowing Rocks Preserve before and I haven’t been to Washington Oaks in a long while, so this post is about Marineland Beach.

Info for Photographers

Photo hints:

This is a terrific sunrise site.  There’s public parking right on the beach and the area isn’t closed at night, so you can arrive as early as you want to.  If you do arrive before dawn, be careful – the footing on or close to the rocks is tricky in the dark.  A misstep can result in broken camera equipment or broken photographers.

Bring a flashlight (or use your cell phone).  Just be mindful of any other photographers nearby – you don’t want to spoil their images with your lights.  And know how to use your camera in the dark so you don’t have to fumble with the flashlight – it will save you time and aggravation.

Bring a cable or remote release to help avoid camera shake.  I usually use manual focus, at least until it’s bright enough for my camera’s autofocus to work.  Many cameras will have a “live view” mode that lets you enlarge around the moon or a distant light so that you can carefully focus on infinity.  If you don’t have live view, try using the markings on your lens.  Just set it to the infinity mark and back off a little.  How much?  Experiment before hand.  If you’re stopped down to f/8 or smaller, depth of field should help.

Before dawn and sunrise are very good times to shoot in RAW format.  RAW will give you extra dynamic range to help control contrast in post processing.  Also, learn about “long exposure noise reduction” and consider turning it on.  For exposures over a second or so, it does well removing noise in camera (at the cost of some extra time after you make the image).

Tripod/Monopod:

Yes – you must bring yours! You can even put your camera on it when you’re not using it for a walking stick!  And make sure you always know where it is in the dark so you don’t knock it over.

Marineland Beach morning 2
KM on the rocks, working the scene (120mm, ISO 100, f/8, .4 seconds)

Lenses:

You can use a variety of lenses.  I’ve added the focal length to the captions for the three photos in this article.  Don’t change lenses on the beach.  It’s often windy and you don’t want salt spray or sand inside your camera.  Choose a versatile zoom lens and leave it on, or retreat to your car to swap to a different one.

Coquina rock sunrise
Coquina rock sunrise (14mm, ISO 100, f/11, 1/8th sec)

Best time to visit:

Sunrise occurs later in the winter and gives you more time to get to this beach.  And check for high tide – it’s best for good water action near the rocks.

Other:

Wear good shoes.  Flip flops could be a problem for your toes on the rocks in the dark.

Make sure you keep an eye on the waves.  Every so often, a larger one will come along.

Summary

Marineland Beach is a wonderful place for landscape and sunrise photos.  You can see larger versions of the photos above if you click on them.  And this set on Flickr has several more photos I made there.

My Gallery /  Flickr photo set:  Marineland Beach on Flickr
Website:  None
Address / Phone:
Just south of Marineland at
9600 N Oceanshore Blvd
St Augustine, FL 32080
Central Florida Photo Ops Rating:  A must do sunrise spot!

Thanks for stopping by and reading my blog. Now – go make some photos!

©2014, Ed Rosack. All rights reserved.

Partial Solar Eclipse at Sunrise

I hadn’t been paying enough attention to astronomy news. Luckily my loyal Sherpa was (thank you Lynn!), and she mentioned that a partial solar eclipse would  be visible along the US east coast at sunrise on November 3rd.  So I took off for Cocoa Beach where I knew I could get a clear view of the horizon.  This was the scene a little before sunrise.

Mai Tiki Bar
Mai Tiki – before sunrise

Normally clouds are a great thing for sunrise photos.  In this case, though, the eclipse would last only a few minutes, so I worried that the band of clouds low on the horizon would block the view.  But the sun and moon finally did break through so we could watch the last part of the event.

Partial eclipse of the sun

Partial Eclipse of the Sun – As seen from the base of the Cocoa Beach Pier

I wanted to clearly show the sun’s disc so I used my “bird” lens for this photo zoomed in to 400mm.  I was happy that these three people were watching from the end of the pier so I could place  them in the frame.  The sun was extremely bright and I was careful not to burn anything in my camera (or my eyes!).  It was tough to compose since I kept my lens pointed away from the sun most of the time and only glanced briefly through the viewfinder to make images.

I like the way this one turned out.  It was definitely a unique sunrise and well worth the drive over.

Thanks for stopping by and reading my blog. Now – go make some photos!

©2013, Ed Rosack. All rights reserved

Is photography a group or solo activity?

Four of us from the Photography Interest Group went to Viera Wetlands last Saturday.  On the way, we stopped by Riverfront Park on the Indian River at SR 520 in Cocoa for sunrise.

Old boat by a bridge

There weren’t many clouds, but with a longer lens than I normally use (120mm equivalent instead of an ultra wide-angle), I managed to place this boat in the frame against a background of clouds and the causeway bridge.  The colors on the water are nice and I was happy with the result.

As we left, I saw what looked like a sunken boat out of the corner of my eye to the south of where we’d been photographing. Since the good light was fading, and everyone else was ready to leave for Viera, I didn’t get a chance to check it out at the time.

For some reason, sunken / abandoned boats really appeal to me as photographic subjects. Maybe it’s because I spent time in the Navy. They seem sad and make me wonder what happened and why. This one nagged at me, and I really wanted to explore it so I decided to drive back over on Wednesday to see what I’d missed.  Many times the boat gets salvaged – so if you don’t photograph it when you find it, you may not get a second chance.

A dream, gone
A dream, gone – in the harbor at dawn.

Luckily the boat was still right where I’d seen it.  I found a spot where I could use the sailboat mast reflections to outline the sunken hull and place it between the blue and orange colors mirrored on the water.  I like the first photo, but I think this second one is stronger.

If we’d taken the time to explore this on our first visit, would I have gotten as strong a photo?  Did I get a better photo on my second trip because I was by myself?  Is photography essentially a solo activity?

Cue the standard photography answer:  “It depends.”   I believe you need to be “in the zone” to make great photos.  Distractions and / or fellow photographers can hinder concentration – or they can point you in the right direction.  When you’re with a group you also have to compromise and go along – you can’t do everything you want and force everyone else to do it too.  If you’re mainly a landscape photographer, going photographing with someone really into bird photography may not help your landscape images.  Or it might – birds hang out in some beautiful places.

If you go with people more experienced / knowledgable than you are,  you may learn a bit and make better images as a result.  Or you may find out about new places that they know but you don’t.  Or you might even open your eyes to a different way of seeing something.  If you’ve ever been out photographing with a group, you know there will be many similar images.  But there will also be some that look completely different even though two photographers stand right next to each other.

I looked through my most interesting images (according to Flickr, anyway).  Of the first 20, 10 were when I was by myself and 10 when I was with other photographers.  Conclusive numerical evidence, eh?

So to answer the question in the title of this post:  Is photography a solo or a group activity?  Yes.  You’ll be a better photographer if you go photographing both by yourself and in groups.  Mix it up and take advantage of both ways to enjoy and improve your photography.

By the way, we did make it to Viera Wetlands.  We saw many of the usual animals in the main area including Hawks, Ospreys, Great Blue Herons, Little Blue Herons, Green Herons, Snowy and Great Egrets, Grebes, Black Bellied Whistling Ducks, Alligators, Turtles, etc.  We saw a few more species in the Click Ponds:  White Pelicans, Sandpipers, Roseate Spoonbills, and Woodstorks.  A nice visit.

Sandpiper flock and reflections

Thanks for stopping by and reading my blog. Now – go make some photos – alone and in a group!

©2013, Ed Rosack. All rights reserved

St. Augustine, Florida and vicinity – photo hints

Lynn was out-of-town last week at the Pressing Iron & Trivet Collectors of America Convention in Indianapolis, Indiana. I talked her into letting me out of my spousal support services subcontract, so I had a chance to sneak in a few days of photography while she was away. I spent the time in St. Augustine, Florida, which is “the oldest continuously occupied European-established settlement and port in the continental United States”. I’ve written about it many times (see this link) and it’s one of my favorite places to photograph. Photo ops abound and include landscapes, architecture, street scenes, beaches, historic landmarks, wildlife, and much more. It’s hard to go anywhere in the area and not come back with a photo! Here are some of mine along with hints on how I made them.
There are some wonderful sunrise and sunset spots. Friends told me about Marineland Beach (thanks Kevin M. and JT) which is just a little south of St. Augustine. It’s now one of my new favorites. The coquina rocks there worked really well as foreground objects in my photos.

Long exposure sunrise

Long exposure sunrise – Marineland Beach, Florida

This is a single exposure, made through a Hoya ND400 filter right after sunrise. The waves were coming in around me, but I stood my tripod on one of the rocks to keep us dry. I used my lowest ISO setting (50) and even with the sun in the frame, the 8 2/3 stop ND filter gave me a 14 second exposure at f/8 . The long shutter speed makes the water surface contrast nicely with the rock texture.

One thing you’ll run into in Florida on summer mornings is condensation. It’s so humid that if you take your camera gear directly from your air-conditioned room or car out into the moist air, you can expect 15 to 30 minutes of fog before they clear. You can decrease this by not running your car’s AC on the way. You can also seal your camera and lens in a plastic bag with as much air removed as possible until it warms up. And it’s a good idea to bring along a micro-fiber cloth to remove condensation if needed. The larger your camera / lens is, the longer it will take to warm up. This is one time that good glass works against you – at least until the temperature equalizes. One more point: try not to change lenses under these conditions. If water condenses on your sensor, it can be hard to remove and may cause dust to adhere to the surface.

The harbor and fort (Castillo de San Marcos) also provide interesting detail for sunrise or sunset and landscapes in general.

A calm morning in the St. Augustine harbor.
A calm morning in the St. Augustine harbor: Clouds to the north over the Castillo de San Marcos and the quarter Moon above the Bridge of Lions add interesting detail to this image.

This photo and the next were both multi-shot panoramas made with the techniques I described last week. Images like the harbor scene can be tough to blend due to smooth gradients in the sky and water. Be sure you check carefully and correct any glitches.

Another thing about summer in Florida: We have awesome afternoon thunderstorms. Clouds add a lot of drama to photos, but the storms were so bad on two of the days I was there that I couldn’t go out for sunset. Plan accordingly.

St. Augustine Sunset
St. Augustine Sunset behind the Castillo de San Marcos

On this evening at the fort, there was a large thunder-storm to the west. The sky wasn’t colorful at all until the sun moved down below the thunder head, resulting in these shadows and rays. One big advantage of sunset photography vs. sunrise is that you can wait to see what develops. At sunrise, you need to be in place extremely early to see all the variations happen.

I had a great time walking around the fort at sunset with my large tripod and big DSLR camera. Most people were oblivious and walked right through my photos (I don’t blame them – I don’t own the place).  I’d wait for a clear spot in the traffic and make another exposure. Other folks stood next to me since they thought wherever someone with a big camera is has to be a good spot. At one point, a tour guide in a pirate costume leading a group of 20 or so people saw me and stopped his group from walking in front of me until I finished my exposure. It turned out he’s a photographer too.

I wanted to try a night photo of the lighthouse. I also wanted to capture the look of the beam coming out of the light. This turned out to be a tough assignment. The contrast range is huge and there’s a lot of glare from the lights in the scene.

St. Augustine Light Station

I ended up merging two exposures. The first one was long (f/4 @ 3 seconds) at a low ISO (400) to decrease noise. The slow shutter blurred the light beam, so I made a second exposure (ISO 3200, f/4 @ 0.4 seconds) and this stopped the beam enough to highlight it. The second exposure had some noise, but was fine with a bit of post processing before I blended the two manually in Photoshop.  I made this photo about an hour before sunrise. It was dark and there was no one around. One of my contacts on Flickr commented that spooky things happen in this area. I’m glad I didn’t notice any when I was there.

Tom M. met me up there on one of the days and we spent several hours just walking around. There were many interesting scenes, and I never saw any two doors  alike.

Red door #33
Red door #33

We were walking down one street and saw someone in the distance photographing this house with his iPhone. He was really working it, making multiple photos / compositions and was still there when we arrived several minutes later. We waited for him to finish and when he looked up and noticed us he asked what kind of cameras we had. It turned out he’s a photographer too and was there on vacation, but forgot his Nikon D3S DSLR. He said using the iPhone was “very liberating”. Photo hint 101: If someone’s taking a picture, look at what he’s photographing – it might be interesting. Photo hint 102: Don’t forget your camera.

A little later, out of the corner of my eye, I saw this waiter zipping through traffic on the way to work.  On a skate board.  I managed to make a quick photo.

Morning commute
Morning commute – very eco-friendly

We also noticed this person reading on the bench.  I really liked the symmetry of the columns and how they led my eye towards the subject. Tom posted a different composition (sorry – no longer available) that I think is really good too.

Reading
Reading.

By the way, if you have Lightroom 5, try out the “Upright” settings in the Lens Corrections panel on photos like the one above. It does a great job squaring things up.

Like I said, there’s a tremendous amount of photo-ops in the area. I didn’t make it by the St. Augustine Alligator Farm on this visit, but from March to June, it’s one of the best places in Florida to photograph a variety of wild birds nesting in the rookery there.  I also didn’t get to Fort Matanzas.  It’s a little south of the city and makes a nice side excursion. The Nombre de Dios Mission in the northern part of the city has a beautiful chapel and grounds as well as a view into the harbor.  And I’m sure that there are a great many more photo ops that I still have to discover in this beautiful place.

You can see these photos larger if you click on them and I have many others from St. Augustine in this set on Flickr.

Thanks for stopping by and reading my blog. Now – go make some photos!

©2013, Ed Rosack. All rights reserved