Category Archives: Technique

Feathered Feeding Frenzy Photo Fun

Once in a while, conditions are just right.  Low water levels force fish into small pools and birds flock to the spot to feed.  When you can get close to a scene like this early in the morning, with soft golden light from the rising sun behind you –  count your blessings!

Great Egret in flightGreat Egret in flight

This happened to me at Merritt Island National Wildlife Refuge a week ago (2/9/18).  I  lucked into seeing a bird feeding frenzy along Black Point Wildlife Drive.  It’s always a treat to watch and photograph these.  I’ve written about them before  (see this post from December of 2012).  Here are some observations. / hints that may help you in a similar situation:

  • The birds all compete for food.  Watch for interactions and squabbles – they can lead to great poses and action shots.
  • Since the birds are very focused on the fish they’re more tolerant of close photographers.  Be quiet and move slowly so you don’t stress them.
  • They’ll be constantly coming and going and moving in the pond.  Watch for good compositions as they shift around.
  • When they fly in, you can often track them as they get closer and land in the pools for some great images.  After a while you’ll be able to anticipate their paths.
  • As the birds land, they’ll be low and close to you – great for eye level BIF photos (BIF = Birds in Flight)!
  • You’ll need to balance zoom level, composition, background, exposure, focus, etc.  And conditions change rapidly.  Set up your camera in advance and be nimble.  I have a BIF preset programmed so I can quickly shift to it when needed.  It shoots at 10 frames / second with continuous focus, large focus area, and higher ISO settings to keep my shutter speed high.  You’ll need  1/1000 sec. exposures (or shorter!) to freeze wing motion.
  • A white bird against a dark background vs. a dark bird against the sky will require exposure compensation adjustments.  I have EC mapped to the rear wheel control so I can easily vary it when needed.
  • Your  “keeper” percentage may be lower than you’re used to.  But there are so many photo opportunities at a feeding frenzy that you’ll likely come home with images you like.  Practice when you can and you’ll get better.

Landing IbisLanding Ibis – I like the composition / background on this one.  But my shutter was too slow to freeze the wings and I didn’t get the exposure compensation right either.  I’m still practicing!

It’s not all about birds in flight.  Interesting groups or poses on the shore or perched on nearby branches are also photogenic.

On the banks of the pondOn the banks of the pond.  I like compositions with multiple species in the frame.

That was a wonderful morning.  I’m glad I was able to see all the action.  Oh, and before the bird activity, I also made a couple of landscape photos:
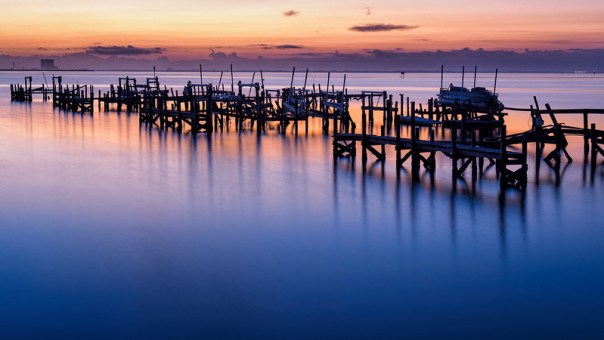
Dawn at the dock on the Indian RiverDawn at the dock on the Indian River.  Olympus Hi-Res mode.

Florida cloudsFlorida clouds along Black Point Wildlife Drive.  Monochrome infrared.

Thanks for stopping by and reading my blog. Now – go make some photos!

©2018, Ed Rosack. All rights reserved

More Computational Photography

As an Electrical Engineer and a long time photographer, I’ve been interested in computational photography for a while.  You can read some of my  earlier posts on the subject at this link. Here’s Wikipedia’s definition:

…”digital image capture and processing techniques that use digital computation instead of optical processes.”

I’d change this slightly from”instead of” to “instead of or in addition to”, but that’s a small quibble.

Moore’s law keeps driving the computing capabilities in phones and cameras ever higher and it’s fascinating to see what companies do with the extra potential.

Towalga River below High FallsTowalga River below High Falls, Georgia. Composite – iPhone default live view and Long Exposure, merged in Photoshop

I made the image above on our recent trip using an iPhone 8+ and Apple’s “Live Photo” mode. After I made the photo, I edited it on the phone and enabled the “Long Exposure” effect. The Long Exposure effect of blurring the moving water is computed from ~3 seconds worth of frames that Live Photo captures.  This is Apple’s web page explaining the feature.  Here’s what it looked like before I changed the mode – it’s not nearly as photogenic:

Towalga River below High FallsDefault iPhone live view

Until iOS 11 added this feature, I wasn’t too interested in Live Photos.  Now, I’m watching for places to use it. You can get a better image with your high-end camera and traditional optical techniques, but this is easier and a lot of fun to play with.

Here are some hints:

  • Pick a suitable subject:  moving water, traffic on a road, blurring people in a crowd, etc.
  • Motion blur with a traditional optical approach requires a slow shutter speed – either low light or using filters.  Since computational methods works by processing multiple frames, you can use it in bright light without filters.
  • Apple says it works on their newer phones (6+ and later).  You’ll need to have iOS 11 (or later) installed.
  • The Long Exposure effect has to align Individual frames and then crop where there’s no overlap so you’ll lose pixels around the edges.  Ideally, use a tripod – but that sort of defeats the idea of pulling your phone out of your pocket, doesn’t it?  Just hold the phone as steady as you can to minimize cropping.
  • Make several exposures and pick the best one later.
  • Long Exposure resolution seems to be lower than default iPhone photos.  This isn’t a huge problem for the moving parts of the frame – they’re supposed to be blurry.  For the static portions, you can load both versions into layers in Photoshop and use masking to paint in higher resolution where you want it.  I did this for the first photo above.
  • You can set a Long Exposure photo as your wallpaper.  You’ll see the static Long Exposure version until you press on it from the lock screen.  Then it changes to show the three-second animation – cool!

I hope Apple enhances this in future updates.  It’d be good to have some control over the blur effect.  3 seconds is nice, but some subjects will look better with less (or more?).

iOS 11 includes other updated computation photo capabilities (e.g. portrait lighting) – but that’s a subject for another day.

Photography’s changing fast – it’s a wonderful time to be a photographer, isn’t it?  In today’s digital world, many advances are likely to be computational and not optical.  Keep up – don’t be left behind!

Thanks for stopping by and reading my blog. Now – go compute some photos!

©2016, Ed Rosack. All rights reserved.

Casual Birding in New Mexico

The birds we saw in New Mexico varied from what we’re used to in Florida (of course).  I saw 12 life birds while we were there.  And this was really with just casual birding. I’m sure my more serious birding friends (thinking of you Kevin M.) would have found many more!

NM birds: Gambel’s QuailGambel’s Quail – Bosque del Apache National Wildlife Refuge

MK wanted to visit White Sands National Monument.  I did too, but I’d heard a lot about the Bosque del Apache National Wildlife Refuge so we agreed to get up early and stop by there on the way.  I was really glad we did!

NM birds: Black-chinned Hummingbirds and Broad-tailed HummingbirdBlack-chinned Hummingbirds and Broad-tailed Hummingbird (on the left) – Bosque del Apache National Wildlife Refuge

The volunteers at the Visitors Center were very helpful and pointed out where to look for the Golden Eagle.  We would have missed it without their help.  At first glance, I mistook it for a vulture!  They also apologized since there were no Sand Hill Cranes (they migrate through in the winter).  I assured them that we see plenty in Florida.  Hopefully I can go back when it’s cold.  Seeing huge flocks of cranes would be an experience!

NM birds: Golden EagleGolden Eagle – Bosque del Apache National Wildlife Refuge

MK was an excellent spotter.  We found the Caissin’s Kingbird when she stopped to look at a road side field on the way home from White Sands.  She also found the Yellow Warbler at the top of Sandia Peak – thanks MK!

NM birds: Caissin's KingbirdCaissin’s Kingbird – Carrizozo, NM

I’ve called myself a “beginning” birder for too long.  Maybe it’s time to change this to “casual” birder.  I like birding and enjoy finding / seeing new birds and figuring out what they are.  But I mostly enjoy the photography and get a bit disappointed if my images are poor.  So, from me to you, here are my…

Birding hints from a casual birder:

  • Take advantage of travel.  New locations can be an easy way to add to your life list.
  • Consider going even if it’s a slow time of year.  Bosque is well-known for its Festival of the Cranes in November.  But we found lots to see even in the middle of summer.
  • Research the local hot spots and add some to your itinerary.  Find and check local sightings or species lists so you’ll know what to look for.  I read through the wildlife list on the Bosque web site before we went.  It lists bird species by month observed and was a big help.
  • Try to look at the right times of day when birds are more active.  We saw the Yellow Warbler near dusk on Sandia peak, and had good luck at Bosque early in the morning.  I strongly doubt we’d have seen as much in mid-afternoon.
  • Stop by the Visitors Center and talk to other birders there.  The volunteers at Bosque were very helpful.
  • Don’t let birds you’re familiar with fool you.  I might have missed the Golden Eagle and the Neotropical Cormorants if I hadn’t been looking for them.  They look similar to other birds I’m familiar with in Florida.
  • A second set of eyes is very helpful.  With two of us looking, MK and I saw more than we would have by ourselves.
  • Birding friends are helpful too.  I probably could have figured out what all the life birds were on my own, but it was faster with Kevin helping.  And having a second opinion is good too.
  • Photograph everything you see and confirm later.  I wasn’t sure about the Golden Eagle until I enlarged the image on the back of my camera.
  • If you think you might be birding, bring your long lens.  I didn’t and regret that.  Thinking back on it, I should have left my ultra-wide at home and taken my longest lens instead.  You can always stitch multi-frame panoramas to get a wider field of view.  But you can’t get a longer focal length in post processing without losing quality.

I never expected to see so much – it was a great trip!  Here’s what we saw:

Life birds:  Golden Eagle, Gambel’s Quail, Black-chinned Hummingbird, Broad-billed Hummingbird, Ring-necked Pheasant, Neotropic Cormorants, Swainson’s Hawk, Cassin’s Kingbird, Say’s Phoebe, Black Phoebe, House Finch, Yellow Warbler

Other birds: Blue Grosbeaks (M & F), Crows, Common Ravens, Brown-headed Cowbirds, House Sparrows, Mockingbirds, Red-winged Blackbirds, Road Runner, Barn, Tree, and Cliff Swallows, Wild Turkeys, Canada Geese, Blue Wing Teals, American Coot, Pied-billed Grebe, Great Blue Herons, Turkey Vulture, Mourning Dove, Robin, Grackles, …

Other wildlife: Prairie Dogs, Snakes (no ID, although one roadkill might have been a Rattlesnake), Deer, Rabbit

You can see more of my New Mexico images here:  https://www.flickr.com/photos/edrosack/albums/72157685850604925

Thanks for stopping by and reading my blog. Now – go do some casual birding, and make some photos!

©2017, Ed Rosack. All rights reserved

Three things

Three more or less unrelated things to discuss today…

1. Image Stabilization

I’ve used Olympus micro four thirds cameras for a while and I’ve watched their capabilities get better and better.  Their latest image stabilization is truly amazing – Olympus claims five to six stops.  This means that if you can normally shoot at 1/100 second handheld without inducing camera shake blur, then with IS, you may be able to shoot at 1/3 to 1/2 second.  Truly a huge difference, as long as subject motion blur is not a problem.

Rapidan RiverRapidan River – This is the view just behind President Herbert Hoover’s cabin at the Rapidan camp retreat in the Shenandoah Mountains.

The settings on this photo are: focal length equivalent of 28mm, ISO 64, f/8, at 0.5 seconds, handheld.  Using the (1/focal length) rule of thumb, I should have exposed this at 1/30 sec to prevent camera shake.  But I wanted to use a slower shutter speed to blur the moving water.  With IS turned on in camera, I could hand hold at a half second and still keep all the non-moving rocks, etc. completely sharp in the frame.  And I like the way the water looks.

It’s a nice option to have if you don’t bring your tripod.

2. Workflow Experiments

I recently bought an SSD (solid state device) disk.  The main advantage of these is that they’re faster than spinning hard drives.  I wanted to speed up my photo processing workflow.  So I moved my 2017 image file directory and my Lightroom catalog to this drive and sure enough, Lightroom does seem faster.

But then it occurred to me that when I travel, I can  take the SSD with me on the road and use it with my laptop.  All I have to do is add a folder for the images from the trip.  When I get home I can just move it back to my desktop computer and any work that I’ve done on the road will come across with the SSD.  I won’t have to export / import, etc.  This should definitely save time when I get back.

There are some things to be careful of.  I’m backing up the SSD drive using Apple’s Time Machine in case there are any glitches with the SSD.  And I’ve had to re-arrange the image folders across the different disks and tell Lightroom where everything is.  I also need to make sure that preferences and presets are all accounted for.

After a week or so, it all seems to work ok.  I’ll let you know if I discover any other gotchas.  If you have questions about this setup, leave a comment and I’ll try to answer.

3.  Merritt Island National Wildlife Refuge update

You may remember this blog post from March:  https://edrosack.com/2017/03/19/morning-glory/.  I posted a photo then of cracked mud on the bottom of a dried out pool.

I haven’t been back recently, and when my friend Howard T. wanted to try out a new camera, we decided to see what’s going on over there.  I’m happy to report that the water is back to normal (or even a bit high).  I can’t really recommend it for wildlife photography yet – the birds and animals still seem to mostly be elsewhere.  Maybe they’ll read this blog and return when they find out conditions have improved.

Black Point Wildlife Drive – The drought has eased – there was a lot of water there last week.

Thanks for stopping by and reading my blog. Now – go make some photos!

©2017, Ed Rosack. All rights reserved

Three Photography Observations

When I left to meet Kevin K. and Tom M. for some photography before dawn last Monday, the sky was clear, the stars were shining and I didn’t think the sunrise would be very good.  If I hadn’t been meeting friends, I might have gone back to bed!  Looking at the photos in this post, it’s easy to see I was wrong – the sunrise was beautiful.

Observation 1:  Go.  You can’t always anticipate what you’ll see when you’re out photographing.  But if you stay home, you know you won’t see anything.

Calm Blue HourCalm Blue Hour.  14mm (equivalent), ISO 64, f/5.6, 10 sec., Hi-res mode.

We ended up at Cocoa Riverfront Park.  The clouds were moving in and the light and colors changed as we watched.  There were several interesting directions to point the camera.

Observation 2:  Arrive early and stay for a while when photographing sunrise.  Watch all directions.  Bring several lenses to vary your exposure, composition, and perspective.  Work the scene!

Fire in the skyFire in the sky.  70mm (equivalent), ISO 200, f/5.6, 1/50 sec., multi-frame stitched panorama

Photos 1 and 3 are from the Olympus E-M1 Mark II camera in hi-res mode.  You may remember this post (https://edrosack.com/2015/08/09/thoughts-on-processing-olympus-om-d-e-m5-mark-ii-high-resolution-photos/) where I wrote about motion anomalies with E-M5 Mark II hi-res and how to manually fix them.

Observation 3:  My conclusions from the earlier post are all still true – except for one.  I’m happy to report that with the E-M1 Mark II camera, Olympus has made a great deal of progress with hi-res mode.  I didn’t have to fix any motion anomalies in either of these photos.  Well done Olympus.

Dew on the BoardwalkDew on the Boardwalk. 14mm (equivalent), ISO 64, f/5.6, 8 sec., Hi-res mode.

Thank you for stopping by and reading my blog. Now, go make some photos!

©2017, Ed Rosack. All rights reserved

Reprocessing reminder

Do you have a favorite photo that you made a while ago?  Perhaps with an older camera?  If so, you may want to see what new versions of software and your revised tastes and improved skills can do differently.

I had a request for a print of this image.  It’s from way back in 2007, made with my first DSLR – a Nikon D80:

Littleton, Colo. cabinLittleton, Colo. cabin

I like this photo.  A lot, and not just because of the subject.  It reminds me of driving along the road between where my Mom used to live and my Sister’s house, and visiting them both.  It’s been on the blog before:  here and here.  If you’re interested, please take a look at these two posts to see earlier versions.

Fortunately, I was saving my digital files in RAW format even back then, so I can take full advantage of any improvements in photo software.  I decided to run this through my current imaging workflow before printing.  Using DxO Optics Pro, Photoshop, and Lightroom, I was able to reduce noise, improve shadow and highlight detail, and tweak color, contrast, and brightness.  I feel the new version is better.

Using current software on an image made with 10-year-old technology can be amazing.  I even see a spider web hanging from the near door that I never noticed before.

What do you think?  Do you ever reprocess your older images?

Thanks for stopping by and reading my blog. Now – go make and / or reprocess some photos!

©2016, Ed Rosack. All rights reserved

Regarding image selection

Editors note:  Although I’m feeling much better, I’m still going to take a sick day.  I’ll repeat this post from September 2014.  If you haven’t read it before, I think it’s still very relevant and worth a look.  If you have – then I apologize for the repeat.


If you use raw format in your photography, they look different from jpg photos.  Raw format is just the data read directly off of the sensor with no processing by the camera.  Depending on how you configure your camera and software, raw image contrast and sharpening can be very low, white balance may not be optimized, and exposure is often set for capture / low noise instead of display / print.. This can make it tough to judge raw photos and decide which ones merit further processing.

When I returned from Maine and reviewed my photos, I bypassed some.  When I finished working on the ones I’d identified as “selects”, I went back and re-looked at those I’d set aside.  Some of them deserved attention.

A calm morning on Bubble Pond

It’s not just raw images that can be difficult to evaluate.  Infrared photos usually need processing to optimize too.

Bass Harbor Light
Bass Harbor Light

And multi image panoramas make seeing composition and field of view a challenge before the individual frames are stitched together.

Behind Sand Beach
Behind Sand Beach

I can’t tell you how to rate your images and select your best.  But what I can tell you is to be very careful not to discard something before you’re very sure that it’s not worth pursuing.  Give your photos a second chance.  Learn your software so you know how far you can go with adjustments.  And as with any thing worth pursuing, practice will make you better.

Thanks for stopping by and reading my blog. Now – go make some photos!
©2014, Ed Rosack. All rights reserved.

iPhone vs. "big" cameras?

When I’m traveling, I try to take an iPhone photo when I get to a new place.  Sometimes I forget but when I can remember, the iPhone’s GPS capability records the location for me.  Then when I’m back home, it makes it easier to map out exactly where I’ve been.

This is one of the first photo’s I made on our trip out to Utah a few weeks ago:

Cedar Breaks National Monument amphitheaterCedar Breaks National Monument amphitheater iPhone panorama

 When I posted it on Flickr, I commented “Straight out of the iPhone’s panorama mode. I’m not sure why I have all these other cameras.”  And I do like the photo.  Phone cameras do pretty well, especially in good light.  So I wondered …

When I got home and processed the rest of my photos, I took a look at some of the other iPhone images compared with similar images from my “big” cameras (interchangeable lens cameras with larger sensors).  Here’s another example:

Sunrise at Point Supreme, iPhone PanoramaSunrise at Point Supreme, iPhone version – Panorama mode

Although the light was very pretty that morning, it was also very challenging for the iPhone sensor and lens.    I’ve tried to adjust the photo to be as similar as possible to the one below.  But I can still see major differences.  I made the next photo a minute or so later and very near the same spot with an Olympus E-M5 II micro four-thirds camera and the 12 – 40 mm f/2.8 Pro zoom lens.

Sunrise at Point Supreme
Sunrise at Point Supreme – Olympus version – multi image panorama

After looking at several cases where I had similar photos, I think this example shows why we need to keep our big cameras.

  • The exposure latitude and dynamic range capability of sensors that are larger than the one in the iPhone means that the dark areas have more detail and less noise, and the bright areas are less likely to blow out.  For high contrast light (sunrise / sunset) this helps a lot.
  • The lens in the iPhone didn’t handle the flare / glare very well.
  • The resolution capabilities of phone cameras are growing.  But with careful capture, I can create much larger images with the big cameras.  For instance the last photo above is 58 megapixel. The amount of detail in a file that large is enormous compared to a phone photo.
  • Control:  For me, the big cameras beat phone cameras in flexibility / control and ergonomics.  I can easily control everything from lens choice to aperture, ISO, shutter speed, etc.  You can get apps for your phone that add better controls, but I find them inconvenient and don’t often use the ones I have.
  • Color / white balance:  The default color and white balance on the phone are very good.  But when I use the big cameras, I can shoot in RAW format, which makes adjusting white balance and color much easier in post processing.  RAW format also allows more adjustment latitude, since I’m working with a 14 bit file in RAW, instead of an 8 bit jpg file.  RAW is coming to the iPhone soon, which should help.

So there are some reasons why I think big cameras are worth the extra weight / trouble of bringing them along.  I use my phone camera to supplement them.  How about you?

Thanks for stopping by and reading my blog. Now – go make some photos!

©2016, Ed Rosack. All rights reserved.

Flower in IR

Keith H. had his Olympus EM-5 MII camera converted to infrared, so one day after lunch we stopped by Central Winds Park in Winter Springs so he could test it.  I’ve had my IR E-PL5 for a while, but wanted to see how it worked with the Oly 50 – 140mm f/2.8 lens.

Flower in IRFlower in IR

This frame was at ISO 200, 150mm (300mm equivalent), f/5.6, 1/80 second.  It’s handheld, but I braced the camera and the winds were calm so the shutter speed was high enough to prevent motion blur.  And the long focal length and close focus makes the blurred background look very nice.  So I think this lens works well in IR.

The processing was comparatively straightforward.  I ran it through DxO Optics Pro for noise reduction and detail improvement.  The rest was in Lightroom:  Crop, exposure, contrast, clarity, to taste; spot removal for small specs of dirt on the flower; and then small doses of post-crop vignette and de-haze to get to an initial false color IR image.

As a last step, I tried something new.  Instead of converting to Black and White, I played around with the vibrance slider to partly desaturate the colors in the image.  This gave me the “pseudo B&W” you see above.  I like this rendering and I’m going to try it in the future for IR images.

If you have any questions about this, feel free to ask in the comments and I’ll do my best to answer.

Thanks for stopping by and reading my blog. Now – go make some photos!

©2016, Ed Rosack. All rights reserved.

Boundary Warp

There’s a new feature in the latest Creative Cloud versions of Lightroom and Camera Raw, and if you stitch together multi-frame panoramas like I tend to, then you should take a close look at it.

It shows up as a new slider called “Boundary Warp” in the “Merge to Panorama” dialog and it’s designed to help fix the empty areas along the edges of some stitched panoramas.  You can see an example in the first image below.

The Tarn - This is a three frame panorama from Acadia National Park that I'd never processed. I used it to test the new "Boundary Warp" feature
The Tarn – This is a three frame panorama from Acadia National Park that I’d never processed. I used it to test the new “Boundary Warp” feature

An easy way to fix this is to crop out the empty portions of the frame, like this:

The Tarn - This version has been cropped to eliminate the missing portions.
The Tarn – I cropped the missing portions out of this version.

But that throws away pixels that you may want to keep.  You can also try to fill in the empty areas with content aware fill or the clone stamp, but that often leaves some anomalies that take time to clean up.

Using the new function is easy.  It keeps all the pixels in the image and warps the edges to fill in empty areas.

The Tarn - I used Boundary Warp on this version to fill in the missing areas.
The Tarn – I used Boundary Warp on this version to fill in the missing areas.

I like the way it works. It’s better than cropping or trying to fill in missing portions with the clone stamp.  Try it – I think you’ll like it too.

Thanks for stopping by and reading my blog. Now – go make some photos and warp some boundaries!

©2016, Ed Rosack. All rights reserved.