I’ve been using the iPhone 11 Pro camera for a bit and thought I’d post some sample photos and a few photographer type thoughts about it this week.
This isn’t a comprehensive review – you can find many of those on the web if that’s what you need. This also isn’t a “should you buy it” post. That’s a personal decision only you can make.
Ultra-wide
 Morning Light on a Majestic Oak. I think I’m going to like the 13mm eq. FOV ultra-wide lens
The iPhone 11 Pro has three cameras and the ultra-wide is new this year. It’s a bit limited compared to the other two: It’s widest aperture is f/2.4 so it doesn’t gather as much light. It also doesn’t have stabilization, it’s fixed focus, doesn’t support RAW format, and doesn’t support night mode.
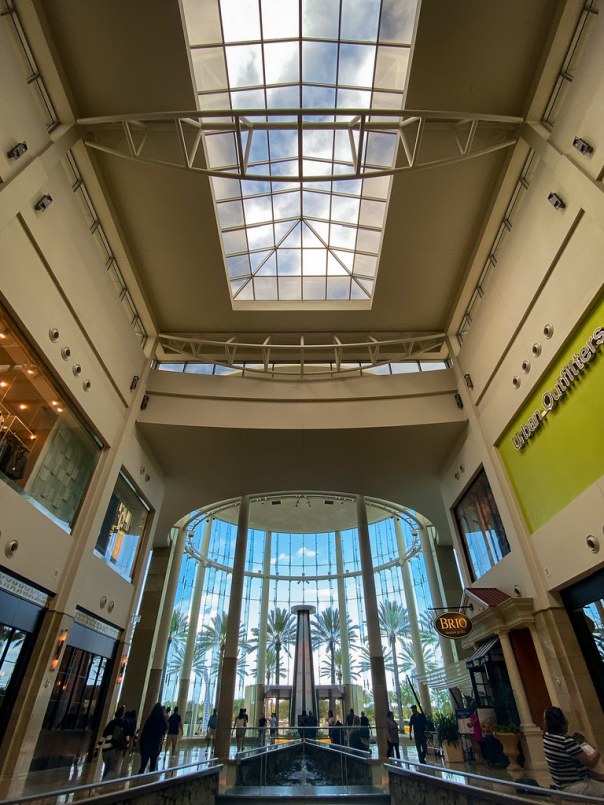 Wide angle at the mall
I’m not sure why Apple designed this camera with those limitations. But at a 13mm eq. field of view, it truly is ultra-wide. That’s going to be very handy in a lot of situations, especially where the light is good. It’ll probably mean I use panorama mode on the phone a lot less. And I think one of the main benefits of the ultra-wide is the inputs it provides for computations Apple can do.
Portrait mode
 Narwhal the kitten helping me test portrait mode
Narwhal modeled for me so I could test the latest Apple implementation of portrait mode. I think his image above looks great and would be pretty hard to tell apart from one taken with a high end camera and a large aperture lens.
That’s because I corrected some issues with the way the phone algorithms rendered depth of field in the original photo. Things like whiskers and hair are difficult to show correctly. Look at the image below to see what I’m talking about. Click on it to open, and then click again to enlarge.
 Correcting depth of field flaws
Look at the crop on the left – it’s the Portrait Mode photo produced by the phone. If you’ve enlarged it, you can see that Narwhal’s whiskers have been clipped by inaccuracies in the algorithm. Bright highlights and low contrast have confused the depth map info. The middle photo is with portrait mode turned off. In that one, all of his whiskers are visible with no depth of field / bokeh effects. On the right side and in the full image I blended some of the middle image with the left one to show the focus rolling off more naturally.
Portrait mode has improved this year. You can make portraits with both the wide and tele cameras. And the depth mapping algorithms are better – but they can still be improved. You may not notice or care much about these things and compared to previous attempts, the algorithms are better and the results look great. Important photos could be manually edited to fix them. If we can do this manually, eventually the software wizards will figure out how to automate it into the phone algorithms. iPhone 12 super pro?
Night mode
I complained last year, that other phones had low light modes and Apple didn’t. They listened to me (ha ha) and added it.
 Night mode street scene
I think it captures low light situations very nicely. And the image stabilization is unbelievably good. I made this next photo of the constellation Orion in my back yard, hand held!
 Orion
Orion
Other improvements
There are other changes that I haven’t tried yet and don’t have examples of.
- If you shoot in landscape mode with the wide (1x) camera, it saves information outside the frame using the ultra-wide. This allows you to correct perspective distortion or rotate your images after capture without cropping(!).
- “Deep fusion” is still in beta. It captures multiple frames and combines them pixel by pixel for the best results. The demos are super interesting and I’m looking forward to trying it.
What about RAW format and manual control?
So many of the improvements in phone cameras now come through software. But the hardware has changes too. In addition to a third camera, the sensors and lenses in the wide and tele cameras are improved. And (except for the ultra-wide) they have all the RAW format and manual control capability they’ve always had, with a little better output.
 A touch of color. 4 RAW frames, stitched and processed in Lightroom / Photoshop
So manual control is still possible. The question is: “When should I bypass auto mode and use manual?”
With the software getting so good, and so much computation going on in the background, there are more and more reasons to use these cameras in automatic mode. As a photographer, you’ll need to really understand your phone camera capabilities and be able to wisely choose when to bypass it. For common situations, I think the answer is becoming “Use auto, most of the time”.
I believe that what I said last year will be true for a just a little longer:
Should you give away your non-phone cameras? No, not yet. Phones are still at a disadvantage in some ways: Lens selection and sensor size are two important ones. And the interfaces on dedicated cameras are better and allow quicker control. But in some (many?) cases, your phone is an excellent photo (and video!) tool. And they’re going to get better. Just make sure you’re up to date on how to use the latest functions.
Thanks for stopping by and reading my blog. Now – go make some photos!
©2019, Ed Rosack. All rights reserved