Monthly Archives: August 2014

Adding location information (GPS) to your photos

Here comes the sun
Here comes the sun – Sunrays shining through offshore clouds mirrored on calm inshore water.  Merritt Island National Wildlife Refuge. GPS:  28°38’8″ N 80°46’33” W

I’ve been adding Lat/Lon location info to my photos for several years.  It’s helpful to others to see where I made each one.  And I like to look back and see the info too.  If you click on a photo in the blog that I’ve geo-tagged, it’ll display on Flickr with a map showing the location below the photo.

I use Lightroom’s Map module for this.  If I know where I was I can easily drag the photos to that place on the map.  For unfamiliar places, I try to remember to make at least one iPhone photo so I can copy its GPS info to the other photos I make there.   That’s what I did on my recent trip to Acadia National Park and it worked well.  But I want something a bit less manual.

It would be nice if all cameras did this automagically like the iPhone does.  The only other one I have with GPS capability is an Olympus TG-2 underwater camera that I use when kayaking.  Nikon makes an add-on GPS, but it only works with Nikon, you’d have to remember it, not lose it, and it plugs into the remote release socket – so it’s a pain when you’re shooting from a tripod.

I’ve experimented before with using my phone to record GPS tracks.  On our trip to Alaska in 2009, I used an app and later synced the tracks to photos back on my computer.  That was a pain too (the app and software weren’t very reliable).  But it seems I wasn’t paying attention to Lightroom updates since then.  I completely missed that it now has the capability to sync a captured GPX format track to photos in your library.

Screen-Shot-2014-08-29-at-12.01.05-PM

Lightroom Map Module:  The track interface is hidden in a pull down menu at the bottom of the screen. 

Using the interface at the bottom of the Map Module (shown above), you can load a track and use it to auto-tag the location of photos in a folder.  And it works very well!

So how exactly do you do this?  There are three steps:

  1. Before you leave, make sure you set the time in your cameras correctly.  The time stamp is used to sync the position from the GPS track to each photo.
  2. Use your GPS unit or an app on your phone to record a track of your movements.  There are several iPhone apps that will capture the track info.  I tried GeoTagr ($4.99 in the app store) and it worked well.  Motion-X GPS (no longer in the app store?) also works.  When I got back home, I emailed myself the .gpx file with the track information.  One warning:  sometimes these location recording apps can be power hungry.  You might want to check to make sure you don’t run down your battery doing this.
  3. Move the .gpx track file to the folder on your computer with your photos.   Then load it into Lightroom and apply it to the photos.  Easy-peasy!  It all just works!

Two more geo-tagged photos from a quick trip to Merritt Island early last Thursday:

Nearby Mangroves and distant storms
Nearby Mangroves and distant storm.   Merritt Island National Wildlife Refuge. GPS:  28°38’8″ N 80°46’33” W

Morning by the causeway
Morning by the causeway.  Parrish Park. GPS:  28°37’21” N 80°47’45” W

I like this method and I’ll probably use it in the future.  It’s much less fussy than what I tried several years ago.  Now all I have to do is remember to start the app at the beginning of a photo-op.  I wish I’d worked this out before my trip to Maine.  It was an effort to figure out where each of those photos were made.

By the way, MINWR was still quiet last week – not much wildlife or birds about.  I did see a group of White Pelicans there.  Usually, they don’t show up until November.  I’m not sure what that means, but they were fun to watch.

Thanks for stopping by and reading my blog. Now, go make some photos! And geo-tag them!

©2014, Ed Rosack. All rights reserved.

Orlando Wetlands Park, 16 August 2014

After the trip to Maine, I was looking forward to getting back out and photographing here in Florida.  So it was up early (not as early as Cadillac Mountain!) and out the door to meet Tom M. at Orlando Wetlands before dawn last Saturday.

Nature foiled our sunrise plans and instead served up some semisolid, soupy fog for our photo enjoyment.

Foggy morning 1
Misty morning 1

And we did enjoy it.  It was interesting looking for compositions in the mist and trying to find foreground objects to add some definition to the photos.  I like the one above but after looking at it on the computer, I wish I’d moved a bit to separate the near and far grass on the left.  I didn’t see the overlap when I made the photo.

It took a while for the sun to burn through the fog.  That gave us time to try several different places.  I thought the south shore of Lake Searcy and the southwest corner of cell 16A were very photogenic.  I especially liked the light on the close leaves in this scene.

Foggy morning 2
Misty morning 2

Discovering beauty in unexpected places or situations is one of the addictive things about photography.  Sunrises shouldn’t all be super saturated.

New subject:  The Lake Jesup flowers will begin blooming at the end of September.  Here’s a link to my post about last year’s flowers, with much more info on them.  Make your plans now!

Thanks for stopping by and reading my blog. Now, go make some photos!

©2014, Ed Rosack. All rights reserved.

Acadia National Park, bonus photo

Tranquility at Bubble Pond

Tranquility at Bubble Pond.  This is a two frame, hand merged image.  ISO 100, f/16, 1/10 sec, 16mm, using a polarizing filter.

Hello everyone,

Apparently, my web server glitched and didn’t send emails to the subscriber list when I posted the new entry about Acadia National Park earlier today (Sunday, 17 August, 2014).  If you’d like to read it, please go to this address in your web browser:  https://edrosack.com/2014/08/17/acadia-national-park-maine/

Sorry for the inconvenience.

Acadia National Park, Maine

Sometimes, you can arrive at a “bucket list” location and it’s disappointing when it doesn’t live up to your expectations.   So let’s get that out-of-the-way now:  That won’t happen at Acadia National Park.  It’s an utterly awesome place.   If you haven’t been there yet, make sure it’s on your own bucket list.

Jordan Pond and "The Bubbles"
“The Bubbles” mountains from the southern end of Jordan Pond.  I used a polarizing filter for this and I like the way it renders the nearby rocks through the water and the trees on the left.  ISO 100, f/16, 1/10 second, at 16mm.

This place on the south shore of Jordan Pond is one of the most iconic views in the park.  I looked and was surprised there weren’t any holes worn in the rock from all the tripods over the years.  But I didn’t let the fact that everyone takes a photo here stop me – I couldn’t resist making one of my own.

I’ve wanted to go to Acadia for a long time.  My friend Kevin M. went last year and raved about it.  When Mary Kate suggested I go up with her, it was an offer I couldn’t refuse.

It’s a landscape photographer’s paradise.  I spent almost 6 full days there.  I met MK and her coworker Ryan on Friday evening and they left Sunday afternoon.  Fellow Photography Interest Group member Tom M. arrived Monday afternoon and we stayed until Thursday morning.  It’s brimming with photo ops:  rugged shorelines, sandy beaches, granite mountains, calm mirror like ponds, beautiful forests, gnarled trees, lighthouses, fishing villages, whales, birds, and more.  It felt like there were photos everywhere I looked.

Acadia is small for a national park (at least compared to some of those out west) but it still covers a very large area.  And getting from the Bass Harbor Head Light all the way to the Schoodic Peninsula can take some time, especially with traffic during the peak summer season.  This map shows where I made my photos.

Acadia National Park Photo Locations

You can see I made it to much of the park, but I missed an even larger part of it.  Not to mention that I mostly stayed close to the car.  I didn’t explore any of the hiking trails and carriage roads.  I guess I’ll have to keep it on my bucket list and go back!

I visited several places more than once and the changing light and weather made them look very different.  Bubble Pond, Schoodic Point, and Cadillac Mountain were my favorites.

Looking west from Otter Creek Drive
Looking north-west from Otter Creek Drive, with Cadillac Mountain in the distance.    A 5 frame panorama, captured in infrared and converted to B&W.  ISO 200, f/5.6, 1/160 sec, at 28mm (equivalent focal length).

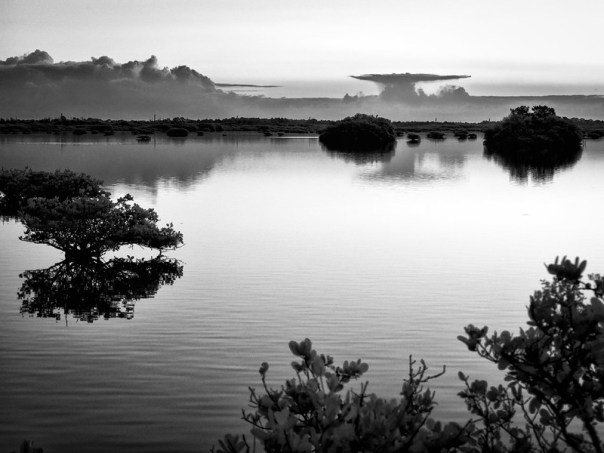
I found the spot above just driving around, not from a guidebook.  The fog in the distance and the lily pads in the nearby pond called out for a photograph.

Schoodic Peninsula is in all the guidebooks and you must go there.  We spent hours looking for compositions hidden in the rocks, cliffs and waves.  Just make sure you’re careful.  The rocks can be slippery and unexpected waves have washed people into the water.

Schoodic Point Waves
Schoodic Point Waves.  I used a Hoya ND400 filter on this to slow my shutter speed.  Even though the sun had been up for a while, I could expose at ISO 100, f/16, 4.2 seconds, at 16mm.

Sieur de Monts is in all the guide books too and when I saw photos of the birch forests I knew I had to stop there.  Tom and I initially made a wrong turn, but finally found it.  And what a wonderful place it was – well worth the walk!

Paper Birch and sedge grass forest
Paper Birch and sedge grass forest, along Jessup’s Path.    This is a 6 frame panorama, captured in infrared and converted to B&W.  ISO 200, f/5.6, 1/100 sec at 28mm (equivalent focal length).

We saw wildlife too.  On Saturday morning, MK and I took the Puffin / Whale tour offered by Bar Harbor Whale Watching.  It was a bit foggy, but nice enough and the captain managed to find both Atlantic Puffins and Humpback Whales for us.  We also saw several lighthouses that we wouldn’t have spotted otherwise.  In addition to the puffins, I photographed four other new life birds:  Arctic Terns, Black Guillemots, Great Shearwaters, and Great Black-backed Gulls.  And there may have been a few others that I didn’t recognize / identify.  Back on land we saw deer a couple of times, and (heard about) a bear.  But sadly, no moose.

Two Humpback whales show their tails after surfacing.
Two Humpback whales show their tails on the way back down after surfacing.  We watched a group of three feeding together.  As the boat idled they often came close.  Researchers keep track of the  whales and ID them from the patterns on their tails and backs.  The whale on the left is “Bottleneck.” (HWC #8807) and was first sighted there in 2004. The other whale is “Vee” (HWC # 0372) and it was first sighted there in 1983 and has also been seen in Puerto Rico.
ISO 400, f/8, 1/1000 sec, at 155mm.

After the boat tour, MK and I drove up to Prospect Harbor to visit Janet M.  She was Mary’s music teacher in Orlando and retired to Maine.  She and her husband Arnold are outstanding tour guides – they drove us around the Schoodic area and showed us many sites from a local’s perspective.  And then they shared a delightfully delicious dinner of Maine Lobster Mac and Cheese, salad, and Maine Blueberry pie for desert.  What wonderful hosts!

There’s a lot of information available about this area, so I won’t try to write an exhaustive how-to guide,  Instead, here are some of the references I used.  I bought and read these two books and I’d recommend either one (or both):

If you search the web, you’ll find a great many Acadia sites.  Here are a couple I looked at:

And you can also find out a lot on Flickr:

Finally, I’ll offer these hints that may help when you go:

  • I brought a full (and heavy) photo backpack and used a lot of the gear.  We flew into Bangor on smaller planes so be careful that your photo luggage meets the carry on restrictions.  I was very glad I had a wide-angle lens, my IR modified camera, a tripod, and polarizing and ND400 filters.  Kevin M. loaned me his 70 – 300mm lens and I used that for whales and puffins.
  • I filled up my camera memory cards for the first time in a long while.  Bring extra, or some way to back them up so you can safely erase them.
  • Atlantic Puffins are small – and far away from the boat!  There’s one tour that actually puts you on the island where they nest inside blinds close to the birds.  But I heard that the waiting list is over a year long.
  • Whales on the other hand are large and sometimes close to the boat.  You can get some good photos even with a phone.
  • Make sure you practice your photography skills before you go.  And know your equipment – no new gear right before the trip.  You want to know what to do when you get there, not figure it out in real-time.
  • Guidebooks and research are helpful, but don’t get too focused in on what others have photographed.  Photo ops are easy to find and I enjoyed trying to put my spin on some of the well-known locations.
  • It’s crowded in July and August.  Especially Bar Harbor and the main park visitor center.  But you can avoid those areas and find places / times where there’s no one else around.
  • The food (especially seafood) is wonderful – arrive hungry!
  • I’m from Florida, but the weather was hotter than I thought it would be (highs in the 80s) and the biting bugs were worse than I thought they would be.
  • The weather varied too.  There was some fog / mist and drizzle.  I was actually glad, because the coast of Maine is known for that, and it gave us some distinct looks.  Bubble Pond looked very different depending on the time of day and the wind and visibility.  But fog did spoil one sunrise (after getting up at 3:30 am!) and Tom’s offshore lighthouse tour.  So plan on some reduced visibility and stay a few days longer if you can so you can go back to some locations.
  • Finally, enjoy yourself.  Relax – don’t get overwhelmed.  Create a lot of memories, not a lot of stress.

Bar Harbor Blue
Bar Harbor Blue – The town lights at night from Cadillac Mountain.   ISO 200, f/8, 25 sec, at 120mm

 I thoroughly enjoyed myself and came home exhausted.   I took too many photos and spent too much time going through them after I got home.  But I like how they turned out – please take a look at the other ones in my Flickr album when you get a chance.

I’ll leave you with a short conversation I overheard on the top of Cadillac Mountain while Tom and I were photographing Bar Harbor after dark.

A little girl, pointing at Tom and I: “What are they doing Daddy?“.
Her father:  “Taking pictures with really big cameras.
Girl:  “Do we have one?
Dad:  “No, but Mommy wants one.
Girl:  “Why don’t they use their phones?
Dad:  no answer

Thanks for stopping by and reading my blog. Now, go make some photos! And use the biggest camera you can!

©2014, Ed Rosack. All rights reserved.

First Light

I spent several exciting days in Maine last week exploring Acadia National Park and some of the surrounding area.  Mary Kate went on business up there and invited me to tag along and sight see.  Thanks again, Mary Kate!

I’m still going through all of my images from the trip, so I can’t really write an article about it yet.  I’ll work on it over the next week or so and add photos to my Maine / Acadia album on Flickr as I finish them.  You can take a look there for a preview of what’s coming.  For now, here are a couple quick photos.

Cadillac Mountain in Acadia is the highest point on the east coast of the US, and going up to the summit to see “the country’s first sunrise” is popular.  When MK, her coworker Ryan, and I got there at about 4:45am, the parking lot was already filling up.  This was the view about a half hour before sunrise.  If you look at the larger version on Flickr, you can see the lights in Bar Harbor on the near shore.

First light - Cadillac Mountain, Acadia National Park
First Light

It turns out that the first sun light hits the US on Cadillac Mountain only in the fall and winter. So we really didn’t see the “first light” – but even so it was a pretty sunrise.

Sunrise panorama - Cadillac Mountain, Acadia National Park
Sunrise panorama

Please be sure to check back for the rest of the story on this absolutely fabulous place.  It’s a landscape photographer’s dream and there’s wildlife around there too!

Thanks for stopping by and reading my blog. Now, go make some photos!

©2014, Ed Rosack. All rights reserved.

Let's go fishing – how I made the image

Here’s another photo from my last trip to Viera Wetlands.

Let's go fishing!
Let’s go fishing! Two fishermen head out before dawn.

I’ve made this kind of photo before – you can see some examples in this set on Flickr.  I think this one turned out better than my earlier tries.  I used a different approach and because it’s been a while since I’ve written a “behind the scenes / how-to post”, I thought I’d fill you in on how I made this.

The boat ramp at this little park where SR 520 crosses the St. Johns River is pretty busy around dawn.  It seems to be a popular place for fishermen to put in.  I  waited several times while they cleared my frame and the water calmed down before I could make my next exposure.  So I decided to make an image that included a boat.

It’s a challenging shot.  I wanted to capture the intense sunrise colors so I had to be careful not to over expose and blow out the sky.  I also wanted some detail in the boat, so I needed to over expose there a bit, but still minimize motion blur.  At sunrise, I normally use a low ISO for the best quality image, and a small aperture for good depth of field.  This results in a long shutter speed, which is bad for photographing moving boats.  And if I want to bracket and use multiple frame HDR to capture the huge contrast range in the scene – that’s even worse for moving boat photography.  So how did I make this image?  Glad you asked!

The secret is to carefully capture two frames and blend them together by hand.  The first frame is exposed for the boat:  I used a high ISO and a wide open  aperture to get my shutter speed as fast as possible, and I overexposed slightly to capture a little shadow detail in the boat and in the vegetation on the shore.  With my camera set and on a tripod, I composed and waited for the next boat to get to the right point in the frame.  Here’s that RAW file:

1-the boat Screen Shot 2014-07-22 at 12.49.58 PM
First frame, exposed for the boat, ISO 1000, f/4, 1/20 second

The second frame was my main exposure and I wanted it to be the best quality possible.  I also wanted to slightly under expose to capture color and detail in the sky.  I waited until the boat was gone and the water was calm again and then made this exposure:

2- the sky Screen Shot 2014-07-22 at 12.49.51 PM
Second frame, exposed for the sky, ISO 100, f/11, 0.8 sec

When I got home, I preprocessed the two raw files using identical color balance and paying careful attention to noise reduction (especially on the higher ISO frame with the boat).  I’ve used DxO Optics Pro lately when I want the best RAW conversion.  It does a wonderful job on both lens corrections and noise reduction for supported equipment.  After a few tweaks to exposure in each file, I brought them into Photoshop on separate layers.

The next thing to deal with was the boat.  Even though I’d pushed my shutter speed as high as I thought I could, 1/20 second still left a little  motion blur visible.  The “Filters / Sharpen / Smart Sharpen” command in Photoshop has a “Remove Motion Blur” option and I’ve found that it works well in situations like this where the direction of motion is known.  I used it selectively on a duplicate layer to enhance detail in the boat.   Here are before and after crops at 200%.  I think it’s a nice improvement:

3-motion blur boat Screen Shot 2014-07-22 at 12.45.59 PM
Motion blur (before using the filter)
4-sharper boat Screen Shot 2014-07-22 at 12.45.43 PM
After the motion blur processing

Next I used layer masks to blend the multiple frames together.  I worked carefully around the boat and painted it into the main / second frame.  I like a little detail in my shadows instead of a straight silhouette.  Since I’d slightly overexposed the first frame (and was careful with noise reduction) I painted some of that into the vegetation.  Here’s the first merged result:

6-Initial merge Screen Shot 2014-07-22 at 12.48.18 PM
Initial merged frames

The only filter I used on this was Topaz Clarity – I like the way it increases mid-tone contrast without adding halos.

7-Adding clarity Screen Shot 2014-07-22 at 12.48.29 PM
After Topaz Clarity

After selective sharpening on a separate layer, I returned to Lightroom for final adjustments (black and white points, vignette, etc) to get the first image in this post.

I struggled some with the cropping. I tried a 16×9 aspect ratio, but because I wanted to keep all the sky, I thought the horizon ended up too close to the center. I decided to keep the original composition since the dark water at the bottom holds my eye in the frame. I might play with it some more.

I like how it turned out and I hope you do too.  I also hope the info helps with your photography.  If you have any questions on details or other photography related things, let me know in the comments.

Thanks for stopping by and reading my blog. Now, go make some photos!

©2014, Ed Rosack. All rights reserved.