Category Archives: St. Johns River

A bad day for fish…

Photography Interest Group members haven’t been doing much photography together lately.  I was happy that Kevin M. arranged a trip to Viera Wetlands last Friday.  Kevin K. also went along.

Early morning calmEarly morning calm – Along the St. Johns River where it crosses HW 50

On the way, we stopped at a favorite sunrise spot and even though it’s been well photographed, managed to get images we liked.

At Viera, we drove around the main cells a couple of times and saw some interesting things.  This Tricolored Heron had speared a large fish and was trying to swallow it.   It couldn’t hold on and dropped it just after I made this photo.

Tri-colored HeronTri-Colored Heron, this one with breakfast.

We saw a few of the regular birds there, but the ducks and other winter migrants don’t seem to have arrived yet.  On the way out, Kevin M. talked us into taking a quick spin around the Click Ponds and I’m glad he did.  The water’s been low there for a while and the birds are having a feast.  The shallow water concentrates the fish and makes them easy prey.  Birds lined up and grabbed fish out of this small stream that flowed toward the low point in the pond.

Chow lineChow line – The water level in the Click Ponds at Viera Wetlands was very low yesterday. 

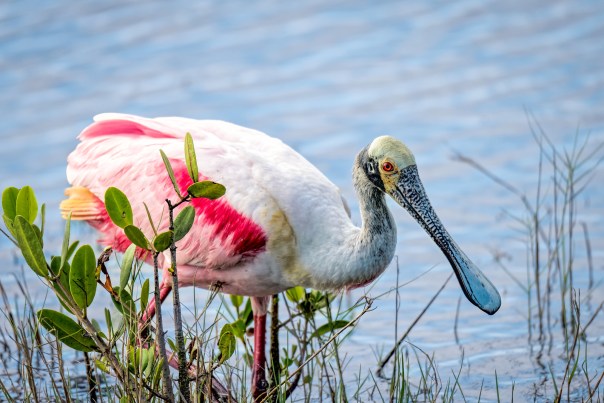
Over in the corner was a very large mixed flock also enjoying the banquet.  I spotted Wood Storks, Great Blue Herons, Great Egrets, Snowy Egrets, Tricolored Herons, Glossy and White Ibis, Roseate Spoonbills, Black Vultures, and a White Pelican in this one photo.

A large flock of birdsA large flock of feeding birds

So, it wasn’t a good day for fish, but the birds enjoyed it.

I have many posts about Viera Wetlands here on the blog  that you can scroll through at this link, and many photos you can look through in this album on Flick.

You might also be interested in this quite literal “behind the scenes” look at a very handsome gentleman photographing the sunrise on Friday morning:  https://www.flickr.com/photos/34024553@N08/29844690526/in/dateposted/

Oh, and I might be joking about the handsome gentleman part    😉

Thanks for stopping by and reading my blog. Now – go make some photos!

©2016, Ed Rosack. All rights reserved.

Merritt Island – March 30, 2016

I went over to Merritt Island National Wildlife Refuge last week with Tom M. Here are a few of the things we saw on this trip.

St. Johns Sunrise - silver lining and sun raysSt. Johns Sunrise – silver lining and sun rays:  This is a long exposure (10 second) image I made at the boat ramp on the St. Johns where it meets HW 50.  The water is higher than I’ve seen it there before 

Pollen covered Bumble Bee on Purple ThistlePollen covered Bumble Bee on Purple Thistle:  These thistles are blooming all over Black Point Wildlife Drive.  The pollen on this bee may be an indication of why we’re having such severe allergy problems here in Central Florida.

Spoonbill in the reedsSpoonbill in the reeds:  There were many other birds around too.

Life and death in the Florida wildLife and death in the Florida wild: The bird (a female Red-breasted Merganser) was looking for fish along a small grass island in the distance. I glanced over when I heard some splashing but couldn’t see anything at first. Then I noticed this alligator with the bird. The struggle was hard to watch, but mercifully brief.

On a related subject, you may have seen news about the recent fish kills we’ve had in the Indian River Lagoon.  These are occurring just south of MINWR, nearer Melbourne, Florida.  As we were driving around the refuge, I was struck by how natural it looked and by the absence of any dead fish. I’m very thankful that the Refuge has preserved this natural area for us to enjoy.

I worry about the areas where fertilizer runoff and septic tank leakage can lead to pollution, brown tide, lack of oxygen and dead fish and animals.  I hope that we can figure out solutions so that people living near our natural resources don’t damage them.

OK, sorry for the commentary.  Thanks for stopping by and reading my blog. Now – go make some photos!

©2016, Ed Rosack. All rights reserved.

Let's go fishing – how I made the image

Here’s another photo from my last trip to Viera Wetlands.

Let's go fishing!
Let’s go fishing! Two fishermen head out before dawn.

I’ve made this kind of photo before – you can see some examples in this set on Flickr.  I think this one turned out better than my earlier tries.  I used a different approach and because it’s been a while since I’ve written a “behind the scenes / how-to post”, I thought I’d fill you in on how I made this.

The boat ramp at this little park where SR 520 crosses the St. Johns River is pretty busy around dawn.  It seems to be a popular place for fishermen to put in.  I  waited several times while they cleared my frame and the water calmed down before I could make my next exposure.  So I decided to make an image that included a boat.

It’s a challenging shot.  I wanted to capture the intense sunrise colors so I had to be careful not to over expose and blow out the sky.  I also wanted some detail in the boat, so I needed to over expose there a bit, but still minimize motion blur.  At sunrise, I normally use a low ISO for the best quality image, and a small aperture for good depth of field.  This results in a long shutter speed, which is bad for photographing moving boats.  And if I want to bracket and use multiple frame HDR to capture the huge contrast range in the scene – that’s even worse for moving boat photography.  So how did I make this image?  Glad you asked!

The secret is to carefully capture two frames and blend them together by hand.  The first frame is exposed for the boat:  I used a high ISO and a wide open  aperture to get my shutter speed as fast as possible, and I overexposed slightly to capture a little shadow detail in the boat and in the vegetation on the shore.  With my camera set and on a tripod, I composed and waited for the next boat to get to the right point in the frame.  Here’s that RAW file:

1-the boat Screen Shot 2014-07-22 at 12.49.58 PM
First frame, exposed for the boat, ISO 1000, f/4, 1/20 second

The second frame was my main exposure and I wanted it to be the best quality possible.  I also wanted to slightly under expose to capture color and detail in the sky.  I waited until the boat was gone and the water was calm again and then made this exposure:

2- the sky Screen Shot 2014-07-22 at 12.49.51 PM
Second frame, exposed for the sky, ISO 100, f/11, 0.8 sec

When I got home, I preprocessed the two raw files using identical color balance and paying careful attention to noise reduction (especially on the higher ISO frame with the boat).  I’ve used DxO Optics Pro lately when I want the best RAW conversion.  It does a wonderful job on both lens corrections and noise reduction for supported equipment.  After a few tweaks to exposure in each file, I brought them into Photoshop on separate layers.

The next thing to deal with was the boat.  Even though I’d pushed my shutter speed as high as I thought I could, 1/20 second still left a little  motion blur visible.  The “Filters / Sharpen / Smart Sharpen” command in Photoshop has a “Remove Motion Blur” option and I’ve found that it works well in situations like this where the direction of motion is known.  I used it selectively on a duplicate layer to enhance detail in the boat.   Here are before and after crops at 200%.  I think it’s a nice improvement:

3-motion blur boat Screen Shot 2014-07-22 at 12.45.59 PM
Motion blur (before using the filter)
4-sharper boat Screen Shot 2014-07-22 at 12.45.43 PM
After the motion blur processing

Next I used layer masks to blend the multiple frames together.  I worked carefully around the boat and painted it into the main / second frame.  I like a little detail in my shadows instead of a straight silhouette.  Since I’d slightly overexposed the first frame (and was careful with noise reduction) I painted some of that into the vegetation.  Here’s the first merged result:

6-Initial merge Screen Shot 2014-07-22 at 12.48.18 PM
Initial merged frames

The only filter I used on this was Topaz Clarity – I like the way it increases mid-tone contrast without adding halos.

7-Adding clarity Screen Shot 2014-07-22 at 12.48.29 PM
After Topaz Clarity

After selective sharpening on a separate layer, I returned to Lightroom for final adjustments (black and white points, vignette, etc) to get the first image in this post.

I struggled some with the cropping. I tried a 16×9 aspect ratio, but because I wanted to keep all the sky, I thought the horizon ended up too close to the center. I decided to keep the original composition since the dark water at the bottom holds my eye in the frame. I might play with it some more.

I like how it turned out and I hope you do too.  I also hope the info helps with your photography.  If you have any questions on details or other photography related things, let me know in the comments.

Thanks for stopping by and reading my blog. Now, go make some photos!

©2014, Ed Rosack. All rights reserved.

Viera Wetlands on 7-19-2014

I went over to Viera Wetlands last Saturday.  It’s best not to expect too much in the middle of summer in Florida, so my expectations were a little low.

First on the agenda was a stop where SR 520 crosses the St. Johns River, near Cocoa, Florida.  There’s a park on the north side of the road with a busy boat ramp and a boardwalk reaching a short distance out into the river.  The sunrise was pretty – here’s one of the images I made:

Ultra-wide daybreak
Ultra-wide daybreak – Five frame panorama – The resulting horizontal field of view is about 130 degrees.

After sunrise I went on to Viera Wetlands to meet up with several Photography Interest Group members.  Kevin M. organized it and we had one of the largest turnouts in a long time.  Frank B., Kevin K. and his son Evan, and Tom M all showed up too.

With the heavy rains we’ve had lately they closed the berms to cars, so we took off on a stroll around the cells closest to the entrance.  There were more birds out and about than anticipated.

Red bellied Woodpecker
A very colorful Red bellied Woodpecker

In addition to woodpeckers, we saw and heard a lot of whistling ducks.

Perched Black Bellied Whistling Duck

We also saw many of the regular Florida avians (Tri-colored Herons, Great Blue Herons, Snowy Egrets, Ibis, Anhingas, Moorhens, Coots, Black Vultures, etc.). Dragonflies and Alligators were also abundant.

I started with low photographic expectations and ended up coming home with several images I really like.  I also got to spend a little time with friends.  Once again I was pleasantly surprised by another wonderful Central Florida Photo Op!

You can see more of the photos from trip by clicking the links I included above to each person’s photo stream.  You can also click here to view the Photography Interest Group photo pool.  My Viera Wetlands album on Flickr is at this link, My St. Johns River album is at this link, and my Cocoa album  is at this link.

Thanks for stopping by and reading my blog. Now, go make some photos!

©2014, Ed Rosack. All rights reserved.

Blue Spring State Park

Intro / Description

There’s been a lot of news here recently about all the Manatees at Blue Spring State Park in Orange City, Florida – so I decided to go over and look for myself.

Many Manatees Around 20 Manatees in this one photo – There were more than 200 there on the day I went and the count’s been over 330 on some recent days.

Louis Thursby bought Blue Spring in 1856 and ran a steamboat landing.  The steamboats shipped people and goods up and down the St. Johns River and stopped at the landing until the 1880s.  The area became pretty run down until the state purchased the land in the 1960s and established the park.

There’s lots to do:  Plenty of picnic areas;  Hiking and nature trails; Cabins and a campground for overnight stays; Canoes and kayaks to rent;  And you can even take a River Boat tour right from the park. We’ve been several times in the past but I hadn’t visited in years.  It brought back very fond memories of tubing down the run from the spring and of our kids shivering in the 72 degree water, but enjoying it so much they refused to get out.  When I used to scuba dive (a very long time ago), I dove to the bottom of the spring.  In retrospect, that was at least a little reckless – people have died in there.

Info for Photographers

Photo hints:

You can’t go in the water when the Manatees are there.  But a lengthy boardwalk running from the St. Johns up to the spring  provides many vantage points for photos.  The Manatees are all along the run, but many congregate in the swimming area where you can get very close.

You must bring your Polarizer to cut the reflections so you can better see the manatees under the surface.  Remember this will block a couple stops of light.  And since the water is in shade in many places you may be a little starved for light.  A camera / lens with vibration reduction / optical stabilization and good output at higher ISOs (~640) will come in handy.

Take a breath

Take a breath – A manatee surfaces at Blue Springs State Park

Tripod/Monopod: They’re allowed, but crowds could make tripods a problem.  I left mine at home.

Lenses:

I used a 24 – 120 f/4 lens and was happy with it.  I really didn’t want to switch lenses (and polarizers) so the focal length range on this came in handy.  At times I wished for a little more reach but I could usually find another Manatee closer to me.  I also wished for a wider aperture (f/2.8?), but the stabilization made this lens my best choice.

Best time to visit: Visit during a wintertime cold snap for the best chance of seeing Manatees.  They can draw a crowd and the park is closed early to new arrivals if it fills up.  Go on a weekday or get there very early on a weekend to make sure you get in. For other activities, you’ll  have to work around their schedule – all water activities are prohibited when there’s a Manatee in the water.  For swimming, tubing, snorkeling / diving,  and kayaking in the spring run go when they aren’t there (March 15th – November 15th). Other: Manatees are the main attraction in the winter, but there are other animals there too.  I’ve seen Alligators, wild pigs, and common Florida birds  (e.g. Herons, Egrets, Anhingas, Limpkins, Wood Storks, Red Shouldered Hawks, and Vultures).  Other folks have reported some not so common Florida Birds like Florida Scrub Jays and Barred Owls, – so keep your eyes open! And there’s a three-story home built built by the original owners that’s worth a visit.

The Louis P. Thursby House The Louis P. Thursby House was built in 1872 at Blue Springs State Park

Summary

Manatees are on the endangered species list.  Blue Spring provides a unique opportunity to see these large animals up close.  If you’ve thought about going to Blue Spring, now’s the time.  If you haven’t thought about going to Blue Spring, now’s the time! You can find out a lot about Manatees at the Save the Manatee Club  website, including updated reports on conditions and counts at Blue Spring on this web page.

My Gallery /  Flickr photo set:  Blue Spring on Flickr
Website:  http://www.floridastateparks.org/bluespring/
Address / Phone: 2100 W. French Avenue Orange City, Florida 32763
(386) 775-3663
Central Florida Photo Ops Rating: A Central Florida Photo Ops Must Do!

Thanks for stopping by and reading my blog.  Now, go make some photos! ©2014, Ed Rosack. All rights reserved.

Panoramic alternatives – iPhones and more

If you’ve read this blog for any length of time, you know that I like panoramic photos.  We’ve all been to many places where the view is so grand it doesn’t fit into a single frame.  Sometimes you can’t capture what your eyes see with one camera exposure.  So I started stitching panoramas together.  My first few were way back in the film era (1999 or 2000).  When I started using digital cameras, panoramas became easier and I’ve made many more since then.   They help me avoid “tunnel vision” and show more of a scene.  They’re also an excellent way to capture an image with a huge number of pixels – which allows for very large prints.

I often include panos in this blog.  When I checked today, there are 33 different posts (over 10%) that are tagged “panorama”, including my very first one from May of 2007.  For some panorama examples, look at this set of over 100 images on Flickr.

San Francisco panorama from Twin Peaks

May 2007:  View of San Francisco from Twin Peaks (6389 x 3110 pixels)

I’ve learned quite a bit about how to make panos, and in August of this year, I shared info on how I usually process them.  That was a description of the detailed workflow I use to make the best quality image I can.  It can be time consuming and requires care in capture as well as post processing.  But if you put in the effort, the results are very good – and the files are much bigger than from a single frame.  Here’s a recent example:

City at twilight
September 2013: Chicago skyline at twilight (11,175 x 4706 pixels)

But it turns out that my way isn’t the only way to make panos.  There’s a much easier way to make them – here’s an example:

Underneath the bridge over the St. John's River by the old bridge and railroad trestle
October 2013: Underneath the bridge over the St. John’s River by the old bridge and railroad trestle (7908 x 2692 pixels)

I made this pano with my phone.  It’s not as large (2692 pixels on the short side compared to 4706), but you probably couldn’t tell much of a difference in quality unless you pixel peep.  Using my phone is easier and if something is easier, people will do more of it – and more panos means better memories.

iPhones have had a built-in panorama mode for a while, and the latest versions bring a lot of processing power into it.  The iPhone 5S does automagic adjustment of exposure across the frame, and stitches the results together in real-time as you sweep your phone.  The results are fairly large files, and the quality is surprisingly good.

Here’s one more recent iPhone panorama example and proof of the saying that the best camera is the one you have with you:

Interior panorame of the Roman Colosseum (Flavian Amphitheatre)

November 2013:  Interior panorama of the Roman Colosseum (Flavian Amphitheatre) – Photo by MK Rosack (used with permission)

Lets compare making panoramas on a phone with a multi-photo approach.  I’ll use the iPhone 5S for this – your phone may be different.

iPhone 5S Multi-Photo
Capture convenience Very high – you always have it with you Low – You need to plan for it and carry your gear
Quickness High – End result available very quickly.  And can post right from the phone. Low – Need to get home and run your software
Processing flexibility Low – Done by the camera; Can adjust jpg result High – Adjustments can be made throughout each processing step
Processing difficulty Low – Done by the camera;  Some amount of touch up may be needed May be High, depending on software and source images
Raw capture No – jpg only Yes
Output size Medium – Short dimension a max of 2448 pixels High – DSLRs typically higher resolution than iPhone and you can make multiple rows if desired

So, should you use your phone for panoramas?  Yes!

Should you always use your phone for panoramas? Not quite yet.

Phones are getting better all the time.  And they’re getting better faster than cameras are getting better.  Sooner or later, most people won’t want or need a dedicated camera.  Right now I think phones are “good enough” in many cases, especially if you think about the trade-off between output quality and ease of use.   For panoramas, the ease of use and convenience allows many people to make photos they otherwise wouldn’t.  In my case, if I don’t have any other camera with me, I’m sure going to use my phone.  But if I want the best quality image possible, I’ll still use my stand alone cameras when possible.  Check again in a few years – the answers may be different.

Thanks for stopping by and reading my blog. Now – go make some panoramas!  And don’t forget your phone!

©2013, Ed Rosack. All rights reserved

St. Johns sunrise, and a ride 'round Viera

Happy Holidays!

I had a rare mid-week day off last Wednesday and decided to spend the morning making photographs.

First up was a site I’ve driven by many times and always said “That looks like a great place for a photo”.  It’s the boat ramp off of Highway 50 where it crosses the St. Johns river. I was there before dawn and had a good time watching the sun come up and the clouds evolve.  And yes, it is a good place for a photo.

Dawn on the St. Johns River
Dawn on the St. Johns River at the Highway 50 boat ramp

Next, I drove over to Viera Wetlands. I haven’t been there recently and wanted to see what’s going on.

Palm, clouds, marsh
Palms, clouds, and marsh at Viera Wetlands

There are a lot of the usual birds around:  Herons, Egrets, Ibis, Anhingas, Coots, Grebes, Limpkins, Ospreys, Cormorants, a Caracarra, a Hawk, Gulls, etc.  I also saw a lot of winter visitors there, including Kingfishers, Mergansers, Caspian Terns, Tree Swallows, and Northern Shovelers.  By the way, another good place to find out what’s going on is the Viera Wetlands group on Flickr.  I usually check it before I go so I’ll know what to watch for when I get there.  Other folks are seeing Northern Harriers, Loggerhead Shrikes, Horned Grebes, American Kestrels, and many more.

Caracarra with prey
Caracara with prey

The Great Blue Herons are all busy courting and building nests.  This is a wonderful time to get some action shots, especially of these birds in flight.  If you watch one of the couples for a while, you’ll likely see the male leave repeatedly to gather nesting material.  They tend to leave and return from the same direction and this gives you a big advantage when setting up to take flight photos.

Great Blue Heron pair

You can see other photos I’ve made at Viera Wetlands in this set on Flickr.  If you get some spare time over the holiday break, this would a good place to spend it.

Thanks for stopping by and reading my blog. Now – go make some photos!
©2011, Ed Rosack. All rights reserved

The St. Johns River near Sanford and Deland

Intro / Description

At 310 miles, the St. Johns is the longest river in Florida.  It’s one of the few rivers in the US that flow from south to north.  Near Orlando it forms the dividing line between Seminole and Volusia counties, and it’s a favorite destination for fishermen, boaters, and folks on jet skis.  It should be a favorite destination for photographers, too.

A beautiful place to catch some fish

Vince invited Tom and I out on his boat for a photo expedition a while back.  We finally took him up on his offer  a couple of weeks ago.  We were up early, put in near the I-4 bridge right around dawn, and motored north.

There’s a rule of thumb about sunrise and sunset.  The rule of thumb is that there’s no rule of thumb telling you when the good colors / conditions will occur.  You have to hang around and keep making photographs until you’re sure the show is over.  The next photo is a good example of this rule (or is it a lack of rules?):

The St. Johns River near Blue SpringsThe St. Johns River near Blue Springs

When we first got out on the river around sunrise (~7am), there was some color in the sky, but nothing spectacular.  About an hour later the conditions were quite different and much more photogenic.

This image is a 5 frame panorama that I merged in Photoshop. I made the exposures hand-held from a moving boat, so they weren’t aligned all that well.  In post, I first ran all 5 RAW frames through Lightroom and adjusted several  parameters  identically, including color balance, lens profile, and camera profile.  Then I moved to Photoshop to do the merge.  After that, I worked on it a little more to take a small curve out of the shoreline, and then used Topaz Denoise 5 to selectively reduce the residual noise that you could see in the full res version.  The last step was to add a duplicate layer and run it through Topaz Adjust 4.  Back in Photoshop, I modified the transparency of the resulting layer and the strength of the Topaz filter.  I also selectively erased portions of the Topaz layer until I liked the result.

Info for Photographers

Photo hints:  We saw many kinds of birds and several alligators.  But the wild life doesn’t like power boats very much.  We had a hard time getting close to any of the birds, and alligators would see or hear us coming and submerge long before we got close to them.   If you have time, you might try coasting in from a longer distance – but that could take a while and we didn’t try it so I can’t tell you whether it will help.  You can also look for alligators on docks.  They don’t seem to be as skittish when they’re out sunning themselves.  In fact, they seem quite friendly.

Gators always smile at you, but this one was even waving!

Gators always smile at you, but this one was even waving!

Tripod/Monopod: They won’t do you much good on a moving boat, so save yourself some trouble and don’t bring them unless you’re going ashore.

Lenses:  The boat motion will also make hand holding a long lens difficult, so don’t bother bringing really long glass either.  Instead, carry your wide-angle lens and maybe a short telephoto or zoom.

Best time to visit:  Early in the morning on a calm day before the other boats show up.  The water should be calm,  undisturbed, and very scenic.  And you can get some photography in before it gets too hot.

Calm, dawn light

Other:  There are several places to stop and eat along the river.  If you want to grab lunch ashore, do some research first.  Also, if you don’t have a friend with a boat, don’t let that stop you.  Nearly every marina we passed had pontoon  and house boats for rent.

By the way, if you’re visiting Florida you may not know that it’s probably not a very good idea to swim in the river.  The alligator in the photo above was about 5 feet long.  It (along with some larger relatives) lives in the river.  We also occasionally have people  infected with water-borne diseases (such as amoebic meningoencephalitis), although that usually occurs in lake water.

Summary

We had a great time and were very grateful to Vince for taking us out.  I got a photo or two that I really like.

My Gallery /  Flickr photo set: http://www.flickr.com/photos/edrosack/sets/72157624991879878/with/5010338576/
Website: N/A
Address / Phone: View in Google Maps
Central Florida Photo Ops Rating: Very scenic.  If you have a boat, go!

©2010, Ed Rosack. All rights reserved.